crossmax slr disc 09 - lesrouleuxdewailly - Free
crossmax slr disc 09 - lesrouleuxdewailly - Free
crossmax slr disc 09 - lesrouleuxdewailly - Free

Create successful ePaper yourself
Turn your PDF publications into a flip-book with our unique Google optimized e-Paper software.
31<br />
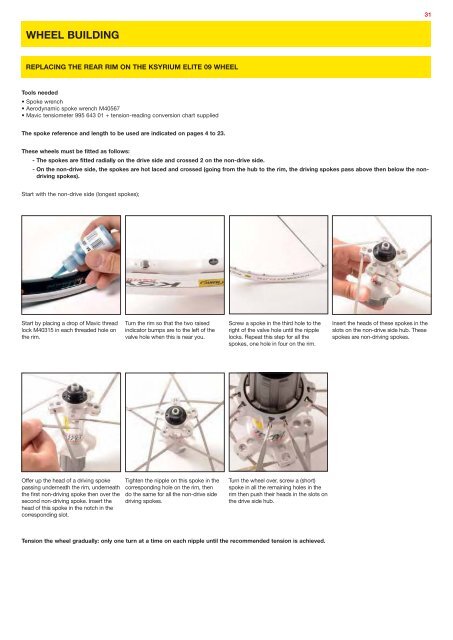
WHEEL BUILDING<br />
REPLACING THE REAR RIM ON THE KSYRIUM ELITE <strong>09</strong> WHEEL<br />
Tools needed<br />
• Spoke wrench<br />
• Aerodynamic spoke wrench M40567<br />
• Mavic tensiometer 995 643 01 + tension-reading conversion chart supplied<br />
The spoke reference and length to be used are indicated on pages 4 to 23.<br />
These wheels must be fitted as follows:<br />
- The spokes are fitted radially on the drive side and crossed 2 on the non-drive side.<br />
- On the non-drive side, the spokes are hot laced and crossed (going from the hub to the rim, the driving spokes pass above then below the nondriving<br />
spokes).<br />
Start with the non-drive side (longest spokes);<br />
Start by placing a drop of Mavic thread<br />
lock M40315 in each threaded hole on<br />
the rim.<br />
Turn the rim so that the two raised<br />
indicator bumps are to the left of the<br />
valve hole when this is near you.<br />
Screw a spoke in the third hole to the<br />
right of the valve hole until the nipple<br />
locks. Repeat this step for all the<br />
spokes, one hole in four on the rim.<br />
Insert the heads of these spokes in the<br />
slots on the non-drive side hub. These<br />
spokes are non-driving spokes.<br />
Offer up the head of a driving spoke<br />
passing underneath the rim, underneath<br />
the first non-driving spoke then over the<br />
second non-driving spoke. Insert the<br />
head of this spoke in the notch in the<br />
corresponding slot.<br />
Tighten the nipple on this spoke in the<br />
corresponding hole on the rim, then<br />
do the same for all the non-drive side<br />
driving spokes.<br />
Turn the wheel over, screw a (short)<br />
spoke in all the remaining holes in the<br />
rim then push their heads in the slots on<br />
the drive side hub.<br />
Tension the wheel gradually: only one turn at a time on each nipple until the recommended tension is achieved.