Ash Pan Pedestal - Instructions - Avalon
Ash Pan Pedestal - Instructions - Avalon
Ash Pan Pedestal - Instructions - Avalon

Create successful ePaper yourself
Turn your PDF publications into a flip-book with our unique Google optimized e-Paper software.
<strong>Avalon</strong> <strong>Ash</strong>pan Installation <strong>Instructions</strong> Part # 99200125<br />
5b<br />
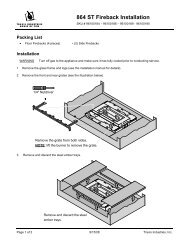
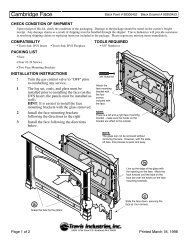
This kit includes four bricks. Locate the 9" x 3-3/4" and 4-1/2" x 2-5/8" bricks, they are used for the<br />
Olympic (1190). The other two bricks may be discarded. Use the bricks inside the firebox, along<br />
with the two bricks for the Olympic (1190), to form the brick pattern shown below (NOTE: you will<br />
have two full-size bricks remaining - these bricks may be discarded).<br />
Standard Olympic (1190) Floor Brick Pattern<br />
<strong>Ash</strong>pan <strong>Pedestal</strong> Olympic (1190) Floor Brick Pattern<br />
A<br />
A<br />
A<br />
A<br />
F<br />
B<br />
F<br />
C<br />
B<br />
F<br />
F<br />
B<br />
F<br />
D<br />
B<br />
F<br />
Brick<br />
Size<br />
A 8-1/4" x 4-1/2"<br />
B 6-3/8" x 4-1/2"<br />
C (included with ashpan pedestal) 9" x 3-3/4"<br />
D (included with ashpan pedestal) 4-1/2" x 2-5/8"<br />
F Full (9" x 4-1/2")<br />
6 Follow the directions titled "<strong>Avalon</strong> <strong>Ash</strong>pan Operating <strong>Instructions</strong>" (on pages 6 & 7 of these<br />
instructions) for installing & removing the ashpan.<br />
Outside Air Installation<br />
This pedestal has an internal air duct that may be used to direct air to the combustion chamber. Follow<br />
the directions below prior to installing the stove or attaching the pedestal.<br />
! Outside air is required for mobile home installations and in certain localities.<br />
+ Read the section "Outside Air Requirements" in the owner's manual prior to installing outside air.<br />
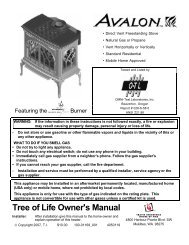
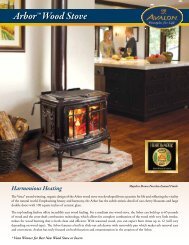
1 Before placing the stove on pedestal, determine the location of the hole that is cut through the floor<br />
protection and floor. The illustration on the following page details the location where this hole may<br />
be cut in relation to the faceplate of the stove. Cut a hole at least 16 square inches in area that does<br />
not interfere with structural members of the home.<br />
Top View<br />
FRONT<br />
26"<br />
16"<br />
Outside air may be drawn from this<br />
area underneath the pedestal<br />
(min. 16 square inches)<br />
The faceplate of the Rainier<br />
(990) is 3/8" in front of the<br />
forward edge of the pedestal<br />
base. The Olympic (1190) is<br />
7/8" in front.<br />
17"<br />
18-3/4"<br />
<strong>Pedestal</strong> Base<br />
(without dowels)<br />
Page 4 of 7 Printed September 4, 2008