Ash Pan Pedestal - Instructions - Avalon
Ash Pan Pedestal - Instructions - Avalon
Ash Pan Pedestal - Instructions - Avalon

Create successful ePaper yourself
Turn your PDF publications into a flip-book with our unique Google optimized e-Paper software.
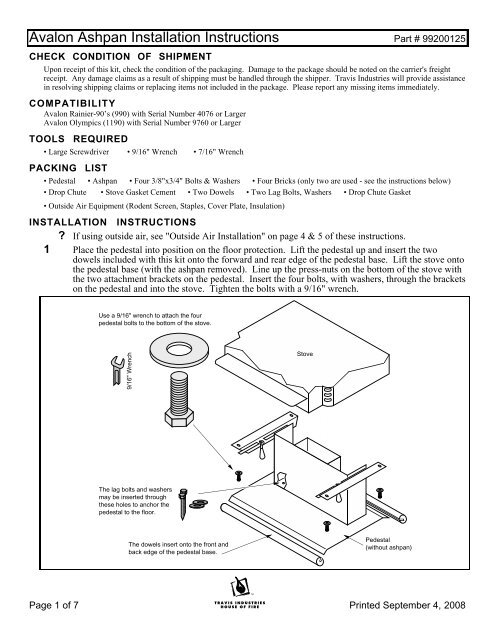
<strong>Avalon</strong> <strong>Ash</strong>pan Installation <strong>Instructions</strong> Part # 99200125<br />
CHECK CONDITION OF SHIPMENT<br />
Upon receipt of this kit, check the condition of the packaging. Damage to the package should be noted on the carrier's freight<br />
receipt. Any damage claims as a result of shipping must be handled through the shipper. Travis Industries will provide assistance<br />
in resolving shipping claims or replacing items not included in the package. Please report any missing items immediately.<br />
COMPATIBILITY<br />
<strong>Avalon</strong> Rainier-90’s (990) with Serial Number 4076 or Larger<br />
<strong>Avalon</strong> Olympics (1190) with Serial Number 9760 or Larger<br />
TOOLS REQUIRED<br />
• Large Screwdriver • 9/16" Wrench • 7/16" Wrench<br />
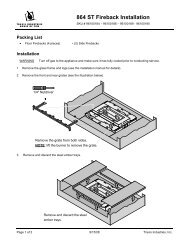
PACKING LIST<br />
• <strong>Pedestal</strong> • <strong>Ash</strong>pan • Four 3/8"x3/4" Bolts & Washers • Four Bricks (only two are used - see the instructions below)<br />
• Drop Chute • Stove Gasket Cement • Two Dowels • Two Lag Bolts, Washers • Drop Chute Gasket<br />
• Outside Air Equipment (Rodent Screen, Staples, Cover Plate, Insulation)<br />
INSTALLATION INSTRUCTIONS<br />
? If using outside air, see "Outside Air Installation" on page 4 & 5 of these instructions.<br />
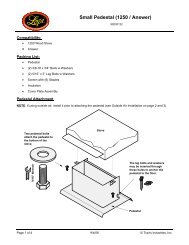
1 Place the pedestal into position on the floor protection. Lift the pedestal up and insert the two<br />
dowels included with this kit onto the forward and rear edge of the pedestal base. Lift the stove onto<br />
the pedestal base (with the ashpan removed). Line up the press-nuts on the bottom of the stove with<br />
the two attachment brackets on the pedestal. Insert the four bolts, with washers, through the brackets<br />
on the pedestal and into the stove. Tighten the bolts with a 9/16" wrench.<br />
Use a 9/16" wrench to attach the four<br />
pedestal bolts to the bottom of the stove.<br />
9/16" Wrench<br />
Stove<br />
The lag bolts and washers<br />
may be inserted through<br />
these holes to anchor the<br />
pedestal to the floor.<br />
The dowels insert onto the front and<br />
back edge of the pedestal base.<br />
<strong>Pedestal</strong><br />
(without ashpan)<br />
Page 1 of 7 Printed September 4, 2008
<strong>Avalon</strong> <strong>Ash</strong>pan Installation <strong>Instructions</strong> Part # 99200125<br />
2 Pry out the drop chute knockout with a large screwdriver.<br />
FRONT OF STOVE<br />
Drop Chute<br />
Knock-Out<br />
Standard <strong>Pedestal</strong><br />
Outside Air Knock-Out<br />
NOTE: If using<br />
outside air, remove<br />
this knock-out.<br />
<strong>Ash</strong>pan <strong>Pedestal</strong>/Air Boot<br />
Outside Air Knock-Out<br />
Rear Blower Knock-Outs<br />
3 Open the door to the stove and remove the floor firebricks on the left side. Locate the drop chute<br />
cover on the floor of the firebox. Remove the four bolts that secure it with a 7/16" wrench. Remove<br />
the cover and the gasket below it. Insert the drop chute gasket around the drop chute. Then insert<br />
the drop chute through the hole in the firebox floor. Position the drop chute so the slots run side to<br />
side. Replace the four bolts to secure the drop chute.<br />
7/16" Wrench<br />
Remove the four bolts<br />
that hold the drop<br />
chute in place.<br />
Drop Chute Cover<br />
Insert the Drop Chute into the hole. Secure it in place<br />
with the four bolts that held the drop chute cover in<br />
place.<br />
(Floor of Firebox)<br />
Drop Chute<br />
Remove and discard<br />
the drop chute cover.<br />
Make sure the gasket<br />
forms a seal around<br />
the perimeter of the<br />
drop chute.<br />
Drop<br />
Chute<br />
Gasket<br />
When installed the grates on the drop chute<br />
should look like this when viewed from the side.<br />
FRONT<br />
<br />
<br />
<br />
Page 2 of 7 Printed September 4, 2008
<strong>Avalon</strong> <strong>Ash</strong>pan Installation <strong>Instructions</strong> Part # 99200125<br />
4 Seal the area around the knock-out for outside air on standard pedestals (the 2" x 7" forward center<br />
knockout - see the illustration below) with stove gasket cement (knead the cement inside the tube<br />
prior to applying). Smooth the cement so it is flush with the baseplate. Seal the area around the<br />
drop chute in the same manner.<br />
STOVE GASKET<br />
CEMENT<br />
STOVE GASKET<br />
CEMENT<br />
Seal the gap around<br />
this knock-out<br />
Seal the gap around the<br />
bottom of the drop chute<br />
Do not seal this<br />
knock-out.<br />
5 For the Rainier (990), follow step 5a. For the Olympic (1190), follow step 5b.<br />
5a This kit includes four bricks. Locate the 6" x 2-1/8" and 2-7/8" x 8-1/4" bricks, they are used for the<br />
Rainier (990). The other two bricks may be discarded. Use the bricks inside the firebox, along with<br />
the two bricks for the Rainier (990), to form the brick pattern shown below (NOTE: you will have<br />
two extra bricks - these bricks may be discarded).<br />
Standard Rainier (990) Floor Brick Pattern<br />
<strong>Ash</strong>pan <strong>Pedestal</strong> Rainier (990) Floor Brick Pattern<br />
B<br />
F<br />
C<br />
F<br />
A<br />
B<br />
F<br />
F<br />
D<br />
E<br />
C<br />
F<br />
A<br />
B<br />
F<br />
F<br />
Brick<br />
Size<br />
A 9" x 1-5/8"<br />
B 9" x 3-15/16"<br />
C 1-3/4" x 3-15/16"<br />
D (included with ashpan pedestal) 6" x 2-1/8"<br />
E (included with ashpan pedestal) 2-7/8" x 8-1/4"<br />
F Full (9" x 4-1/2")<br />
Page 3 of 7 Printed September 4, 2008
<strong>Avalon</strong> <strong>Ash</strong>pan Installation <strong>Instructions</strong> Part # 99200125<br />
5b<br />
This kit includes four bricks. Locate the 9" x 3-3/4" and 4-1/2" x 2-5/8" bricks, they are used for the<br />
Olympic (1190). The other two bricks may be discarded. Use the bricks inside the firebox, along<br />
with the two bricks for the Olympic (1190), to form the brick pattern shown below (NOTE: you will<br />
have two full-size bricks remaining - these bricks may be discarded).<br />
Standard Olympic (1190) Floor Brick Pattern<br />
<strong>Ash</strong>pan <strong>Pedestal</strong> Olympic (1190) Floor Brick Pattern<br />
A<br />
A<br />
A<br />
A<br />
F<br />
B<br />
F<br />
C<br />
B<br />
F<br />
F<br />
B<br />
F<br />
D<br />
B<br />
F<br />
Brick<br />
Size<br />
A 8-1/4" x 4-1/2"<br />
B 6-3/8" x 4-1/2"<br />
C (included with ashpan pedestal) 9" x 3-3/4"<br />
D (included with ashpan pedestal) 4-1/2" x 2-5/8"<br />
F Full (9" x 4-1/2")<br />
6 Follow the directions titled "<strong>Avalon</strong> <strong>Ash</strong>pan Operating <strong>Instructions</strong>" (on pages 6 & 7 of these<br />
instructions) for installing & removing the ashpan.<br />
Outside Air Installation<br />
This pedestal has an internal air duct that may be used to direct air to the combustion chamber. Follow<br />
the directions below prior to installing the stove or attaching the pedestal.<br />
! Outside air is required for mobile home installations and in certain localities.<br />
+ Read the section "Outside Air Requirements" in the owner's manual prior to installing outside air.<br />
1 Before placing the stove on pedestal, determine the location of the hole that is cut through the floor<br />
protection and floor. The illustration on the following page details the location where this hole may<br />
be cut in relation to the faceplate of the stove. Cut a hole at least 16 square inches in area that does<br />
not interfere with structural members of the home.<br />
Top View<br />
FRONT<br />
26"<br />
16"<br />
Outside air may be drawn from this<br />
area underneath the pedestal<br />
(min. 16 square inches)<br />
The faceplate of the Rainier<br />
(990) is 3/8" in front of the<br />
forward edge of the pedestal<br />
base. The Olympic (1190) is<br />
7/8" in front.<br />
17"<br />
18-3/4"<br />
<strong>Pedestal</strong> Base<br />
(without dowels)<br />
Page 4 of 7 Printed September 4, 2008
<strong>Avalon</strong> <strong>Ash</strong>pan Installation <strong>Instructions</strong> Part # 99200125<br />
2 Place the included screen (or other screen) over the hole to act as a rodent barrier. It may be attached<br />
above or below the floor. Secure the screen with the included staples.<br />
OUTSIDE AIR EQUIPMENT<br />
Cover plate is used<br />
to block off room air .<br />
Insulation is used to seal the<br />
side edges of the pedestal .<br />
Screen is used to prevent<br />
rodents from entering.<br />
Staples are used to<br />
attach the screen to<br />
the floor.<br />
3 Prop the front of the stove up 12" and pry out the ashpan pedestal knockout with a large screwdriver.<br />
FRONT OF STOVE<br />
Drop Chute<br />
Knock-Out<br />
Standard <strong>Pedestal</strong><br />
Outside Air Knock-Out<br />
NOTE: If using<br />
outside air, remove<br />
this knock-out.<br />
<strong>Ash</strong>pan <strong>Pedestal</strong>/Air Boot<br />
Outside Air Knock-Out<br />
Rear Blower Knock-Outs<br />
4 Follow the instructions on pages 1 through 4 of this instruction sheet for installing the ashpan<br />
pedestal. With the pedestal in place, tuck the insulation included with the pedestal underneath the<br />
side edges of pedestal to seal off any air from entering underneath the pedestal.<br />
5 The cover plate seals the area around the air control rod. Remove the two screws and bridge from<br />
the cover plate. Slide the cover plate underneath the air control rod and re-attach the bridge.<br />
Phillips<br />
Screwdriver<br />
Remove the two screws that hold the<br />
bridge to the cover plate. Then replace<br />
the bridge when the cover plate is in<br />
place.<br />
Bridge<br />
Air Control<br />
Rod<br />
The cover plate has a clip which<br />
attaches it underneath the air control.<br />
Page 5 of 7 Printed September 4, 2008
<strong>Avalon</strong> <strong>Ash</strong>pan Operating <strong>Instructions</strong><br />
WARNINGS:<br />
! Do not remove the ashpan when the stove is hot or while it still has burning coals or wood.<br />
! Do not operate the stove when the ashpan is removed or loose.<br />
! Whenever the ashpan is removed, inspect the gasket on the ashpan to make sure it is intact.<br />
! <strong>Ash</strong>es must be completely cool before disposal. The ashpan, or other non-combustible container<br />
with a sealing lid, may be used to contain the ashes until they are completely cool. The container<br />
must be placed on a non-combustible surface while ashes are still warm. If burying the ashes,<br />
dispose of them away from any structure in soil that does not contain flammable material (pine<br />
needles, branches, etc.).<br />
WHEN TO EMPTY THE ASHES<br />
+ <strong>Ash</strong>es inside the firebox may be pushed into the drop chute whenever ashes start to pile up. Empty<br />
the ashpan once the ashpan fills 3/4 full. Depending upon the wood used and how thoroughly the<br />
wood is burned, you may burn 1/4 to 3/4 of a cord of wood before the ashpan requires emptying.<br />
REMOVING THE ASHPAN<br />
1 With the stove cool,<br />
reach along both sides of<br />
the ashpan and rotate the<br />
two handles backwards.<br />
<strong>Ash</strong>pan<br />
Stove<br />
Rotate the<br />
handle on both<br />
sides backwards<br />
to release the<br />
ashpan.<br />
2 Slide the ashpan forward<br />
and away from the stove.<br />
3 Flip the ashpan cover<br />
over the ashpan to seal<br />
the ashes inside. All<br />
ashes must be<br />
completely cool before<br />
disposal. The ashpan, or<br />
other non-combustible<br />
container, may be used<br />
to contain the ashes until<br />
they are completely cool.<br />
If burying the ashes,<br />
dispose of them away<br />
from any structure in soil<br />
that does not contain<br />
flammable material (pine<br />
needles, branches, etc.).<br />
<strong>Pedestal</strong><br />
<strong>Ash</strong>pan Cover <br />
<br />
<br />
<br />
<br />
<br />
<strong>Ash</strong>pan<br />
<br />
Hinge<br />
<strong>Ash</strong>pan Gasket<br />
Page 6 of 7<br />
10850 117th Place N.E. Kirkland, WA 98033<br />
Printed September 4, 2008
<strong>Avalon</strong> <strong>Ash</strong>pan Operating <strong>Instructions</strong><br />
REPLACING THE ASHPAN<br />
1 Inspect the gasket on top of the ashpan. It must be intact and in place. If it is not, contact your<br />
dealer for a replacement gasket. Swing the ashpan cover so it is behind the ashpan.<br />
2 Slide the ashpan with the lid towards the rear into its holder on the pedestal. The ashpan has a rail on<br />
each side that slides over a rail on the pedestal. Slide the ashpan all the way in.<br />
Rail on <strong>Pedestal</strong><br />
Faceplate of Stove<br />
<br />
<br />
<br />
<br />
<strong>Ash</strong>pan<br />
Rail on <strong>Ash</strong>pan<br />
NOTE: make sure the<br />
lid is facing to the rear.<br />
<strong>Ash</strong>pan Gasket<br />
3 Rotate the handles on both sides of the pedestal forward. The handles, when rotated, compress the<br />
ashpan against the stove and create an air-tight seal between the ashpan and stove. If you do not feel<br />
the handles compress, check alignment of the ashpan.<br />
Page 7 of 7<br />
10850 117th Place N.E. Kirkland, WA 98033<br />
Printed September 4, 2008