- Page 1 and 2: HOLISTIC CAPACITY OF RAIL NETWORKS
- Page 3 and 4: Holistic - can be defined as: ‘Em
- Page 5 and 6: All Australasian Railways are under
- Page 7 and 8: Improved services can be provided b
- Page 9 and 10: PHOTO Approach to Roma Street - SOU
- Page 11 and 12: Can the existing infrastructure sup
- Page 13: PHOTO Approach to Roma Street - SOU
- Page 17 and 18: PHOTO Approach to Roma Street - SOU
- Page 19 and 20: PHOTO Approach to Roma Street - SOU
- Page 21 and 22: DIAGRAM: SEQ EXISTING TRANSLINK RAI
- Page 23 and 24: DIAGRAM: SEQ EXISTING TRANSLINK RAI
- Page 25 and 26: DIAGRAM: SEQ EXISTING TRANSLINK RAI
- Page 27 and 28: DIAGRAM: SEQ EXISTING TRANSLINK RAI
- Page 29 and 30: DIAGRAM: SEQ 2031 INDICATIVE RAIL N
- Page 31 and 32: PHOTO Roma Street, Southern Main Ju
- Page 33 and 34: PHOTO Roma Street, Southern Main Ju
- Page 35 and 36: PHOTO Roma Street, Southern Main Ju
- Page 37 and 38: PHOTO Roma Street, Southern Main Ju
- Page 39 and 40: PHOTO Roma Street, Southern Main Ju
- Page 41 and 42: PHOTO Roma Street, Southern Main Ju
- Page 43 and 44: PHOTO: Roma Street, Western approac
- Page 45 and 46: DIAGRAM: SEQ EXISTING TRANSLINK RAI
- Page 47 and 48: DIAGRAM: EXTRACT FROM SEQ RAIL NETW
- Page 49 and 50: DIAGRAM: EXTRACT FROM SEQ RAIL NETW
- Page 51 and 52: Source: Queensland Rail - RTOA Scre
- Page 53 and 54: Photo Source: Queensland Rail - Net
- Page 55 and 56: Photo Source: Queensland Rail - Net
- Page 57 and 58: Benchmark Summary Operate instrumen
- Page 59 and 60: Benchmark Summary Operate instrumen
- Page 61 and 62: Benchmark Summary 5 days of morning
- Page 63 and 64: Photo Source: Queensland Rail - Net
- Page 65 and 66:
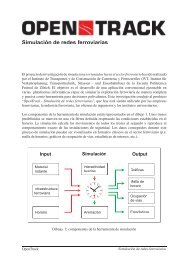
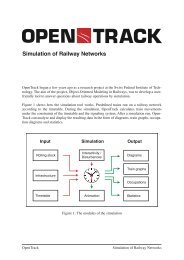
OpenTrack administers input data in
- Page 67 and 68:
The simulation is carried out with
- Page 69:
OPENPOWERNET RAIL ELECTRICAL NETWOR
- Page 76 and 77:
Photo Source: Plateway Archives 76
- Page 78 and 79:
Photo Source: Plateway Archives 78
- Page 80:
Photo Source: Plateway Archives 80
- Page 83 and 84:
• The Blue trace is the Power fro
- Page 85 and 86:
• The Blue trace is the Power fro
- Page 87 and 88:
Benchmark Summary Operate instrumen
- Page 89 and 90:
Benchmark Summary Operate instrumen
- Page 91 and 92:
Photo Source: Queensland Rail - Net
- Page 93 and 94:
Photo Source: Queensland Rail - Net
- Page 95 and 96:
Photo Source: Queensland Rail - Net
- Page 97 and 98:
Photo Source: Queensland Rail - Net
- Page 99 and 100:
Photo Source: Queensland Rail - Net
- Page 101 and 102:
Photo Source: Queensland Rail - Net
- Page 103 and 104:
Photo Source: Queensland Rail - Net
- Page 105 and 106:
Photo Source: Queensland Rail - Net
- Page 107 and 108:
Photo Source: Queensland Rail - Net
- Page 109 and 110:
Photo Source: Queensland Rail - Net
- Page 111 and 112:
111
- Page 113 and 114:
PHOTO: Lytton Junction Feeder Stati
- Page 115 and 116:
UP TRACK Time Period Load Curve for
- Page 117 and 118:
Time Period Load Curve for Transfor
- Page 119 and 120:
Time Period Load Curve for Transfor
- Page 121 and 122:
Time Period Load Curve for Transfor
- Page 123 and 124:
The 1st hour is from second 1 to se
- Page 125 and 126:
125
- Page 127 and 128:
CVN WPY TNS MNY WNM LDM MJE MGS CRO
- Page 129 and 130:
CVN WPY TNS MNY WNM LDM MJE MGS CRO
- Page 131 and 132:
CVN WPY TNS MNY WNM LDM MJE MGS CRO
- Page 133 and 134:
UP RW UP DN CATENARY (MW) CONTACT (
- Page 135 and 136:
135
- Page 137 and 138:
Photo Source: Queensland Rail - Net
- Page 139 and 140:
16000 kWh 14000 kWh 12000 kWh Queen
- Page 141 and 142:
Benchmark Summary 5 days of morning
- Page 143 and 144:
Photo Source: Queensland Rail - Net
- Page 145 and 146:
145