Installation and Operation Manual For Hunter Ceiling ... - Hunter Fan
Installation and Operation Manual For Hunter Ceiling ... - Hunter Fan
Installation and Operation Manual For Hunter Ceiling ... - Hunter Fan

Create successful ePaper yourself
Turn your PDF publications into a flip-book with our unique Google optimized e-Paper software.
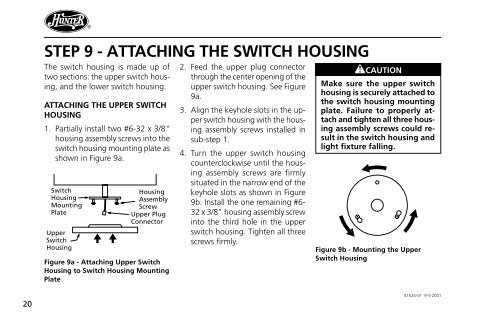
®STEP 9 - ATTACHING THE SWITCH HOUSINGThe switch housing is made up oftwo sections: the upper switch housing,<strong>and</strong> the lower switch housing.ATTACHING THE UPPER SWITCHHOUSING1. Partially install two #6-32 x 3/8"housing assembly screws into theswitch housing mounting plate asshown in Figure 9a.SwitchHousingMountingPlateUpperSwitchHousingHousingAssemblyScrewUpper PlugConnectorFigure 9a - Attaching Upper SwitchHousing to Switch Housing MountingPlate2. Feed the upper plug connectorthrough the center opening of theupper switch housing. See Figure9a.3. Align the keyhole slots in the upperswitch housing with the housingassembly screws installed insub-step 1.4. Turn the upper switch housingcounterclockwise until the housingassembly screws are firmlysituated in the narrow end of thekeyhole slots as shown in Figure9b. Install the one remaining #6-32 x 3/8" housing assembly screwinto the third hole in the upperswitch housing. Tighten all threescrews firmly.CAUTIONMake sure the upper switchhousing is securely attached tothe switch housing mountingplate. Failure to properly attach<strong>and</strong> tighten all three housingassembly screws could resultin the switch housing <strong>and</strong>light fixture falling.Figure 9b - Mounting the UpperSwitch Housing2041524-01 9-5-2001