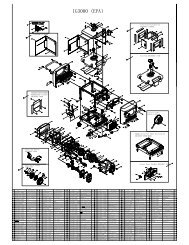
ig6000 service - Kipor Power Systems
ig6000 service - Kipor Power Systems
ig6000 service - Kipor Power Systems
- No tags were found...

You also want an ePaper? Increase the reach of your titles
YUMPU automatically turns print PDFs into web optimized ePapers that Google loves.
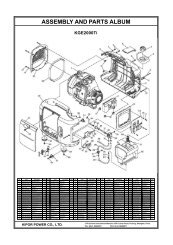
2.3 Service Rules• Use genuine KIPOR or KIPOR recommended parts and lubricants or their equivalents. Parts thatdo not meet KIPOR’s design specifications may damage the engine and void the warranty.• Use special tools designed for the product when specified.• Always install new gaskets, O-rings, etc. when reassembling components.• When tighten the bolt or nut, please from major diameter to minor diameter, from inside tooutside. Tighten the bolt and nut to the specific torque in this way.• Clean parts in cleaning solvent upon disassembly. Lubricate any sliding surfaces beforereassembly.• After reassembly, check all parts for proper installation and operation.• Many screws used in this machine are self-tapping. Be aware that cross-threading or overtightening these screws will strip the threads and ruin the hole.• Use only metric tools when servicing this engine. Metric bolts, nuts and screws are notinterchangeable with non-metric fasteners. The use of incorrect tools and fasteners will damagethe engine.• Be sure to follow the mark and instruction of the book when use the tools.■ Electrical Precautions• Hold the connector body to disconnect the connector. Do not disconnect by pulling the wireharness. To disconnect the locking connector, be sure to unlock first, and then disconnect.• Check the connector terminals for bend, excessive extrusion, missing terminals, or otherabnormalities before connecting the connector.• To connect, insert the connector as far as it goes. If the connector is a locking type, be sure that itis locked securely.• Check the connector cover for breakage and check whether the connector female terminal is notopened excessively. Then, connect the connector securely. Check the connector terminal for rust.Remove the rust using an emery paper or equivalent material before connecting the connector.• Set the harness clips in the specified places of the frame securely, and secure the wireharnesses.• Clamp the cables securely.8