PT-36 Mechanized Plasmarc Cutting Torch Instruction Manual
PT-36 Mechanized Plasmarc Cutting Torch Instruction Manual
PT-36 Mechanized Plasmarc Cutting Torch Instruction Manual
- No tags were found...

Create successful ePaper yourself
Turn your PDF publications into a flip-book with our unique Google optimized e-Paper software.
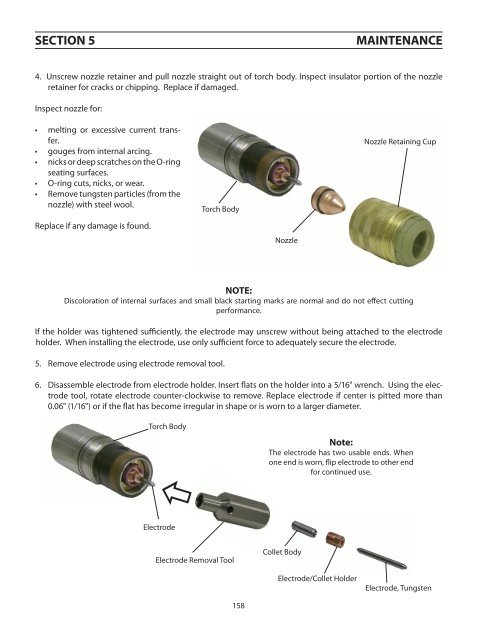
section 5Maintenance4. Unscrew nozzle retainer and pull nozzle straight out of torch body. Inspect insulator portion of the nozzleretainer for cracks or chipping. Replace if damaged.Inspect nozzle for:• melting or excessive current transfer.• gouges from internal arcing.• nicks or deep scratches on the O-ringseating surfaces.• O-ring cuts, nicks, or wear.• Remove tungsten particles (from thenozzle) with steel wool.<strong>Torch</strong> BodyNozzle Retaining CupReplace if any damage is found.NozzleNOTE:Discoloration of internal surfaces and small black starting marks are normal and do not effect cuttingperformance.If the holder was tightened sufficiently, the electrode may unscrew without being attached to the electrodeholder. When installing the electrode, use only sufficient force to adequately secure the electrode.5. Remove electrode using electrode removal tool.6. Disassemble electrode from electrode holder. Insert flats on the holder into a 5/16" wrench. Using the electrodetool, rotate electrode counter-clockwise to remove. Replace electrode if center is pitted more than0.06" (1/16") or if the flat has become irregular in shape or is worn to a larger diameter.<strong>Torch</strong> BodyNote:The electrode has two usable ends. Whenone end is worn, flip electrode to other endfor continued use.ElectrodeElectrode Removal ToolCollet BodyElectrode/Collet HolderElectrode, Tungsten158