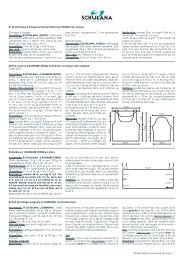
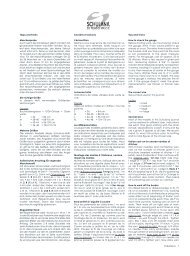
Halsausschnitt die mittleren 82 M abk, dabeijede 2. und 3. M re zus-str und beide Seitengetrennt weiterstr. Am inneren Rand für dieweitere Rundung in jeder 2. R noch 2x je 10 Mabk, dabei über dem Flechtmuster nochjede 2. und 3. M re zus-str. In 2 cm = 8 R Halsausschnitthöhedie restl 15/20 Schulter-Mabk. Die andere Seite gegengleich beenden.Vorderteil: Wie das Rückenteil str, jedoch mittieferem Halsausschnitt. Dafür bereits in 14/15 cm = 56/60 R Armausschnitthöhe die mittleren58 M abk und beide Seiten getrenntweiterstr. Am inneren Rand für die weitereRundung in jeder 2. R noch 1x 9 M, 1x 8 M, 2xje 4 M, 2x je 3 M und 1x 1 M abk. Achtung:Über dem Flechtmuster wie am Rückenteilverfahren, damit der Ausschnitt nicht zu weitwird. Die Schulter-M am äußeren Rand ingleicher Höhe wie am Rückenteil abk. Dieandere Seite gegengleich beenden.Ausarbeiten: Teile spannen, anfeuchten undtrocknen lassen. Nähte schließen. Die Armausschnittränderzur Stabilität mit je 1 RdKettm relativ fest umhäkeln, damit sie in Formbleiben. Armausschnittränder an der Schulternahtca. 1 cm nach innen einschlagenund festnähen. Mit der Rund-N <strong>Nr</strong>. 3,75 ausdem Halsausschnittrand 192 M auffassen. Fürden doppelten Rollkragen glatt re in Rd str. In5 cm Kragenhöhe mit der Rund-N <strong>Nr</strong>. 4 weiterstr. Nach weiteren16 cm wieder 5 cm mit N <strong>Nr</strong>. 3,75weiterstr. Dann die M locker mit N<strong>Nr</strong>. 4 abk. Kragen zur Hälfte nachinnen umlegen und gegennähen.Gedoppelten Kragen alslockeren Rollkragen zur Hälftenach außen umlegen.Zeichenerklärung= 1 M re= 12 M nach li verkreuzen: 6 Mauf 1 Hilfs-N vor die Arbeitlegen, die 6 folg M re str, danndie 6 M der Hilfs-N re str= 12 M nach re verkreuzen: 6 Mauf 1 Hilfs-N hinter die Arbeitlegen, die 6 folg M re str, danndie 6 M der Hilfs-N re str152/162 m. A 16/17 cm = 64/68 rgs de hautd’emm comm l’encol en rab les 82 m. centen tric ch 2e + 3e m. ens à l’end et term chcôté séparément. Rab ensuite côté encol tsles 2 rgs 2x 10 m. en tric sur le pt natté ch 2e +3e m. ens à l’end. A 2 cm = 8 rgs de hautd’encol rab les 15/20 m. rest de l’épaule.Term le 2e côté en symétrie.Devant: comme le dos mais en comm l’encol.à 14/15 cm = 56/60 rgs de haut d’emm.Pour ceci rab les 58 m. cent et term ch côtéséparément. Rab ensuite côté encol ts les2 rgs 1x 9, 1x 8, 2x 4, 2x 3 et 1x 1 m. Attention:sur le pt natté procéder comme pour le dospour que l’encol ne soit pas trop large. Rables m. de l’épaule sur le bord ext à la haut dudos. Term le 2e côté en symétrie.Finitions: tendre les pièces, les humecter etlaisser sécher. Fermer les cout. Sur le borddes emm croch 1 tr de m.c. assez serréespour renforcer les bords. Rentrer le bord desemm d’env. 1 cm sur la cout de l’épaule etfixer. Avec l’aig circ N° 3,75 rel 192 m. sur l’encolet tric un col roulé double en jers end entrs. A 5 cm de haut de col cont sur aig N° 4 sur16 cm puis encore 5 cm sur aig N° 3,75. Rables m. souplement sur aig N° 4. Replier le colde moitié sur l’env et le fixer. Replier le col endouble souplement de moitié vers l’ext.Explications des signes= 1 m end= croiser 12 m vers la gche:mettre 6 m sur 1 aig aux devl'ouvrage, tric 6 m end puisles 6 m de l'aig aux à l'end= croiser 12 m vers la droite:mettre 6 m sur 1 aig aux derrl'ouvrage, tric 6 m end puis les6 m de l'aig aux à l'endevery 2 nd and 3 rd st across the entrelac andwork both sides separately. At the inner edgeof the neck bind off 10 sts in every follow rowtwice, across the entrelac section k tog every2 nd and 3 rd st. When the neck meas 2 cm(8 rows) bind off the remaining 15/20 sts.Work the second side with reverse shaping.Front: Work as indicated for the back, howeverwith a deeper neck edge. When armholemeas 14/15 cm (56/60 rows) bind off thecenter 58 sts and continue working bothsides separatelt. At the inner neck edge bind9 sts in the foll 2 nd row, 8 sts in the foll 2 nd row,4 sts in every foll 2 nd row twice, 3 sts in everyfoll 2 nd row twice and 1 sts in the foll 2 nd rowonce. Note: Across the entrelac part proceedas for the back, so that the neck edgewill not be too loose. Bind off the shoulder stsas indicated for the back. Work second partwith reverse shaping.Finishing: Block all pieces lightly. Sew seams.Work a tight crochet row of slip st around thearmholes. Fold the borders of the armholesinside (about 1 cm) and sew on. With circularneedle size 3.75 mm pick up 192 sts aroundthe neck ende. Work the double collar in theround in St st. At 5 cm switch to circular needlesize 4 mm and work a further 16 cm. Thenswitch back to size 3.75 mm and work a further5 cm. With circular needle size 4 mm131197531bind off all stsloosely. Fold thecollar in half towardsthe insideand sew on. Foldit again in themiddle towardsthe outside.List of conventional signs= k1= cross 12 sts towards left: put 6sts on st holder and leave atfront of work, k foll 6 sts, then k6 sts on st holder= cross 12 sts towards right: put 6sts on st holder and leave atback of work, k foll 6 sts, thenk 6 sts on st holder7 PacolanaÄrmellose Weste in Ballonform mit Streifen imHebemaschenmuster und ArmstulpenGröße S/M, L und XLMaterial: SCHULANA „Pacolana“ (47% Schurwolle,23% Alpaka, 30% Mikrofasern – Polyamid,50 g = ca. 135 m): für die Weste ca.500/550/600 g, für die Armstulpen ca. 100 gGrau meliert col. 7. addi Strick-N <strong>Nr</strong>. 5,5 und 6.Je 1 addi Rundstrick-N <strong>Nr</strong>. 5, 5,5 und 6, 80 cmlang. addi Spielstrick-N <strong>Nr</strong>. 5 und 6. 1 ovalerKnopf von Jim Knopf, 5 x 2 cm.Glatt links: Mit N <strong>Nr</strong>. 5,5 bzw. 6 lt. folg AnleitungHin-R li, Rück-R re str. In Rd nur li str.Hebemaschenmuster: Mit N <strong>Nr</strong>. 6 nach Strickschrift(s. Seite 20) str. Die Zahlen re außenbezeichnen die Hin-R, li außen die Rück-R.Die Zahlen innerhalb der Strickschrift am reund li Rand geben die Anzahl der glatt li zustr M an. In der Breite mit den M vor dem 1.Pfeil beginnen, den MS = anfangs 11 M zwischenden Pfeilen fortl wdh, enden mit denM nach dem 2. Pfeil. Abn für die Ballonformund Seitenschrägungen sind eingezeichnetund werden in folg Anleitung genau erklärt.16 CréalanaVeste sans manches de forme ballon, à raies,en mailles glissées et manchettesTailles S/M, L et XLFournitures: fil SCHULANA „Pacolana“ (47%laine, 23% alpaca, 30% microfibres – polyamide,50 g = env. 135 m): pour la veste env.500/550/600 g, pour les manchettes env.100 g en gris chiné col 7. Aig à tric addi N° 5,5et 6. Aig circ addi N° 5, 5,5 et 6 de 80 cm delong. Jeu d’aig addi N° 5 et 6. 1 bouton ovalede Jim Knopf, 5 x 2 cm.Jers env: sur aig N° 5,5 voire 6 selon les expl.Rgs end m. env, rgs env m. end. En trs tric tjsen m. env.Pt de mailles glissées: sur aig N° 6. Tric.d’après la grille (v. page 20).Les chiffres enmarge à droite désignent les rgs end, enmarge à gche les rgs env. Les chiffres à l’intde la grille, sur les bords droit et gche indiquentle nb de m. tric ens en jers env. En largeurcomm par les m. avant la 1re flèche,rép tjs le rapport = 11 m. au début, entre lesflèches et term par les m. après la 2e flèche.Faire les dim pour la forme ballon et cintrerSleeveless Vest with Stripes and FingerlessLong GlovesSizes S/M, L and XLMaterials: SCHULANA „Pacolana“ (47% purewool, 23% alpaca, 30% microfiber – polyamid,50 g = about 135 m): for the vest500/550/600 g, for the fingerless gloves 100 ggrey speckled col 7. addi needles sizes 5,5and 6. addi circular needles sizes 5, 5,5 and6 mm, 80 cm. addi double pointed needlessizes 5 and 6 mm. 1 oval-shaped button (JimKnopf) 5 x 2 cm.Reversed St st: With needles sizes 5,5 or 6 mmaccording to instructions. P all rs rows, k all wsrows. When working in the round p all sts androws.Pattern with slipped stitches: With needlessize 6 mm follow st pattern chart (see page20) The numbers on the right edge indicatethe rs rows, the numbers on the left edge indicatethe ws rows. The numbers stated withinthe chart on the right and left edge indicatethe number of sts to be worked inReversed St st. Begin with the sts before the
In der Höhe die 1. – 112. R 1x str, dann die 105.– 112. R stets wdh.Maschenproben: 15 M und 23,5 R glatt li mitN <strong>Nr</strong>. 6 = 10 x 10 cm. 15 M und 25,5 R Hebemaschenmustermit N <strong>Nr</strong>. 6 = 10 x 10 cm.Rückenteil: 100/106/112 M mitN <strong>Nr</strong>. 5,5 und einem Kontrastfadenanschl. Dann für dieBlende mit Originalwolle glattli str. Nach 3 cm = 8 R ab Anschlmit N <strong>Nr</strong>. 6 im Hebemaschenmusterweiterarb, dabeinach der Rand-M mit 7/10/13 M glatt li und weiteren 8 Mwie gezeichnet vor dem 1.Pfeil beginnen, den MS 6x str,nach dem 2. Pfeil mit 10 M wiegezeichnet und 7/10/13 Mglatt li vor der Rand-M enden.Zwischen den Musterstreifenliegen je 4 M glatt li. In 23. und39. R für die Zun der Ballonforminnerhalb der Musterstreifenkeine M zus-str, dadurchwerden pro Zun-R je16 M zugenommen, gleichzeitigin der 39. R beids für dieSchrägungen je 1 M abn =130/136/142 M. Zwischen denMusterstreifen liegen nun je8 M glatt li. Die 2. und 3. Abnfür die Schrägungen beids wie gezeichnet in55. und 71. R ausführen = 126/132/138 M. DieAbn für die Ballonform in der 75. R beginnen.Dafür vor dem 1. Musterstreifen, dann nachdem 1. und 7x nach jedem folg Musterstreifendie Zun weg lassen. Somit werden in dieserR 9 M abgenommen = 117/123/129 Mnach der 75. R. Es liegen nun zwischen denMusterstreifen je 7 M glatt li. In der 81. R beidsdie letzte Abn für die Seitenschrägungen arb= 115/121/1<strong>27</strong> M. Für die Ballonform in der83. R nach dem 1. und vor dem letzten Musterstreifensowie dazwischen vor und nachjedem Musterstreifen die Zun weg lassen. Somitwerden in der 87. R automatisch 14 M abgenommen= 101/107/113 M. Zwischen denMusterstreifen liegen je 5 M glatt li. Dannnoch in der 91. R vor und nach jedem Musterstreifendie Zun weg lassen. Somit werden inder 95. R automatisch 16 M abgenommen =85/91/97 M. Jetzt liegen nur noch je 3 M glattli zwischen den Musterstreifen. Nun beids 1Markierung anbringen und bis zum Armausschnittgerade weiterstr, dafür wieder die ZuundAbn innerhalb der Musterstreifen wiegezeichnet arb. Nach 17 cm = 42 R ab Markierungbeids für die Armausschnitte 3 Mabk, dann in jeder 2. R noch 1x 3 M, 1x 2 Mund 4x je 1 M abk = 61/67/73 M. In 20/21/22 cm= 52/54/56 R Armausschnitthöhe für die Schulterschrägungenbeids 6/7/8 M abk, dann injeder 2. R noch 2x je 6/7/8 M abk. Gleichzeitigmit der 1. Schulterabn für den rundenHalsausschnitt die mittleren 15 M abk undbeide Seiten getrennt weiterstr. Am innerenRand für die weitere Rundung in jeder 2. Rnoch 1x 3 M und 1x 2 M abk. Damit sind die Mder einen Seite aufgebraucht. Die andereSeite gegengleich beenden.21460/61/622,59Linkes Vorderteil: 55/58/61 M mit N <strong>Nr</strong>. 5,5und einem Kontrastfaden anschl. Dann fürdie Blende mit Originalwolle glatt li str. Nach3 cm = 8 R ab Anschl mit N <strong>Nr</strong>. 6 im Hebemaschenmusterweiterarb, dabei nach derRand-M mit 7/10/13 M glatt li und weiteren8 M wie gezeichnet vor dem 1. Pfeil beginnen,den MS 3x str, nach dem 2. Pfeil mit 5 Mglatt li und der Rand-M enden. Zwischen denMusterstreifen liegen zu Beginn je 4 M glatt li.Damit der li Rand bis zum Halsausschnittbelescôtés comme indiqué sur la grille et selonles expl. En haut exécuter 1x les rgs 1 – 112puis rép tjs les rgs 105 – 112.Echantillons: 15 m. et 23,5 rgs en jers env suraig N° 6 = 10 x 10 cm. 15 m. et 25,5 rgs en ptde m. glissées sur aig N° 6 = 10 x 10 cm.12,5/14,510,5/ 8 10,52 232,5/34,5/36,5 5,52,5Linkes VorderteilRückenteil, Hälftedevant gauche - demi-dosleft front, back, half20/21/221721,515,52Dos: avec un fil contrastantmonter 100/106/112 m. suraig N° 5,5 et tric un parementen jers env avec le filindiqué. A 3 cm = 8 rgs dehaut tot cont en pt de m.glissées sur aig N° 6. Pourceci comm par 1 m. lis,7/10/13 m. en jers env et les8 m. avant la 1re flèche, rép6x le rapport, après la 2e flèchetric 10 m. comme indiquéet 7/10/13 m. en jers envpuis 1 m. lis. Entre les bandesde motifs on a tjs 4 m. en jersenv. Aux 23e et 39e rgs, pourles augm de la forme ballon,ne pas tric de m. ens à l’intdes bandes de motifs =16 augm par rg avec augm,simul au 39e rg dim 1 m. dech côté pour cintrer =130/136/142 m. On a maintenant8 m. en jers env entreles bandes de motifs. Exécuterles 2e et 3e dim pour cintrer de ch côtéaux 55e et 71e rgs = 126/132/138 m. Comm lesdim pour la forme ballon au 75e rg. Pour ceci,avant la 1re bande de motifs puis après la 1reainsi que 7x après ch bande de motifs suiv nepas faire d’augm. On obtient ainsi à ce rg 9dim = 117/123/129 m. après le 75e rg. On amaintenant entre les bandes de motifs 7 m.en jers env. Au 81e rg exécuter la dernièredim pour cintrer de ch côté = 115/121/1<strong>27</strong> m.Pour la forme ballon, au 83e rg, après la 1 re etavant la dernière bande de motifs ainsi queds l’intervalle avant et après ch bande demotifs ne pas faire d’augm Ainsi on obtientau 87e rg automatiquement 14 dim =101/107/113 m. Entre les bandes de motifs ona maintenant 5 m. en jers env. Au 91e rg,avant et après ch bande de motifs ne pasfaire d’augm. Au 95e rg on a automatiquement16 dim = 85/91/97 m. Il ne reste plus que3 m. en jers env. entre les bandes de motifs.Mettre 1 repère de ch côté et cont tt droitjusqu’aux emm. Pour ceci faire à nv les augmet dim à l’int des bandes de motifs commeindiqué. A 17 cm = 42 rgs des repères commles emm en rab 3 m. de ch côté puis ts les 2rgs 1x 3, 1x 2 et 4x 1 m. = 61/67/73 m. A 20/21/22 cm = 52/54/56 rgs de haut d’emm commle biais des épaules en rab 6/7/8 m. de chcôté puis ts les 2 rgs 2x 6/7/8 m. Simul avec la1re dim des épaules comm également l’encolen rab les 15 m. cent et term ch côté séparément.Rab ensuite côté encol ts les 2 rgs1x 3 et 1x 2 m. Ttes les m. de ce côté sont épuisées.Term le 2e côté en symétrie.Devant gauche: avec un fil contrastant monter55/58/61 m. sur aig N° 5,5 et tric un parementen jers env avec le fil indiqué. A 3 cm =8 rgs de haut tot cont en pt de m. glissées suraig N° 6. Pour ceci comm par 1 m. lis 7/10/13 m. en jers env et 8 m. comme indiquéavant la 1re flèche, rép 3x le rapport, après la2e flèche faire 5 m. en jers env et 1 m. lis. Entreles bandes de motif on a au début 4 m.en jers env. Pour que le bord gche reste biendroit jusqu’au début de l’encol trav tjs selonles rgs 1 – 8 de la grille en exécutant les augmet dim comme indiqué en suiv logiquementle motif. Pour la forme ballon, pour les 3 premièresbandes de motifs à partir du bordarrow, repeat the pattern repeat of 11 sts describedbetween the two arrows continuously,and end with the sts after the secondarrow. Increases and decreases for the shapingare indicated and will be explained indetail in the follow instructions. Work rows 1-112 once, then repeat rows 105-112.Gauge: 15 sts and 23,5 rows in Reversed St stwith needles size 6 = 10 x 10 cm. 15 sts and25,5 rows in st pattern with needles size 6 = 10x 10 cm.Back: With needles size 5,5 mm and wasteyarn cast on 100/106/112 sts. Work the borderwith the recommended yarn in Reversed Stst. At 3 cm (8 rows) from cast on edge switchto needle size 6 mm and follow St pattern(chart), set up as follows:Next row: selvedge st, 7/10/13 sts in ReversedSt st, the 8 sts as indicated in the chart beforethe 1st arrow in Reversed St st, work patternrepeat from chart 6 times, work the 10 stsafter the second arrow and end with 7/10/13 sts in Reversed St st.There are 4 sts in Reversed St st in betweeneach pattern repeat.For the shaping, in rows 23 and 39 omit theincreases within the pattern stripes, this willresult in an increase of 16 sts per decreaserow, at the same time for the shaping in row39 decrease 1 st on each edge = 30/136/142 sts. There are now 8 sts in Reversed St st inbetween each pattern repeat. For the shapingwork the 2 nd and 3 rd decreases in rows 55and 71 as indicated on the chart =126/132/138 sts. Begin the decreases for furthershaping in row 75 by omitting the increasebefore the 1 st pattern repeat, thenafter the 1 st pattern repeat and 7 times moreafter each follow pattern repeat. This resultsin a total of 9 decreases = 117/123/129 sts afterrow 75. There are now 7 sts in Reversed Stst in between each pattern repeat. In row 81work the last decreases for the side shaping= 115/121/1<strong>27</strong> sts. Continue the body shapingas follows: in row 83 omit the increases afterthe 1 st and before the last pattern repeat aswell as in between, before and after eachpattern repeat. This results in an automaticdecrease of 14 sts in row 87 = 101/107/113 sts.There are now 5 sts in Reversed St st in betweenevery pattern repeat. In row 91 omitthe increases before and after each patternrepeat. This results in an automatic decreaseof 16 sts in row 95 = 85/91/97 sts. There arenow 3 sts in Reversed St in between eachpattern repeat. Place a marker at eachedge and continue straight up to the beg ofthe armhole shaping,. For the armhole shapingwork the increase and decreases as indicatedin the chart. At 17 cm (42 rows) fromthe markers for the armholes: bind off 3 stseach side, then 3 sts each side in the follow2 nd row, 2 sts each side in the follow 2 nd rowand 1 st each side in each follow 2 nd rows 4times = 61/67/73 sts. When armhole meas20/21/22 cm (52/54/56 rows) for the shouldershaping: bind off 6/7/8 sts each side, then6/7/8 sts each side in every follow row twice.At the same time as the 1 st decrease of theshoulder shaping for the neck edge bind ofthe center 15 sts and work both sides separately.At the inner edge of the neck bind off3 sts in the follow 2 nd row and 2 sts in the foll2 nd row. All sts have been worked on this side.Work the second side in reverse shaping.Left Front: With needles size 5,5 mm andwaste yarn cast on 55/58/61. Switch to recommendedyarn for the border and work it inReversed St st. At 3 cm (8 rows) from cast onedge switch to needle size 6 mm and St pattern,set up as follows:Créalana 17