Anleitungen Créalana Nr. 27 - Schulana
Anleitungen Créalana Nr. 27 - Schulana
Anleitungen Créalana Nr. 27 - Schulana
- No tags were found...

Create successful ePaper yourself
Turn your PDF publications into a flip-book with our unique Google optimized e-Paper software.
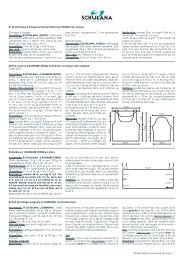
ginn gerade weiterläuft, stets wie in 1. – 8. R lt.Strickschrift arb, also die Zu- und Abn wie gezeichnetmustergemäß ausführen. Für dieBallonform bei den ersten 3 Musterstreifenab re Rand jeweils wie am Rückenteil arb,beim 4. Streifen = 1. Streifen ab li Rand nur inder re Hälfte mit den Zu- und Abn in den entsprechendenR wie am Rückenteil verfahren.Somit werden in 23. und 39. R je 7 M zugenommen,gleichzeitig in der 39. R am re fürdie Schrägung 1 M abn = 68/71/74 M. Zwischenden Musterstreifen liegen nun je 8 Mglatt li. Die 2. und 3. Abn für die Schrägungam re Rand wie gezeichnet in 55. und 71. Rausführen = 66/69/72 M. Die Abn für die Ballonformin der 75. R beginnen. Dafür vor dem1. Musterstreifen, dann nach dem 1. und 2xnach jedem folg Musterstreifen die Zun weglassen. Somit werden in dieser R 4 M abgenommen= 62/65/68 M nach der 75. R. Es liegennun zwischen den Musterstreifen je 7 Mglatt li. In der 81. R am re Rand die letzte Abnfür die Seitenschrägung arb = 61/64/67 M. Fürdie Ballonform in der 83. R nach dem 1. undvor dem 4. Musterstreifen sowie dazwischenvor und nach jedem Musterstreifen die Zunweg lassen. Somit werden in der 87. R automatisch6 M abgenommen = 55/58/61 M.Zwischen den Musterstreifen liegen je 5 Mglatt li. Dann noch in der 91. R vor und nachjedem Musterstreifen – beim 4. Streifen nurdavor – die Zun weg lassen. Somit werden inder 95. R automatisch 7 M abgenommen =48/51/54 M. Jetzt liegen nur noch je 3 M glattli zwischen den Musterstreifen. Nun am reRand 1 Markierung anbringen und bis zumArmausschnitt gerade weiterstr, dafür wiederdie Zu- und Abn innerhalb der Musterstreifenwie gezeichnet arb. Den Armausschnittund die Schulterschrägung am reRand jeweils in gleicher Höhe wie am Rückenteilausführen. Bereits in 6/7/8 cm =16/18/20 R Armausschnitthöhe am li Rand fürden Halsausschnitt 4 M abk, dann in jeder2. R noch 10x je 1 M und in jeder 4. R 4x je 1 Mabk. Damit sind alle M aufgebraucht.Rechtes Vorderteil: Gegengleich zum li Vorderteilund mit Knopfloch str. Dafür in 5/6/7 cm = 14/16/18 R Armausschnitthöhe am reRand nach der 7. M 1 U auf die N nehmen,dann die folg 2 M zus-str.Ausarbeiten: Teile spannen, anfeuchten undtrocknen lassen. Schulternähte schließen.Mit der Rund-N <strong>Nr</strong>. 5,5 aus den Armausschnitträndernje 72/75/78 M auffassen. Für dieBlenden je 10 R glatt li str, dabei mit 1 Rück-Rre beginnen. M locker abk. Den Anschl desRückenteils aus dem Kontrastfaden vorsichtigabtrennen und die 100/106/112 M nacheinanderauf die Rund-N <strong>Nr</strong>. 5 fassen. Für denBesatz 4 R glatt li str. Dann die M abk. Nunebenfalls den Anschl des re Vorderteils ausdem Kontrastfaden vorsichtig abtrennenund die 55/58/61 M nacheinander auf dieRund-N <strong>Nr</strong>. 5 fassen, dazu aus dem senkrechtenVorderteilrand bis zum Ausschnittbeginnnoch 105/107/109 M dazu auffassen = 160/165/170 M. Die Ecke markieren. Dann den Besatzwie am Rückenteil anstr, dabei in der 3. Rüber der Ecke 3 M zus-str. Den Besatz am liVorderteil gegengleich anstr. Seiten-, BesatzundBlendennähte schließen. Armausschnittblendenjeweils zur Hälfte nach innen umschlagenund gegennähen. Besatz ebenfallsringsum nach innen umschlagen – am unterenRand jeweils bis zum Beginn der erstenHeben-M – und gegennähen. Nun mit derRund-N <strong>Nr</strong>. 5,5 für den Kragen 104 M anschl.Glatt li str. Für die Kragenschmalseiten zunächstverkürzte R arb. Dafür in der 2. und3. R je 4 M weniger str und jeweils mit 1 U wenden.Dann beids in jeder 2. R noch 8x je 4 M18 Créalanadroit trav comme pour le dos, pour la 4ebande = 1re bande à partir du bord gche nefaire les augm et dim que sur la moitié droite,ceci aux rgs comme pour le dos. Aux 23e et39e rgs on augm à ch x 7 m., simul au 39e rgdim 1 m. sur le bord droit pour cintrer =68/71/74 m. Entre les bandes de motifs on a àprésent 8 m. en jers env. Exécuter les 2e et 3edim pour cintrer sur le bord droit comme indiquéaux 55e et 71e rgs = 66/69/72 m. Commles dim pour la forme ballon au 75e rg. Pourceci, avant la 1re bande de motifs et aprèsla 1re bande ainsi que 2x après ch bande demotifs suiv ne pas faire d’augm. On obtientainsi sur ce rg 4 dim = 62/65/68 m. après le75e rg. On a maintenant entre les bandes demotifs 7 m. en jers env. Au 81e rg exécuter ladernière dim pour cintrer sur le bord droit =61/64/67 m. Pour la forme ballon, au 83e rg,après la 1re bande et avant la 4e bande demotifs ainsi que ds l’intervalle avant et aprèsch bande de motifs ne pas faire d’augm. Onobtient ainsi au 87e rg automatiquement 6augm = 55/58/61 m. Entre les bandes de motifson a à présent 5 m. en jers env. Au 91e rg,avant et après ch bande de motifs – à la 4ebande seulement avant – ne pas faired’augm. On obtient ainsi au 95e rg automatiquement7 dim = 48/51/54 m. Il ne reste plusque 3 m. en jers env entre les bandes de motifs.Mettre à présent 1 repère sur le bord droitet tric tt droit jusqu’à l’emm. Pour ceci, faireà nv les augm et dim à l’int des bandes demotifs comme indiqué. Exécuter l’emm et lebiais de l’épaule sur le bord droit à la haut dudos. A 6/7/8 cm = 16/18/20 rgs de haut d’emmcomm l’encol sur le bord gche en rab 4 m.puis ts les 2 rgs 10x 1 m. et ts les 4 rgs 4x 1 m.Ttes les m. de ce côté sont à présent épuisées.Devant droit: en symétrie du dev gche etavec 1 boutonnière. Pour ceci, à 5/6/7 cm =14/16/18 rgs de haut d’emm, sur le bord droitaprès la 7e m. faire 1 jeté puis tric les 2 m. suivens à l’end.Finitions: tendre les pièces, les humecter etlaisser sécher. Fermer les cout des épaules.Avec l’aig circ N° 5,5 rel 72/75/78 m. sur lebord de ch emm. Tric un parement de 10 rgsen jers env en comm par 1 rg env en m. end.Rab les m. souplement. Ouvrir le bord demontage du dos en fil contrastant en rel lesm. une par une = 100/106/112 m. sur l’aig circN° 5. Tric une parementure de 4 rgs en jersenv puis rab les m. Procéder de même avecle bord de montage du dev droit en rel les55/58/61 m. successivement sur l’aig circN° 5. En plus de ces m. rel sur les bords verticauxdes dev jusqu’à la base de l’encol105/107/109 m. = 160/165/170 m. Repérer l’angle.Tric la parementure comme pour le dos,au 3e rg tric 3 m. ens ds l’angle. Tric la parementuredu dev gche en symétrie. Fermerles cout des côtés, des parementures et desparements. Rentrer les parements des emmde moitié et les fixer. Rentrer de même la parementuredu tour – sur le bord inf jusqu’audébut des premières m. glissées – la coudre.Avec l’aig circ N° 5,5 rel 104 m. pour le col,tric en jers env. Pour les petits bords du coltric d’abord en rgs raccourcis. Pour ceci tricaux 2e et 3e rgs 4 m. en moins et tourner tjsavec 1 jeté. Puis de ch côté, ts les 2 rgs tricencore 8x 4 m. en moins en tournant tjs avec1 jeté. Cont sur l’aig circ N° 6 en tric le dernierrg end raccourci jusqu’à la fin du rg et en tricles jetés tjs avec la m. suiv ens à l’env pouréviter les trous. Au rg env suiv rab ttes les m.en passant les jetés dev la m. end suiv et triccette m. avec le jeté ens à l’end pour éviterégalement les trous et pour que les jetés setrouvent sur l’env du col. Tric encore 16 rgsNext row: selvedge st, 7/10/13 sts in ReversedSt st, the 8 sts as indicated in the chart beforethe 1st arrow in Reversed St st, work patternrepeat from chart 3 times, work the 5 sts afterthe second arrow and end with selvedgest. There are 4 sts in Reversed St st in betweeneach pattern repeat. In order to keep the leftedge straight (up to the beg of the neckedge shaping), work the increases and decreasesas indicated in rows 1 to 8 of thechart. For the body shaping: work the first 3pattern repeats from the right edge as indicatedfor the back, for the 4 th repeat (this isthe first repeat from the left edge) follow instructionsfor the back for the right half only,so follow instructions for the increases anddecreases as explained for the back. 7 stseach are decreased in rows 23 and 39, atthe same time for the shaping decrease 1 stat the right edge in row 39 = 68/71/74 sts.There are now 8 sts of Reversed St st in betweeneach pattern repeat. For the shapingwork the 2nd and 3rd decreases at the rightedge in rows 55 and 71 as indicated in thechart = 66/69/72 sts. Beg the decreases forthe body shaping in row 75 by omitting theincreases before the 1 st pattern repeat, thenafter the 1 st repeat and after every follow repeattwice. This results in 4 decreases =62/65/68 sts after row 75. There are 7 sts inReversed St st in between each pattern repeat.Work the last decrease for the sideshaping at the right edge in row 81 = 61/64/67 sts. For the body shaping omit the increasesin row 83 after the 1 st and before the 4 thpattern repeat and before and after everyrepeat in between. This results in an automaticdecrease of 6 sts in row 87 = 55/58/61sts. There are 5 sts in Reversed St st in betweeneach pattern repeat. Omit the increasesagain in row 91 before and after each patternrepeat (4 th repeat: only before the repeat.This results in an automatic decreaseof 7 sts in row 95 = 48/51/54 sts. There are now3 sts in Reversed St st in between each patternrepeat. Place a marker at the right edgeund work straight up to the armholes, workthe increases and decreases as indicated inthe chart within the pattern repeats. Workthe armhole shaping and the shoulder shapingat the right edge as indicated for theback. However, begin the neck edge shapingwhen the armhole meas 6/7/8 cm(16/18/20 rows) at the left edge: bind off 4 sts,then bind off 1 st in every follow 2 nd row 10times and 1 st in every follow 4 th row 4 times.All sts have been worked.Right Front: As indicated for the left front withreverse shaping, however, when armholemeas 5/6/7 cm (14/16/18 rows) work buttonholerow as follows:Buttonhole row: k7, yo, k2tog, work to theend of the row.Finishing: Block all pieces. Sew shoulderseams. With circular needle 5,5 mm pick up72/75/78 sts around each armhole edge. Forthe border, work 10 rows in Reversed St st,beg with a ws row. Bind of all sts loosely. Removethe waste yarn carefully from the caston edge of the back and put the 100/106/112 sts one by one on circular needle size 5mm. Work 4 rows in Reverse St st. Bind off allsts. Remove the waste yarn on the right front(55/58/61 sts) and put these one by one oncircular needle size 5 mm and pick up anadditional 105/107/109 sts from the frontedge up to the beg of the neck shaping =160/165/170 sts. Place a marker at the corner.Work the border as explained for the back,and additionally in the 3rd row k3tog at thecorner. Repeat for the left front with reverseshaping. Sew side seams and all border