Anleitungen Créalana Nr. 27 - Schulana
Anleitungen Créalana Nr. 27 - Schulana
Anleitungen Créalana Nr. 27 - Schulana
- No tags were found...

Create successful ePaper yourself
Turn your PDF publications into a flip-book with our unique Google optimized e-Paper software.
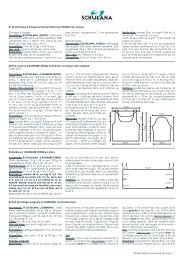
in jeder 4. R noch 6x je 1 M betont abn. DieSchulter am re Rand in gleicher Höhe wie amRückenteil schrägen.Rechtes Vorderteil: Gegengleich zum liVorderteil str.Ärmel: 39 M mit Kontrastgarn und N <strong>Nr</strong>. 9anschl. Dann mit Originalwolle und N<strong>Nr</strong>. 10 den italienischen Anschlag arb.Für den hohen Bund 19 cm = 26 R Rippenstr, dabei in der letzten R 1 M verschr ausdem Querfaden zun = 40 M. Dann glattre weiterarb. Beids für die Schrägungenin der 19./13./9. R ab Bundende 1 M zun,dann in folg 14. R 0/1/0x 1 M und in jeder8. R noch 0/0/3x je 1 M zun = 42/44/48 M.Nach <strong>27</strong> cm = 40 R ab Bundende beidsfür die Ärmelkugel 3 M abk, dann in jeder2. R 10x je 1 M betont abn, 1x 2 M und1x 3 M abk. In der folg R die restl 6/8/12 Mabk.Ausarbeiten: Teile spannen, anfeuchtenund trocknen lassen. Nähte schließen.Mit der Rund-N <strong>Nr</strong>. 8 aus dem senkrechtenRand des re Vorderteils bis zum Beginnder Ausschnittschrägung von der Außenseite68 M auffassen. Für dieReißverschlussblende 3 R glatt re str, dabeimit 1 Rück-R li beginnen. Dann die M abk.Nun von der Innenseite mit der Rund-N <strong>Nr</strong>. 8auch 68 M auffassen und den Besatz genausoanstr. Dann am li Vorderteil Blende undBesatz genauso anstr. Reißverschluss jeweilszwischengefasst einnähen. Blenden- undBesatzschmalseiten zus-nähen. Nun mit derRund-N <strong>Nr</strong>. 8 aus dem Ausschnittrand einschließlichder oberen Blendenschmalseitenvon außen 75 M auffassen. Für den KragenRippen mit patenten Rand-M str, dabei mit1 Rück-R wie gezeichnet beginnen undgleichzeitig für die Form ab 1. Rück-R verkürzteR wie folgt str: zunächst nur 46 M abstr,dann nach 1 li M mit 1 U wenden und 18 Mzurückstr, wieder mit 1 U wenden und beidsin jeder 2. R noch 2x je 4 M mehr abstr, dabeiebenfalls stets mit 1 U wenden. Dann wiederüber alle M im Zus-hang weiterstr. In der jeweilslängeren R den U der Vor-R stets mit derfolg M re zus-str, damit kein Loch entsteht, dabeiauch darauf achten, dass die U auf der reSeite nicht sichtbar sind. Nach 10 durchgehendenRippen-R 10 R mit der Rund-N <strong>Nr</strong>. 9 anfügen,dann noch 14 R mit der Rund-N <strong>Nr</strong>. 10 str.Fertige Kragenhöhe = 20 cm am vorderenRand gemessen. Die M locker abk, wie sie erscheinen.Ärmel einsetzen.17<strong>27</strong>19l’épaule sur le bord droit à la haut du dos.Devant doit: en symétrie du dev gche.18/19/21171/2/4Ärmel, Hälfte63Manches: sur aig N° 9 monter39 m. avec un fil contrastant.Tric le bord à l’italienne sur aigN° 10 avec le fil indiqué. Tric unparement de 19 cm = 26 rgs encôtes, au dernier augm 1 m.torse ds le fil intercalaire = 40 m.Cont en jers end. Pour biaiser lamanche augm 1 m. de ch côtéaux 19e/13e/9e rg après le parementpuis rép ces augm0/1/0x au 14e rg et 0/0/3x ts les8 rgs = 42/44/48 m. A <strong>27</strong> cm =40 rgs après le parement commla tête de manche en rab 3 m.de ch côté puis faire 1 dim apparente10x ts les 2 rgs, rab encore1x 2 et 1x 3 m. Rab les6/8/12 m. rest au rg suiv.demi-manche Finitions: tendre les pièces, lessleeve, halfhumecter et laisser sécher. Fermerles cout. Avec l’aig circN° 8 rel 68 m. sur le bord vertical du dev droitjusqu’au début du biais de l’encol sur le côtéend. Pour la parementure de la fermeture àglissière tric 3 rgs en jers end en comm par1 rg env en m. env. Rab les m. Sur le côté envrel également 68 m. sur l’aig circ N° 8 et tricune parementure de la même façon. Procéderde même sur le dev gche. Coudre la fermetureentre les parementures. Ass les petitsbords des parements et parementures. Avecl’aig circ N° 8 rel sur l’end 75 m. sur le bord del’encol, y compris des petits bords sup desparements. Tric le col en côtes avec m. lis encôte anglaise en comm par 1 rg env commeindiqué. Simul pour la forme, à partir du 1errg env tric en rgs raccourcis comme suit: tricd’abord seulement 46 m. puis tourner avec1 jeté après 1 m. env, tric 18 m. en retour, tourneravec 1 jeté. Ts les 2 rgs tric encore 2x 4 m.en plus de ch côté en tournant tjs par 1 jeté.Tric ensuite à nv sur ttes les m. Aux rgs les pluslongs tric le jeté du rg précédent avec la m.suiv ens à l’end pour éviter les trous et enveillant à ce que les jetés ne soient pas visiblessur l’end. Après 10 rgs de côtes entierstric 10 rgs sur l’aig circ N° 9 puis 14 rgs sur l’aigcirc N° 10. Haut du col fini = 20 cm, mesuré surle bord devant. Rab les m. souplement commeelles se présentent. Monter les manches.der at the right edge matching the backshoulder shaping.Right Front: As for left front with reversedshaping.Sleeves: With needles size 9 mm and wasteyarn cast on 39 sts (provisional cast on. Switchto working yarn and needle size 10 mm andwork the provsional cast on method as describedon the information page on page.Work 19 cm = 26 rows of ribbing for the longborder, m1 in the last row = 40 sts. Switch to Stst. In the 19/13/9th row from the end of theborder inc 1 st at each side, then 0/1/0 st inthe foll 14 th row, and 1 st in every foll 8 th row0/0/3 x = 42/44/48 sts. At <strong>27</strong> cm = 40 rowsfrom end of the border bind off 3 sts at eachside, then 1 st in every foll 2 nd row 10 x , 2 stsonce and 3 sts once.In the foll row bind off the rem 6/8/12 sts.Finishing: Lightly block pieces. Sew seams.Set in sleevesZipper Bands: With circular needle size 8 mmpick up 68 sts from the edge of the right frontto the beg of the neck edge. Work 3 rows inSt st for the zipper bands, beg with a ws row.Bind off. With needle size 8 mm pick up 68 stsfrom the inside and work in the same way.Repeat for the left front. Insert the zipper onboth sides in between the two bands. Sewtogether the two bands.Collar: With circular needle size 8 mm pickup 75 sts around the neck edge and incl. thetop borders of the front zipper bands. Workingin Fisherman’s Rib Pattern, beg with a wsrow as indicated in the chart and at thesame time for the shaping beg with the 1 st wsrow, work short rows as follows: work 46 sts,wrap and turn, work 18 sts, wrap and turnand in every foll 2 nd row on each side work 2x 4 sts more, by cont to work wrap and turn.Continue working across all sts. To avoid agap, work the wrapped st together with st onneedle, and make sure that the wrapped stis not visible on the RS.Work 10 rows across all sts in ribbing and thenswitch to circular needle size 9 mm work another10 rows and then switch to circularneedle size 10 mm work another 14 rows. Thefinished collar will measure 20 cm at the front.Bind off loosely by working the sts as they appear.312Zeichenerklärung= 1 M re= 1 M li= 1 M re verschr= 1 M wie zum Linksstr abh, Fadenvor der M weiterführenExplications des signes= 1 m end= 1 m env= 1 m end torse= gl 1 m comme pour la tric à l'enven passant le fil dev l'ouvrageList of conventional signs= k1= p1= 1 st twisted k-wise= slip 1 p-wise, yarn at front of workSchal mit PelzbommelnGröße: 130 x 14 cmAusführung: Das Teil quer str. 144 M mit derRund-N <strong>Nr</strong>. 10 anschl. 1 Rück-R li, dann glattre str. Nach 14 cm = 21 R ab Anschl die Mlocker abk. Schmalseiten des Schals mit jeeinem Faden fest zus-ziehen. Fadenendengut vernähen. Druckknopfhälfte an jedesSchalende nähen. Bommeln befestigen.Längsseiten des Schals rollen sich aufgrundder Stricktechnik ein.Echarpe avec pomponsDimensions: 130 x 14 cmRéalisation: monter 144 m. sur l’aig circ N° 10et tric en jers end en comm par 1 rg env en m.env. A 14 cm = 21 rgs de haut tot rab les m.souplement. Passer un fil ds les petits bordsde l’écharpe et resserrer. Rentrer les extrémitésdu fil. Fixer les boutons-pression aux extrémitésainsi que les pompons. Les grandsbords de l’écharpe s’enroulent en raison dela technique de tric.Scarf with fur pomponsSize: 130 x 14 cmInstructions: the piece is worked lengthwise.With needle size 10 mm cast on 144 sts. Workin St st, beg with a ws row. At 14 cm = 21 rowsfrom cast on edge bind off all sts loosley. Inserta thread into the short sides and pull togethertightly to create a gathered end. Fastenoff ends securely. Sew snap fastenerparts on each side. Sew pompons on eachside. The scarf edges will roll up as a consequenceof the St st.Créalana 5