Reference Manual BioTrak Datalink and Gas ... - Biodownloads
Reference Manual BioTrak Datalink and Gas ... - Biodownloads
Reference Manual BioTrak Datalink and Gas ... - Biodownloads
- No tags were found...

Create successful ePaper yourself
Turn your PDF publications into a flip-book with our unique Google optimized e-Paper software.
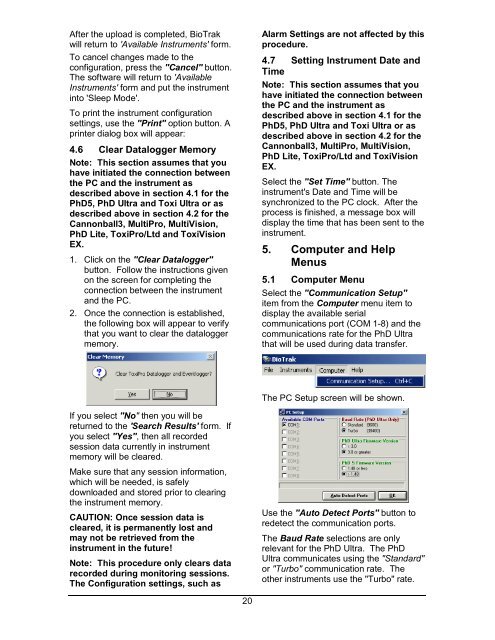
After the upload is completed, <strong>BioTrak</strong>will return to 'Available Instruments' form.To cancel changes made to theconfiguration, press the "Cancel" button.The software will return to 'AvailableInstruments' form <strong>and</strong> put the instrumentinto 'Sleep Mode'.To print the instrument configurationsettings, use the "Print" option button. Aprinter dialog box will appear:4.6 Clear Datalogger MemoryNote: This section assumes that youhave initiated the connection betweenthe PC <strong>and</strong> the instrument asdescribed above in section 4.1 for thePhD5, PhD Ultra <strong>and</strong> Toxi Ultra or asdescribed above in section 4.2 for theCannonball3, MultiPro, MultiVision,PhD Lite, ToxiPro/Ltd <strong>and</strong> ToxiVisionEX.1. Click on the "Clear Datalogger"button. Follow the instructions givenon the screen for completing theconnection between the instrument<strong>and</strong> the PC.2. Once the connection is established,the following box will appear to verifythat you want to clear the dataloggermemory.Alarm Settings are not affected by thisprocedure.4.7 Setting Instrument Date <strong>and</strong>TimeNote: This section assumes that youhave initiated the connection betweenthe PC <strong>and</strong> the instrument asdescribed above in section 4.1 for thePhD5, PhD Ultra <strong>and</strong> Toxi Ultra or asdescribed above in section 4.2 for theCannonball3, MultiPro, MultiVision,PhD Lite, ToxiPro/Ltd <strong>and</strong> ToxiVisionEX.Select the "Set Time" button. Theinstrument's Date <strong>and</strong> Time will besynchronized to the PC clock. After theprocess is finished, a message box willdisplay the time that has been sent to theinstrument.5. Computer <strong>and</strong> HelpMenus5.1 Computer MenuSelect the "Communication Setup"item from the Computer menu item todisplay the available serialcommunications port (COM 1-8) <strong>and</strong> thecommunications rate for the PhD Ultrathat will be used during data transfer.The PC Setup screen will be shown.If you select "No" then you will bereturned to the 'Search Results' form. Ifyou select "Yes", then all recordedsession data currently in instrumentmemory will be cleared.Make sure that any session information,which will be needed, is safelydownloaded <strong>and</strong> stored prior to clearingthe instrument memory.CAUTION: Once session data iscleared, it is permanently lost <strong>and</strong>may not be retrieved from theinstrument in the future!Note: This procedure only clears datarecorded during monitoring sessions.The Configuration settings, such asUse the "Auto Detect Ports" button toredetect the communication ports.The Baud Rate selections are onlyrelevant for the PhD Ultra. The PhDUltra communicates using the "St<strong>and</strong>ard"or "Turbo" communication rate. Theother instruments use the "Turbo" rate.20