- Page 1 and 2:
SiteView - Data Logger SoftwareUser
- Page 3 and 4:
Table of ContentsABOUT THIS MANUAL.
- Page 5 and 6:
CHAPTER 11 - WORK WITH UNITS.......
- Page 7 and 8:
Buttons ...........................
- Page 9 and 10:
CHAPTER 2 - INSTALL SITEVIEWNOTE:Be
- Page 11 and 12:
In this dialog select a destination
- Page 13 and 14:
As SiteView is being installed the
- Page 15 and 16:
Select "No, not this time" from opt
- Page 17 and 18:
The screen below will be displayed
- Page 19 and 20:
Enter the Product Key, then click A
- Page 21 and 22:
3. Double click the logger icon. If
- Page 23 and 24:
Record the IP address and the port
- Page 25 and 26:
4. Click New button to create a new
- Page 27 and 28:
Serial Port ConnectionStart Communi
- Page 29 and 30:
Serial Device Server Connection (Et
- Page 31 and 32:
4. Click New button to create a new
- Page 33 and 34:
In order to make the connection, bo
- Page 35 and 36:
%C0 Compression Control%C0: Disable
- Page 37 and 38:
CHAPTER 4 - VIEW STATUS OF LOGGERWh
- Page 39 and 40:
Know If Logger Operate Properly?It
- Page 41 and 42:
Each time when Download Logger dial
- Page 43 and 44:
LAB01SN010101065282-2010-09-02-07-0
- Page 45 and 46:
CHAPTER 6 - CONFIGURE LOGGERWARNING
- Page 47 and 48:
If the sampling interval is set bel
- Page 49 and 50:
Decide what to do when in Alarm Sta
- Page 51 and 52:
Measured DataIdeal DataOutputCali.
- Page 53 and 54:
Save Real-Time DataThe real-time da
- Page 55 and 56:
CHAPTER 8 - CALIBRATE LOGGERSiteVie
- Page 57 and 58:
The above page allows you to calibr
- Page 59 and 60:
The above page shows all parameters
- Page 61 and 62:
Once you have obtained those four p
- Page 63 and 64:
e set by Low Alarm and High Alarm f
- Page 65 and 66:
Please refer to User Interface Refe
- Page 67 and 68:
If there is an alarm, a red-color r
- Page 69 and 70:
CHAPTER 10 - WORK WITH EQUATIONSWha
- Page 71 and 72:
The function has one parameter name
- Page 73 and 74:
You need to choose a unit for the n
- Page 75 and 76:
The following Import Equation dialo
- Page 77 and 78:
Create Custom-Line EquationA custom
- Page 79 and 80:
A new line was added to the plot.Ca
- Page 81 and 82:
CHAPTER 11 - WORK WITH UNITSWhat is
- Page 83 and 84:
Create UnitTo create a unit under e
- Page 85 and 86:
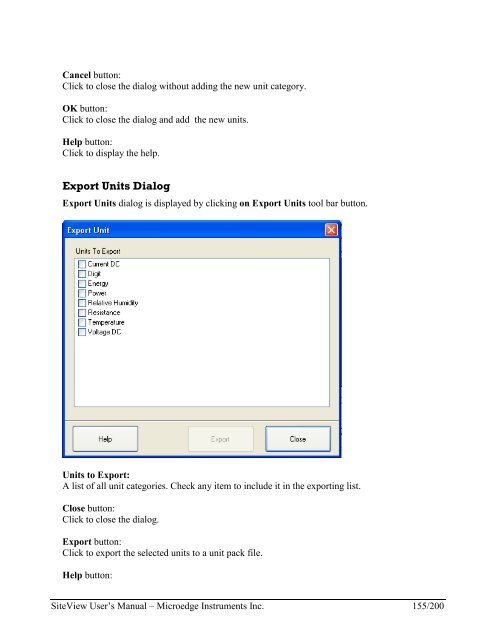
Check the units you want to export
- Page 87 and 88:
Check units you want to import to a
- Page 89 and 90:
Any property you changed will refle
- Page 91 and 92:
CHAPTER 13 - WORK WITH PLOTAfter th
- Page 93 and 94:
StatisticsPlot statistics are a set
- Page 95 and 96:
Save and Export PlotSave the Change
- Page 97 and 98:
Enter the file name you want to sav
- Page 99 and 100:
If the file was saved successfully,
- Page 101 and 102:
Change Plot SettingsNOTEAfter the c
- Page 103 and 104: Change Other SettingsWhen a SiteVie
- Page 105 and 106: After Box Zoom:Zoom-OutZoom-Out is
- Page 107 and 108: Choose an equation in the Add Custo
- Page 109 and 110: 2. Click Add Annotation menu item.
- Page 111 and 112: Note that Zoom Out and Unzoom All a
- Page 113 and 114: To toggle on/off Show Point Value p
- Page 115 and 116: CHAPTER 14 - USER INTERFACE REFEREN
- Page 117 and 118: Plot Preferences:Click to display P
- Page 119 and 120: Communication BarCommunication Bar
- Page 121 and 122: Contact:Click this button to start
- Page 123 and 124: Serial PortThis tab page handles th
- Page 125 and 126: Close:Click this button to close th
- Page 127 and 128: Retry:This field specifies how many
- Page 129 and 130: Calibrate:Click to start on-line/of
- Page 131 and 132: Alarm/Excitation SelectionThis fiel
- Page 133 and 134: Start Time & End TimeThese fields s
- Page 135 and 136: Memory Usage:Specify the memory usa
- Page 137 and 138: Alarm-Off DelayThis filed specifies
- Page 139 and 140: Tool Bar Buttons:List View VisibleC
- Page 141 and 142: Line Properties:Channel#:The column
- Page 143 and 144: Tool bar ButtonsCreate:Click to dis
- Page 145 and 146: Equation Name:Specify the name of t
- Page 147 and 148: Equations:Specify the available equ
- Page 149 and 150: Close button:Click to close the dia
- Page 151 and 152: Click to display the help.Input & O
- Page 153: Import Units:Click to display Impor
- Page 157 and 158: ButtonsAdd:Click to add a new plot
- Page 159 and 160: Description:Specify the description
- Page 161 and 162: Load Plot In Separate Window:This f
- Page 163 and 164: Date + TimePrefix + Serial NumberPr
- Page 165 and 166: Run Executable/Play Music:This fiel
- Page 167 and 168: Remote MODEM:A MODEM connected to t
- Page 169 and 170: Copy:Click to copy the plot to the
- Page 171 and 172: Menu ItemsFile:Add:Click to browse
- Page 173 and 174: Exit:Click to close the plot.View:S
- Page 175 and 176: Select Time Span DialogThis dialog
- Page 177 and 178: Description:Specifies the descripti
- Page 179 and 180: Visible:Specifies if the line will
- Page 181 and 182: Specifies the font of the title.Col
- Page 183 and 184: Alarm CenterConnectionsSpecify whic
- Page 185 and 186: CHAPTER 15 - EQUATION REFERENCESC#
- Page 187 and 188: ight by the number of bits specifie
- Page 189 and 190: ^= The exclusive-OR assignment oper
- Page 191 and 192: this.SampleIntervalthis.Linesl[x].V
- Page 193 and 194: if (FirstIn){FirstIn = false;SumVal
- Page 195 and 196: E1H0H1I0I1I2I3I4L0L1L2L3M0M1M2M3N0N
- Page 197 and 198: &P3&S0&S1&T0&V0&V1&V2Selects 33%-61
- Page 199 and 200: Reg. 6Reg. 7Reg. 8Reg. 9Reg. 10Reg.