

Assembly Instructions - Swing-N-Slide
Assembly Instructions - Swing-N-Slide
Assembly Instructions - Swing-N-Slide
- No tags were found...

You also want an ePaper? Increase the reach of your titles
YUMPU automatically turns print PDFs into web optimized ePapers that Google loves.
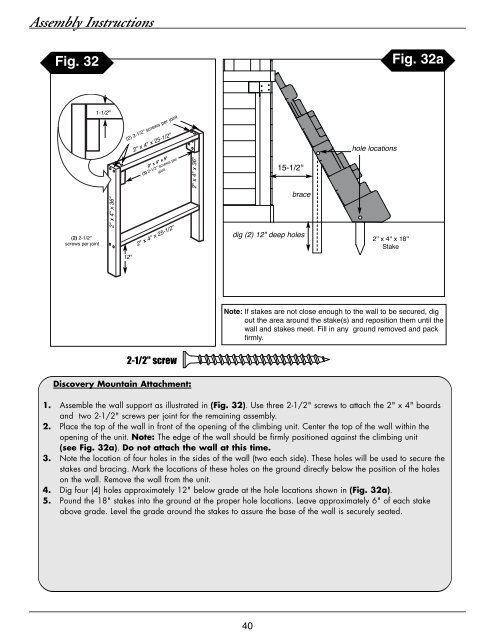
<strong>Assembly</strong> <strong>Instructions</strong>Fig. 32Fig. 32a(2) 2-1/2''screws per joint1-1/2"2" x 4" x 36"(2) 2-1/2'' screws per joint2" x 4" x 25-1/2"2" x 4" x 5"(3) 2-1/2'' screws perjoint2" x 4" x 25-1/2"2" x 4" x 36"15-1/2''bracedig (2) 12" deep holeshole locationsstake 2'' x 4'' x 18''Stake12"Note: If stakes are not close enough to the wall to be secured, digout the area around the stake(s) and reposition them until thewall and stakes meet. Fill in any ground removed and packfirmly.2-1/2'' screwDiscovery Mountain Attachment:1. Assemble the wall support as illustrated in (Fig. 32). Use three 2-1/2" screws to attach the 2" x 4" boardsand two 2-1/2" screws per joint for the remaining assembly.2. Place the top of the wall in front of the opening of the climbing unit. Center the top of the wall within theopening of the unit. Note: The edge of the wall should be firmly positioned against the climbing unit(see Fig. 32a). Do not attach the wall at this time.3. Note the location of four holes in the sides of the wall (two each side). These holes will be used to secure thestakes and bracing. Mark the locations of these holes on the ground directly below the position of the holeson the wall. Remove the wall from the unit.4. Dig four (4) holes approximately 12" below grade at the hole locations shown in (Fig. 32a).5. Pound the 18" stakes into the ground at the proper hole locations. Leave approximately 6" of each stakeabove grade. Level the grade around the stakes to assure the base of the wall is securely seated.40


