

Assembly Instructions - Swing-N-Slide
Assembly Instructions - Swing-N-Slide
Assembly Instructions - Swing-N-Slide
- No tags were found...

Create successful ePaper yourself
Turn your PDF publications into a flip-book with our unique Google optimized e-Paper software.
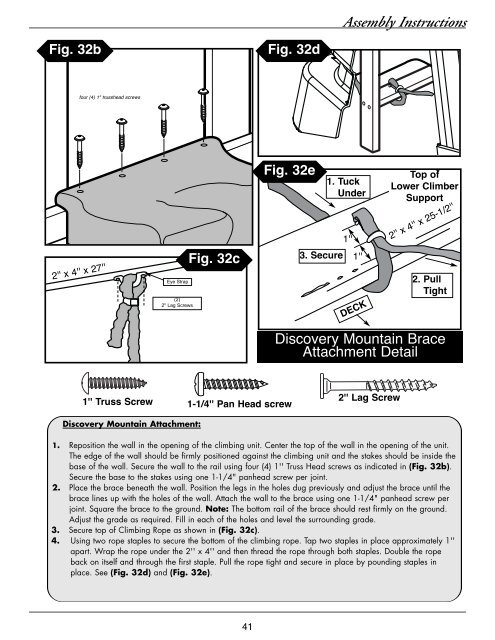
<strong>Assembly</strong> <strong>Instructions</strong>Fig. 32bFig. 32dfour (4) 1" trusshead screwsFig. 32e1. TuckUnder1''Top oflower ClimberSupport2'' x 4'' x 25-1/2''2'' x 4'' x 27''Eye Strap(2)2'' Lag ScrewsFig. 32c3. Secure1''DECK2. PullTightDiscovery Mountain BraceAttachment Detail1'' Truss Screw1-1/4'' Pan Head screw2'' lag ScrewDiscovery Mountain Attachment:1. Reposition the wall in the opening of the climbing unit. Center the top of the wall in the opening of the unit.The edge of the wall should be firmly positioned against the climbing unit and the stakes should be inside thebase of the wall. Secure the wall to the rail using four (4) 1'' Truss Head screws as indicated in (Fig. 32b).Secure the base to the stakes using one 1-1/4" panhead screw per joint.2. Place the brace beneath the wall. Position the legs in the holes dug previously and adjust the brace until thebrace lines up with the holes of the wall. Attach the wall to the brace using one 1-1/4" panhead screw perjoint. Square the brace to the ground. Note: The bottom rail of the brace should rest firmly on the ground.Adjust the grade as required. Fill in each of the holes and level the surrounding grade.3. Secure top of Climbing Rope as shown in (Fig. 32c).4. Using two rope staples to secure the bottom of the climbing rope. Tap two staples in place approximately 1''apart. Wrap the rope under the 2'' x 4'' and then thread the rope through both staples. Double the ropeback on itself and through the first staple. Pull the rope tight and secure in place by pounding staples inplace. See (Fig. 32d) and (Fig. 32e).41


