

Assembly Instructions - Swing-N-Slide
Assembly Instructions - Swing-N-Slide
Assembly Instructions - Swing-N-Slide
- No tags were found...

You also want an ePaper? Increase the reach of your titles
YUMPU automatically turns print PDFs into web optimized ePapers that Google loves.
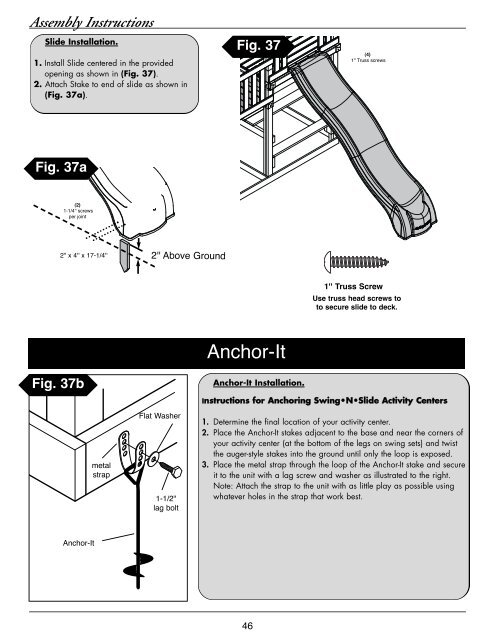
<strong>Assembly</strong> <strong>Instructions</strong><strong>Slide</strong> Installation.1. Install <strong>Slide</strong> centered in the providedopening as shown in (Fig. 37).2. Attach Stake to end of slide as shown in(Fig. 37a).Fig. 37(4)1'' Truss screwsFig. 37a(2)1-1/4'' screwsper joint2'' x 4'' x 17-1/4''2'' Above Ground1'' Truss ScrewUse truss head screws toto secure slide to deck.Anchor-ItFig. 37bAnchor-It Installation.<strong>Instructions</strong> for Anchoring <strong>Swing</strong>•N•<strong>Slide</strong> Activity CentersmetalstrapFlat Washer1-1/2"lag bolt1. Determine the final location of your activity center.2. Place the Anchor-It stakes adjacent to the base and near the corners ofyour activity center (at the bottom of the legs on swing sets) and twistthe auger-style stakes into the ground until only the loop is exposed.3. Place the metal strap through the loop of the Anchor-It stake and secureit to the unit with a lag screw and washer as illustrated to the right.Note: Attach the strap to the unit with as little play as possible usingwhatever holes in the strap that work best.Anchor-It46


