Mixture Design Tutorial (Part 1 â The Basics) - Statease.info
Mixture Design Tutorial (Part 1 â The Basics) - Statease.info
Mixture Design Tutorial (Part 1 â The Basics) - Statease.info

You also want an ePaper? Increase the reach of your titles
YUMPU automatically turns print PDFs into web optimized ePapers that Google loves.
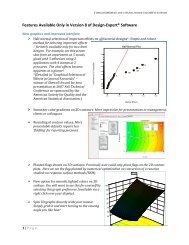
To revert back to the full triangle, right-click over the plot and select Zoom out.Zoom outTrace PlotWouldn’t it be handy to see all your factors on one response plot? You can do this withthe trace plot, which provides silhouette views of the response surface. <strong>The</strong> real benefitfrom this plot is for selecting axes and constants in contour and 3D plots. Use the View,Trace menu item to select it.Trace plot – component A highlighted<strong>The</strong> trace plot shows the effects of changing each component along an imaginary linefrom the reference blend (defaulted to the overall centroid) to the vertex. As the amountof this component increases, the amounts of all other components decrease, but theirratio to one another remains constant. Click on the curve for A. (It will change color).Notice that viscosity is not very sensitive to this component.<strong>The</strong> floating Trace Graph menu offers various options for the directions taken by thetraces and the method. In this case where the experimental region forms a simplex, itmatters little which choices you make. See for yourself by pressing the alternatives towhat’s provided by default.18 • <strong>Mixture</strong> <strong>Tutorial</strong> – <strong>Part</strong> 1 <strong>Design</strong>-Expert 7 User’s Guide