A-Teachers-Guide-to-the-Intel-Galileo-Final
A-Teachers-Guide-to-the-Intel-Galileo-Final
A-Teachers-Guide-to-the-Intel-Galileo-Final

You also want an ePaper? Increase the reach of your titles
YUMPU automatically turns print PDFs into web optimized ePapers that Google loves.
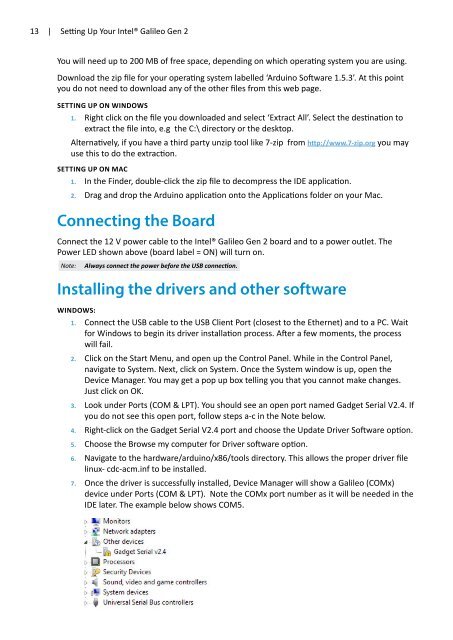
13 | Setting Up Your <strong>Intel</strong>® <strong>Galileo</strong> Gen 2You will need up <strong>to</strong> 200 MB of free space, depending on which operating system you are using.Download <strong>the</strong> zip file for your operating system labelled ‘Arduino Software 1.5.3’. At this pointyou do not need <strong>to</strong> download any of <strong>the</strong> o<strong>the</strong>r files from this web page.Setting up on Windows1. Right click on <strong>the</strong> file you downloaded and select ‘Extract All’. Select <strong>the</strong> destination <strong>to</strong>extract <strong>the</strong> file in<strong>to</strong>, e.g <strong>the</strong> C:\ direc<strong>to</strong>ry or <strong>the</strong> desk<strong>to</strong>p.Alternatively, if you have a third party unzip <strong>to</strong>ol like 7-zip from http://www.7-zip.org you mayuse this <strong>to</strong> do <strong>the</strong> extraction.Setting up on Mac1. In <strong>the</strong> Finder, double-click <strong>the</strong> zip file <strong>to</strong> decompress <strong>the</strong> IDE application.2. Drag and drop <strong>the</strong> Arduino application on<strong>to</strong> <strong>the</strong> Applications folder on your Mac.Connecting <strong>the</strong> BoardConnect <strong>the</strong> 12 V power cable <strong>to</strong> <strong>the</strong> <strong>Intel</strong>® <strong>Galileo</strong> Gen 2 board and <strong>to</strong> a power outlet. ThePower LED shown above (board label = ON) will turn on.Note:Always connect <strong>the</strong> power before <strong>the</strong> USB connection.Installing <strong>the</strong> drivers and o<strong>the</strong>r softwareWindows:1. Connect <strong>the</strong> USB cable <strong>to</strong> <strong>the</strong> USB Client Port (closest <strong>to</strong> <strong>the</strong> E<strong>the</strong>rnet) and <strong>to</strong> a PC. Waitfor Windows <strong>to</strong> begin its driver installation process. After a few moments, <strong>the</strong> processwill fail.2. Click on <strong>the</strong> Start Menu, and open up <strong>the</strong> Control Panel. While in <strong>the</strong> Control Panel,navigate <strong>to</strong> System. Next, click on System. Once <strong>the</strong> System window is up, open <strong>the</strong>Device Manager. You may get a pop up box telling you that you cannot make changes.Just click on OK.3. Look under Ports (COM & LPT). You should see an open port named Gadget Serial V2.4. Ifyou do not see this open port, follow steps a-c in <strong>the</strong> Note below.4. Right-click on <strong>the</strong> Gadget Serial V2.4 port and choose <strong>the</strong> Update Driver Software option.5. Choose <strong>the</strong> Browse my computer for Driver software option.6. Navigate <strong>to</strong> <strong>the</strong> hardware/arduino/x86/<strong>to</strong>ols direc<strong>to</strong>ry. This allows <strong>the</strong> proper driver filelinux- cdc-acm.inf <strong>to</strong> be installed.7. Once <strong>the</strong> driver is successfully installed, Device Manager will show a <strong>Galileo</strong> (COMx)device under Ports (COM & LPT). Note <strong>the</strong> COMx port number as it will be needed in <strong>the</strong>IDE later. The example below shows COM5.