- Page 1 and 2:
ISADORA ® Isadora Manual User’s
- Page 3 and 4:
Initializing Property Values.......
- Page 5 and 6:
Compositing with the Projector (v1.
- Page 7 and 8:
3D Stage Orientation (v1.1)........
- Page 9 and 10:
Envelope Generator ................
- Page 11 and 12:
Min Value Hold ....................
- Page 13 and 14:
Send Control ......................
- Page 15 and 16:
Threshold (v1.1) ..................
- Page 17 and 18:
Isadora - Overview What is Isadora?
- Page 19 and 20:
have a complicated video patch and
- Page 21 and 22:
Follow these steps to register your
- Page 23 and 24:
Click “OK” to continue. • Cho
- Page 25 and 26:
Fire Wire output, or a analog video
- Page 27 and 28:
• Under the heading Stage 2, Stag
- Page 29 and 30:
• Choose Scenes > Insert Scene. A
- Page 31 and 32:
• Click on the module named “Mo
- Page 33 and 34:
Tutorial 2: Changing Actor Settings
- Page 35 and 36:
Isadora Manual movie back and forth
- Page 37 and 38:
Isadora Manual properties. Move the
- Page 39 and 40:
capture device is securely attached
- Page 41 and 42:
• Difference - Compares the brigh
- Page 43 and 44:
hear a short loop of the sound. In
- Page 45 and 46:
Player actors - both are set to 1.
- Page 47 and 48:
• Click to the right of the only
- Page 49 and 50:
You can easily find out the type of
- Page 51 and 52:
to a specific value when its Scene
- Page 53 and 54:
Now you see a silhouette of the dan
- Page 55 and 56:
ecause it does not yet have any inp
- Page 57 and 58:
In this case, we don’t need to ch
- Page 59 and 60:
Creating a New Instance Sometimes y
- Page 61 and 62:
• Choose Windows > Show Media to
- Page 63 and 64:
Experiment with these three setting
- Page 65 and 66:
The standard drives included with m
- Page 67 and 68:
DV NTSC or DV PAL For standard DV r
- Page 69 and 70:
6) Set the slider under “Quality
- Page 71 and 72:
TIFF (.tif) Graphics Interchange Fo
- Page 73 and 74:
To select an multiple bins • Clic
- Page 75 and 76:
To force standard-quality playback
- Page 77 and 78:
• Choose Scenes > Insert Scene. A
- Page 79 and 80:
outside world is changing the way i
- Page 81 and 82:
• Click on the main body of the a
- Page 83 and 84:
To segment Links for better visual
- Page 85 and 86:
To get help for an actor’s proper
- Page 87 and 88:
Ctl Link, Init, Scale Min. and Scal
- Page 89 and 90:
actors - if this is the case, you c
- Page 91 and 92:
• To adjust the color input of an
- Page 93 and 94:
When you close a User Actor editor
- Page 95 and 96:
To edit a User Actor: • To open a
- Page 97 and 98:
• Click on an input or an output
- Page 99 and 100:
Choosing a Folder to Hold Your Glob
- Page 101 and 102:
If you take more Snapshots after th
- Page 103 and 104:
Using Control Panels Overview Isado
- Page 105 and 106:
Isadora Manual Select Scene Four an
- Page 107 and 108:
To Edit Control Panels: • Choose
- Page 109 and 110:
• Ensure that Controls > Show Act
- Page 111 and 112:
IMPORTANT NOTE: If you choose the T
- Page 113 and 114:
Setting the font, font style and fo
- Page 115 and 116:
• Control-click (MacOS) or right-
- Page 117 and 118: • Type the password for this file
- Page 119 and 120: Isadora Preferences Isadora’s Pre
- Page 121 and 122: Thumbnails You can choose whether o
- Page 123 and 124: • Faster - Double Buffer: This is
- Page 125 and 126: First, if the display associated wi
- Page 127 and 128: MIDI/Net Preferences MIDI Scene Con
- Page 129 and 130: Warnings To help new users avoid co
- Page 131 and 132: the Preferences. If the patch is co
- Page 133 and 134: Cue Sheets Isadora has an integrate
- Page 135 and 136: Using the Cue Sheet Once the cue sh
- Page 137 and 138: Video & Audio Output Compositing wi
- Page 139 and 140: • Click on the dot to the left of
- Page 141 and 142: about FreeFrame plug-ins, see page
- Page 143 and 144: • Set the rendering speed by ente
- Page 145 and 146: Recording Isadoraʼs Output To reco
- Page 147 and 148: • TIP: If you can’t find all of
- Page 149 and 150: • If your computer has multiple v
- Page 151 and 152: To use this feature, you must have
- Page 153 and 154: Using Multi-Channel Sound with Movi
- Page 155 and 156: With this setup, sound files played
- Page 157 and 158: 6) You can then use the popup menu
- Page 159 and 160: of the sound in three dimensions -
- Page 161 and 162: Live Video & Audio Input To bring l
- Page 163 and 164: • Enable/Disable the Force 4:3 As
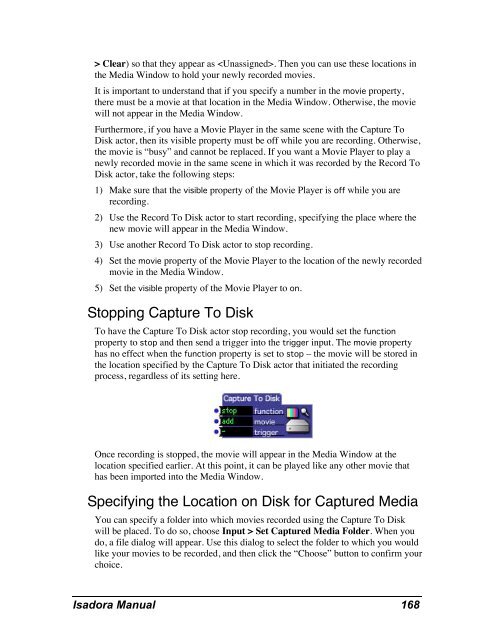
- Page 165 and 166: Controlling Video Capture Performan
- Page 167: Forcing a 4:3 Aspect Ratio There is
- Page 171 and 172: Associating a Physical Input Port t
- Page 173 and 174: 3) Choose Communications > Midi Set
- Page 175 and 176: Adding Custom Open Sound Control (O
- Page 177 and 178: 1) Check or uncheck the Enable chec
- Page 179 and 180: • In the list in the middle of th
- Page 181 and 182: 3) Click the Sort List button to or
- Page 183 and 184: Preparing a Port for Serial Communi
- Page 185 and 186: until the some delimiter character
- Page 187 and 188: [ character_set ] [[ character_set
- Page 189 and 190: Data Input Elements: byte_set A byt
- Page 191 and 192: linteger Isadora Manual integer. An
- Page 193 and 194: Isadora Manual “hello” 0D 0A wo
- Page 195 and 196: Actors Reference 2D Velocity (v1.1)
- Page 197 and 198: • x/y/z rotation: Specifies the r
- Page 199 and 200: 3D Mosaic (v1.3) Creates a 3D Mosai
- Page 201 and 202: • v mag pos 1/2/3/4: The vertical
- Page 203 and 204: Creates a 3D Particle System. The i
- Page 205 and 206: • mid size: Defines the middle si
- Page 207 and 208: 3D Player Renders a 3D object onto
- Page 209 and 210: • x/y/z scale: Scales the object
- Page 211 and 212: • visible: When turned on, the vi
- Page 213 and 214: 3D Quad Distort (v1.1) Renders a vi
- Page 215 and 216: • x3/y3, Offsets the bottom left
- Page 217 and 218: • attack time: Fade in time of th
- Page 219 and 220:
• x/y/z translation: Translates t
- Page 221 and 222:
3D Velocity (v1.3) Calculates the v
- Page 223 and 224:
When a valid scene has been specifi
- Page 225 and 226:
Input Properties • video: the vid
- Page 227 and 228:
image. Where it is black, you will
- Page 229 and 230:
Capture Frame 1 Input Properties
- Page 231 and 232:
Output Properties • tracking: Out
- Page 233 and 234:
What the store pointer does when th
- Page 235 and 236:
Calc Angle 3D (v1.3) Given a pair o
- Page 237 and 238:
Calc MBT Converts a measure, beat a
- Page 239 and 240:
• function: determines the action
- Page 241 and 242:
Output Property • output: Outputs
- Page 243 and 244:
• horz ctr: In tandem with vert c
- Page 245 and 246:
To help you understand what these v
- Page 247 and 248:
Properties • hue: The hue of the
- Page 249 and 250:
Comparator Compares two numbers. In
- Page 251 and 252:
Input Properties • video in: The
- Page 253 and 254:
would be 112. Since this would exce
- Page 255 and 256:
• X2: the horizontal coordinate o
- Page 257 and 258:
• replace: Replaces the data valu
- Page 259 and 260:
gradually decay to 0. The amount of
- Page 261 and 262:
Displace Offsets the pixels of a vi
- Page 263 and 264:
Input Properties • video in: the
- Page 265 and 266:
DV Device Control NOTE: MacOS X onl
- Page 267 and 268:
Isadora Manual xor and or Input Pro
- Page 269 and 270:
When this property is set to all an
- Page 271 and 272:
Explode (v1.1) “Explodes” a vid
- Page 273 and 274:
If you connect the output of the Di
- Page 275 and 276:
Eyes++ (v1.3) Tracks the position,
- Page 277 and 278:
constituent parts. This may or may
- Page 279 and 280:
Flip Flips a video stream horizonta
- Page 281 and 282:
highest integer, while round rounds
- Page 283 and 284:
Get Media Count Returns the number
- Page 285 and 286:
HID Value Listener Receives values
- Page 287 and 288:
HSL Adjust Manipulates the hue, sat
- Page 289 and 290:
• color: "When off, the color of
- Page 291 and 292:
Example output, with no input conne
- Page 293 and 294:
Jump++ Activates a new Scene after
- Page 295 and 296:
Input Properties • key range: Spe
- Page 297 and 298:
LanBox RGB Out (v1.1) Allows you to
- Page 299 and 300:
For example, let’s say we have tw
- Page 301 and 302:
Limit Resolution Scales the incomin
- Page 303 and 304:
Listener Receives a value from a Br
- Page 305 and 306:
sent to the compare input, the inde
- Page 307 and 308:
will see the background. The sharpn
- Page 309 and 310:
• Arc Sine = asin(x) • Arc Cosi
- Page 311 and 312:
The min in chan and max in chan inp
- Page 313 and 314:
Matrix Value Send Broadcasts one or
- Page 315 and 316:
• scale fg: When turned off, prev
- Page 317 and 318:
• dst horz size: Sets the vertica
- Page 319 and 320:
Media Time to Percent (v1.2) Conver
- Page 321 and 322:
• velocity mod: When set to 100,
- Page 323 and 324:
Minimum Outputs the current minimum
- Page 325 and 326:
• decay amt: How fast the output
- Page 327 and 328:
The portion of the sound that will
- Page 329 and 330:
Movie Player Direct Plays a movie d
- Page 331 and 332:
• pan: Controls the panning of th
- Page 333 and 334:
MTC Compare Allows you to trigger e
- Page 335 and 336:
MultiVid Makes multiple copies of t
- Page 337 and 338:
Note Off Watcher Watches for MIDI N
- Page 339 and 340:
Number To Text (v1.3) Converts a nu
- Page 341 and 342:
• address: The OSC address to whi
- Page 343 and 344:
Output Properties • rgb out: The
- Page 345 and 346:
Performance Monitor Performance Mon
- Page 347 and 348:
• preload: When triggered, preloa
- Page 349 and 350:
Point Tracker (v1.1) Generates a ve
- Page 351 and 352:
Properties • trigger: When a trig
- Page 353 and 354:
Program Change Watcher Watches for
- Page 355 and 356:
• keep aspect: When turned on, th
- Page 357 and 358:
Random Generates random numbers. In
- Page 359 and 360:
• force 4:3: When this parameter
- Page 361 and 362:
Scaler (v1.1) Scales a video stream
- Page 363 and 364:
Selector Routes multiple inputs of
- Page 365 and 366:
Send HiRes Control Sends a MIDI Hig
- Page 367 and 368:
• cue list: The cue list for the
- Page 369 and 370:
norm: The parameter value ranges be
- Page 371 and 372:
Send Poly Pressure Sends a MIDI Pol
- Page 373 and 374:
• param 1, param 2, etc: variable
- Page 375 and 376:
You can insert up to nine variable
- Page 377 and 378:
• eom char: The character that si
- Page 379 and 380:
• rotation: When the shape input
- Page 381 and 382:
Slit Scan Scrolls one line or colum
- Page 383 and 384:
these parameters, the watcher will
- Page 385 and 386:
• right trig level: Whenever the
- Page 387 and 388:
total output range is 24 Khz (half
- Page 389 and 390:
method of playing long sounds is to
- Page 391 and 392:
• sound high: The last sound in a
- Page 393 and 394:
• volume: The volume of the voice
- Page 395 and 396:
Output Properties • video out: Th
- Page 397 and 398:
Stage Mouse Watcher (v1.3) Outputs
- Page 399 and 400:
String Formatter (v1.2) This actor
- Page 401 and 402:
TCP In Watcher - Binary Reads a fix
- Page 403 and 404:
TCP Send Data Formats and sends dat
- Page 405 and 406:
Text (v1.3) Outputs text of arbitra
- Page 407 and 408:
. descenders (like the letter “j
- Page 409 and 410:
Text/ure Superimposes text on a vid
- Page 411 and 412:
The Edge Performs “edge detection
- Page 413 and 414:
Timer Measures elapsed time. Input
- Page 415 and 416:
Input Properties • trig in: The i
- Page 417 and 418:
Update Snapshot Updates an existing
- Page 419 and 420:
Video Delay Delays a video stream.
- Page 421 and 422:
Video Inverter Inverts the color of
- Page 423 and 424:
Video Preload Preloads a video or r
- Page 425 and 426:
Input Properties • video in: The
- Page 427 and 428:
Zoomer Zooms in or out on source vi
- Page 429 and 430:
Controls Reference 2D Slider Displa
- Page 431 and 432:
Background Draws a solid background
- Page 433 and 434:
Bin Picker Picks media files groupe
- Page 435 and 436:
• Show Name: If this checkbox is
- Page 437 and 438:
• Show Value of Linked Properties
- Page 439 and 440:
• Horiz. Alignment: The horizonta
- Page 441 and 442:
• Color: Sets color of the dial.
- Page 443 and 444:
Monitor Provides monitoring of vide
- Page 445 and 446:
• Minimum Value: The minimum poss
- Page 447 and 448:
Settings Dialog Control Properties
- Page 449 and 450:
Stage Preview Displays a thumbnail
- Page 451 and 452:
Video Picker Allows the user to pic
- Page 453:
• Bold/Italic/Underline: When che