

Gift to
Ii Gift to - Free and Open Source Software
Ii Gift to - Free and Open Source Software
- No tags were found...

Create successful ePaper yourself
Turn your PDF publications into a flip-book with our unique Google optimized e-Paper software.
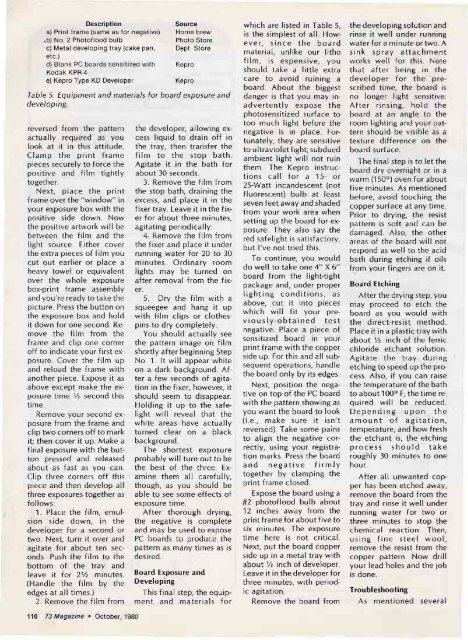
Description<br />
a) Print frame (same as for nega tive)<br />
.b) NO. 2 Pho<strong>to</strong>flood bulb<br />
c) Metal developing tray (cake pan,<br />
etc.)<br />
d) Blank PC boards sensitized with<br />
Kodak KPR·4<br />
e) Kepro Type KD Developer<br />
Tab le 5. Equipment and materials for board expos ure and<br />
develop ing.<br />
rever sed from the pattern<br />
actua ll y required as you<br />
look at it in this attitude.<br />
Clamp th e print fr am e<br />
pieces securely <strong>to</strong> fo rce the<br />
positive and f ilm ti ghtly<br />
<strong>to</strong>gether.<br />
Next . pla ce the pr int<br />
fram e over the "w indow" in<br />
your exposure box with the<br />
positi ve side do wn . N ow<br />
the positi ve artw ork w ill be<br />
between th e fi Im and the<br />
li ght source. Either cover<br />
the ext ra pieces of f ilm you<br />
cut ou t earl ier or place a<br />
heavy <strong>to</strong> we l or equi valent<br />
over the whole exposure<br />
bo x-print fr ame assembly<br />
and yo u' re ready <strong>to</strong> take the<br />
picture . Press the butt on on<br />
the exposure box and ho ld<br />
it down for one seco nd. Remove<br />
the fi lm fr om the<br />
fra me and cli p one corner<br />
off <strong>to</strong> indicate yo ur f irst expo<br />
sure. Cov er t he fi lm up<br />
and reload the f ram e with<br />
another piece. Expose it as<br />
above exce pt mak e the exposure<br />
time Vl secon d this<br />
time.<br />
Remove you r second exposure<br />
from the frame and<br />
cl ip two co rners off <strong>to</strong> mark<br />
it; then cove r it up. Make a<br />
fin al exposure w it h the but<strong>to</strong>n<br />
pressed and released<br />
abou t as fast as you can.<br />
Cl ip three corners off thi s<br />
pie ce and t hen devel op all<br />
three exposures <strong>to</strong>gether as<br />
follows:<br />
1. Place the film, emulsio<br />
n side dow n, in the<br />
devel oper for a second or<br />
two. Next, turn it over and<br />
agit at e for about ten seconds.<br />
Push the fi lm <strong>to</strong> the<br />
bot<strong>to</strong>m of th e tr ay and<br />
leave it for 21;2 minu tes.<br />
(Hand le t he fil m by the<br />
edges at all times.)<br />
2. Remove t he film from<br />
110 73 Magazine· Oct ober, 1980<br />
Source<br />
Home brew<br />
Pho<strong>to</strong> S<strong>to</strong>re<br />
Dept. S<strong>to</strong>re<br />
Kepro<br />
Kepro<br />
the developer. all ow ing excess<br />
li quid <strong>to</strong> dr ain off in<br />
the tr ay, then transfer t he<br />
fi lm <strong>to</strong> the s<strong>to</strong>p ba th.<br />
Agitate it in th e bath for<br />
about 30 seconds.<br />
3. Remove th e f ilm fr om<br />
the s<strong>to</strong>p bath, draining the<br />
excess, and place it in the<br />
fixe r tray. Leave it in the fixer<br />
for abo ut three minutes,<br />
agitat ing period ically.<br />
4. Remove th e f il m fr om<br />
the f ixer and pl ace it under<br />
runni ng water for 20 <strong>to</strong> 30<br />
minutes. Ordin ary room<br />
lights may be turned on<br />
after removal fr om th e f ixer.<br />
5. Dry the f ilm wi th a<br />
squeegee and hang it up<br />
w it h film cl ips or clothespi<br />
ns <strong>to</strong> dry complet ely.<br />
You should actuall y see<br />
the pattern ima ge on film<br />
shor tly af ter beginnin g Step<br />
No . 1. It w ill appear w hite<br />
on a dark backg rou nd. After<br />
a few seconds of agitation<br />
in the f ixer, howeve r, it<br />
should seem <strong>to</strong> di sappear.<br />
Holding it up <strong>to</strong> the safelig<br />
ht wi ll revea l that t he<br />
white areas have act ually<br />
turned cle ar on a b lack<br />
bac kground.<br />
The shortest exposure<br />
probabl y wi ll turn out <strong>to</strong> be<br />
the best of the three. Examine<br />
them all caref ully,<br />
thou gh, as you should be<br />
able <strong>to</strong> see some effects of<br />
exposure time.<br />
After th orough dr ying,<br />
the negative is complete<br />
and m ay be used <strong>to</strong> expose<br />
PC bo ards <strong>to</strong> produce the<br />
pattern as ma ny times as is<br />
desired .<br />
Board Exposure and<br />
Developing<br />
This fi nal step, the equ ipme<br />
nt and mate rial s for<br />
wh ich are li sted in Table 5,<br />
is the simplest of all. However,<br />
si nce th e bo a rd<br />
m aterial , unlike ou r li th o<br />
fil m, is ex pensive, yo u<br />
should take a little extra<br />
care <strong>to</strong> avoid ruin ing a<br />
board . Ab ou t th e bigge st<br />
danger is that you may inadverte<br />
ntly expose the<br />
pho<strong>to</strong>sensitized surface <strong>to</strong><br />
<strong>to</strong>o much light before the<br />
negative is in place. Fortun<br />
ately , they are sensitive<br />
<strong>to</strong> ult ravi olet light; sub dued<br />
ambient li ght will no t ruin<br />
them . The Kepro instructi<br />
on s call f or a 15- or<br />
25-Wa tt incand escent (not<br />
fluorescent ) bulb at least<br />
seven feet away and shaded<br />
from your wo rk area when<br />
setting up the bo ard for expo<br />
sure. They also say the<br />
red safelight is sat isfac<strong>to</strong>ry,<br />
but I've not tried thi s.<br />
To conti nue, you wou ld<br />
do wel l <strong>to</strong> ta ke on e 4" X 6"<br />
boa rd fr om the light-t ight<br />
package and, under proper<br />
ligh t ing c o n d it io n s, as<br />
above , cut it in<strong>to</strong> pieces<br />
w hi ch w ill fi t your pr e<br />
v io us ly- ob ta i ned test<br />
negative. Place a piece of<br />
sensitized board in your<br />
print frame w it h the copper<br />
side up. For t his and all subsequent<br />
opera tions, handl e<br />
t he board on ly by its edges.<br />
Nex t, position the negati<br />
ve on <strong>to</strong>p of th e PC boa rd<br />
w ith the pattern show ing as<br />
yo u want the board <strong>to</strong> look<br />
(i.e., mak e sure it isn't<br />
reversed). Take some pa ins<br />
<strong>to</strong> align the negat ive correctly,<br />
using your reg ist rati<br />
on marks. Press the board<br />
and n eg a t i v e f i r m l y<br />
<strong>to</strong>gether by cl ampin g th e<br />
print fr ame closed.<br />
Expo se th e bo ard using a<br />
#2 pho<strong>to</strong>flood bulb about<br />
12 inches away f rom the<br />
print fram e for about five <strong>to</strong><br />
six mi nute s. The exposure<br />
tim e here is not critical.<br />
Next, pu t th e board copper<br />
side up in a metal tray w ith<br />
abo ut y, inch of developer.<br />
Leave it in the developer for<br />
three minutes, with pe riodic<br />
agitation.<br />
Rem ove t he board from<br />
the developi ng solution and<br />
rinse it well under running<br />
wa ter for a mi nute or two. A<br />
sink sp ray attac hmen t<br />
works we ll for this . Not e<br />
th at after being in t he<br />
dev elo per f o r the prescribed<br />
time, the bo ard is<br />
no longer light sensitive.<br />
After rin si ng , ho ld t he<br />
boa rd at an angle <strong>to</strong> the<br />
room lighting and your pattern<br />
sho uld be visible as a<br />
texture difference on the<br />
board surface.<br />
The final step is <strong>to</strong> let the<br />
boa rd dry ove rnig ht or in a<br />
warm (150°) ov en for abo ut<br />
five minutes. As me ntio ned<br />
before, avoid <strong>to</strong>uching the<br />
copper surface at any tim e.<br />
Prior <strong>to</strong> drying, the resist<br />
pa ttern is soft and can be<br />
damage d. A lso, the other<br />
areas of the board wi ll not<br />
respond as well <strong>to</strong> t he acid<br />
bath during etching if oi ls<br />
fr,om your fingers are on it.<br />
Board Etching<br />
After the drying step, yo u<br />
may proce ed <strong>to</strong> etc h the<br />
boa rd as you wo ul d with<br />
t he di rect-resist method.<br />
Place it in a pl astic tr ay wi th<br />
about y, inch of the fe rric<br />
chlor ide et chant solution.<br />
Agita te th e t ra y during<br />
etchi ng <strong>to</strong> speed up the process.<br />
Also, if you can raise<br />
the temperature of t he bath<br />
<strong>to</strong> about 100° F, t he time req<br />
uired will be reduced.<br />
D ep e n d in g upon t h e<br />
a moun t of ag ita t io n,<br />
temp era ture, and how fresh<br />
the etc hant is, t he etching<br />
pro c e ss shou l d tak e<br />
roughly 30 minutes <strong>to</strong> one<br />
ho ur.<br />
After all unwanted copper<br />
has been etc hed away,<br />
remove the bo ard fr om the<br />
tray and rinse it we ll under<br />
runni ng water for tw o or<br />
three mi nutes <strong>to</strong> s<strong>to</strong>p the<br />
chem ica l reaction . Then,<br />
using fine stee l w o ol ,<br />
rem ove the resist from the<br />
copper pattern. Now drill<br />
your lead holes and th e job<br />
is done.<br />
Troubleshoo ting<br />
A s mentio ned seve ra l


