

Maximum_PC_June_2017

You also want an ePaper? Increase the reach of your titles
YUMPU automatically turns print PDFs into web optimized ePapers that Google loves.
R&D<br />
Secure Logins with<br />
Google Authenticator<br />
you’ll need this<br />
Linux pC<br />
The system you want to secure<br />
must be running Ubuntu Linux.<br />
andrOid phOne<br />
Your smartphone needs to have<br />
the Google Authenticator app.<br />
In thIs age of multI-core processors and easy-to-use password-cracking tools,<br />
locking access to your computer (and all the data it holds) with a password alone simply<br />
doesn’t cut the mustard anymore. If you’re really concerned about unauthorized access to<br />
your computer, you should definitely add an additional layer of authentication. One of the<br />
easiest mechanisms with which to implement such a two-step verification is the Google<br />
Authenticator service, which issues a time-based authentication token to supplement the existing<br />
password challenge.<br />
Once you’ve integrated the service with your Ubuntu login, in addition to your user password,<br />
you’ll be prompted for one of the quickly expiring tokens before being allowed to log in. Google<br />
Authenticator generates these OTPs (one-time passwords) on your Android device once it’s been<br />
configured for every user on your Ubuntu machine. –mayank sharma<br />
1<br />
Open sesame<br />
To implement multi-factor authentication, you need the Google<br />
Authenticator PAM (pluggable authentication module). A PAM<br />
is a mechanism used to plug different forms of authentication into<br />
a Linux computer.<br />
>> The Google Authenticator PAM module is available in the<br />
official Ubuntu software repositories. To install the package on<br />
Ubuntu, head to the Terminal and type:<br />
$ sudo apt-get install libpam-google-authenticator<br />
>> Once the package has been installed, make sure you’re logged<br />
in as the user you want to protect with the two-factor authentication.<br />
Now, in the Terminal window, type:<br />
$ google-authenticator<br />
>> This initiates the process of creating a secret key for the user<br />
by asking a bunch of questions. While it’s safe to answer yes to them<br />
all, it’s a good idea to understand each one before making your final<br />
choice, as these choices help balance security with ease of use. The<br />
first question is pretty safe, and you should allow the command to<br />
update your Google Authenticator file by answering yes.<br />
>> You’re then asked whether you would like to restrict the<br />
use of a token, which forces you to wait for 30 seconds between<br />
A<br />
logins. While it might seem a little inconvenient at first, you<br />
should agree to this limitation for maximum protection.<br />
The next question asks for permission to increase the time<br />
window that tokens can be used for from the default 1:30<br />
minutes to 4:00 minutes. Although you can answer yes to<br />
this question to avoid any issues, type “no” for maximum<br />
security. If you notice any issues later on, rerun the<br />
command, and increase the expiration time as suggested.<br />
The fourth and final question asks you to limit the number<br />
of attempts for entering the authentication code. You<br />
should definitely enable this option, because it helps<br />
prevent brute-force login attacks.<br />
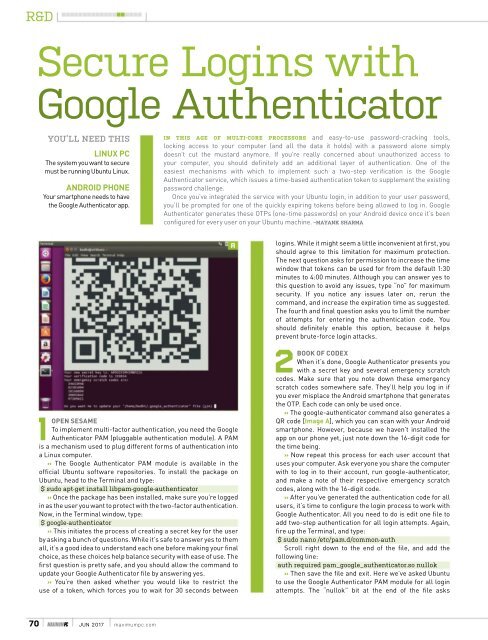
2BOOk Of COdex<br />
When it’s done, Google Authenticator presents you<br />
with a secret key and several emergency scratch<br />
codes. Make sure that you note down these emergency<br />
scratch codes somewhere safe. They’ll help you log in if<br />
you ever misplace the Android smartphone that generates<br />
the OTP. Each code can only be used once.<br />
>> The google-authenticator command also generates a<br />
QR code [image a], which you can scan with your Android<br />
smartphone. However, because we haven’t installed the<br />
app on our phone yet, just note down the 16-digit code for<br />
the time being.<br />
>> Now repeat this process for each user account that<br />
uses your computer. Ask everyone you share the computer<br />
with to log in to their account, run google-authenticator,<br />
and make a note of their respective emergency scratch<br />
codes, along with the 16-digit code.<br />
>> After you’ve generated the authentication code for all<br />
users, it’s time to configure the login process to work with<br />
Google Authenticator. All you need to do is edit one file to<br />
add two-step authentication for all login attempts. Again,<br />
fire up the Terminal, and type:<br />
$ sudo nano /etc/pam.d/common-auth<br />
Scroll right down to the end of the file, and add the<br />
following line:<br />
auth required pam_google_authenticator.so nullok<br />
>> Then save the file and exit. Here we’ve asked Ubuntu<br />
to use the Google Authenticator PAM module for all login<br />
attempts. The “nullok” bit at the end of the file asks<br />
70 MAXIMUM<strong>PC</strong> jun <strong>2017</strong> maximumpc.com


