gPROMS ModelBuilder version 2.3.1
gPROMS ModelBuilder version 2.3.1
gPROMS ModelBuilder version 2.3.1

Create successful ePaper yourself
Turn your PDF publications into a flip-book with our unique Google optimized e-Paper software.
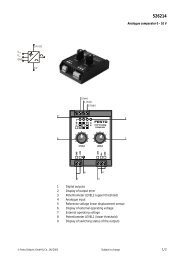
4.2 Interface tab<br />
27<br />
Interface tab<br />
The Interface tab (Figure 4.1) allows a user to define a public view of the Model: in particular it determines how the<br />
Model appears when used on the Topology tab of a composite model. Primarily, the interface is used to determine<br />
two characteristics: the Model icon and the Model Ports.<br />
4.2.1 Icon definition<br />
Position of the Ports in<br />
the icon<br />
Figure 4.1 The Model Interface tab<br />
Icon<br />
Ports<br />
An icon should first be created in an external graphical package and then imported into <strong>gPROMS</strong> 12 . To do this:<br />
click on the “Select icon” button,<br />
browse to the location of the icon file using popup dialog window, and<br />
select the file containing the icon<br />
The current icon is always displayed in the “Interface” window. The user can also select the size of the icon, to do<br />
this:<br />
click on the field next to the label “Icon size when added to the topology diagrams”,<br />
select the suitable option in the drop-down list<br />
12 Note: the icon files must be GIF, JPEG or PNG formats