

fiesta

You also want an ePaper? Increase the reach of your titles
YUMPU automatically turns print PDFs into web optimized ePapers that Google loves.
Wheels and tyres<br />
WARNING<br />
Have the wheel nuts checked<br />
for tightness and the tyre<br />
pressure checked as soon as<br />
possible.<br />
TYRE REPAIR KIT<br />
E90922<br />
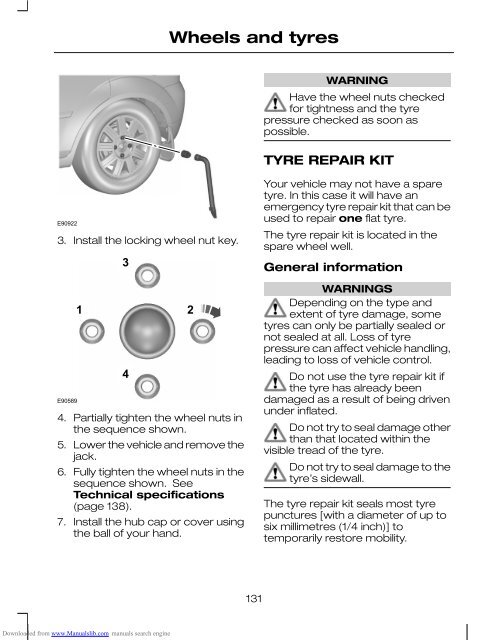
3. Install the locking wheel nut key.<br />
E90589<br />
3<br />
1 2<br />
4<br />
4. Partially tighten the wheel nuts in<br />
the sequence shown.<br />
5. Lower the vehicle and remove the<br />
jack.<br />
6. Fully tighten the wheel nuts in the<br />
sequence shown. See<br />
Technical specifications<br />
(page 138).<br />
7. Install the hub cap or cover using<br />
the ball of your hand.<br />
Your vehicle may not have a spare<br />
tyre. In this case it will have an<br />
emergency tyre repair kit that can be<br />
used to repair one flat tyre.<br />
The tyre repair kit is located in the<br />
spare wheel well.<br />
General information<br />
WARNINGS<br />
Depending on the type and<br />
extent of tyre damage, some<br />
tyres can only be partially sealed or<br />
not sealed at all. Loss of tyre<br />
pressure can affect vehicle handling,<br />
leading to loss of vehicle control.<br />
Do not use the tyre repair kit if<br />
the tyre has already been<br />
damaged as a result of being driven<br />
under inflated.<br />
Do not try to seal damage other<br />
than that located within the<br />
visible tread of the tyre.<br />
Do not try to seal damage to the<br />
tyre’s sidewall.<br />
The tyre repair kit seals most tyre<br />
punctures [with a diameter of up to<br />
six millimetres (1/4 inch)] to<br />
temporarily restore mobility.<br />
131<br />
Downloaded from www.Manualslib.com manuals search engine