
You also want an ePaper? Increase the reach of your titles
YUMPU automatically turns print PDFs into web optimized ePapers that Google loves.
Form Factor w Micro ATX Form Factor; 24.4cm x 21.0cm<br />
(Note 1) Due to Windows 32-bit operating system limitation, when more than 4 GB of physical memory is<br />
installed, the actual memory size displayed will be less than 4 GB.<br />
(Note 2) Whether the CPU fan speed control function is supported will depend on the CPU cooler you install.<br />
(Note 3) Available functions in EasyTune may differ by motherboard model.<br />
(Note 4) Due to the hardware limitation, you must install the Intel ® Core TM 2 Extreme/Core TM 2 Quad/Core TM 2 Duo/<br />
Pentium Dual-Core/Celeron Dual-Core/Celeron 400 Series CPU to enable support for Easy Energy Saver.<br />
1-3 Installing the CPU and CPU Cooler<br />
Read the following guidelines before you begin to install the CPU:<br />
• Make sure that the motherboard supports the CPU.<br />
(Go to GI<strong>GA</strong>BYTE's website for the latest CPU support list.)<br />
• Always turn off the computer and unplug the power cord from the power outlet before installing<br />
the CPU to prevent hardware damage.<br />
• Locate the pin one of the CPU. The CPU cannot be inserted if oriented incorrectly. (Or you may<br />
locate the notches on both sides of the CPU and alignment keys on the CPU socket.)<br />
• Apply an even and thin layer of thermal grease on the surface of the CPU.<br />
• Do not turn on the computer if the CPU cooler is not installed, otherwise overheating and damage<br />
of the CPU may occur.<br />
• Set the CPU host frequency in accordance with the CPU specifications. It is not recommended<br />
that the system bus frequency be set beyond hardware specifications since it does not meet the<br />
standard requirements for the peripherals. If you wish to set the frequency beyond the standard<br />
specifications, please do so according to your hardware specifications including the CPU, graphics<br />
card, memory, hard drive, etc.<br />
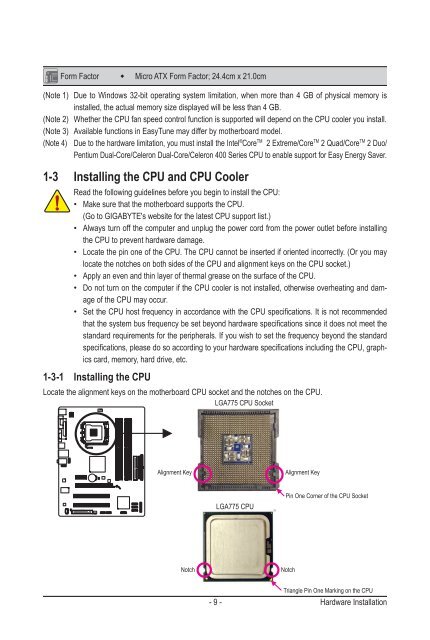
1-3-1 Installing the CPU<br />
Locate the alignment keys on the motherboard CPU socket and the notches on the CPU.<br />
L<strong>GA</strong>775 CPU Socket<br />
Alignment Key<br />
L<strong>GA</strong>775 CPU<br />
Notch Notch<br />
Alignment Key<br />
Pin One Corner of the CPU Socket<br />
Triangle Pin One Marking on the CPU<br />
- 9 - Hardware Installation