- Page 1:
ibm.com/redbooks Front cover SAN Bo
- Page 4 and 5:
Note: Before using this information
- Page 6 and 7:
2.8.4 Creating a host on DS5000 ser
- Page 8 and 9:
4.9.2 Activating and installing the
- Page 10 and 11:
viii SAN Boot Implementation and Be
- Page 12 and 13:
Trademarks IBM, the IBM logo, and i
- Page 14 and 15:
Scott Dybas is a Senior Software En
- Page 16 and 17:
xiv SAN Boot Implementation and Bes
- Page 18 and 19:
1.1 What SAN Boot is SAN Boot is a
- Page 20 and 21:
IBM System Storage devices use pers
- Page 22 and 23:
1.5 What switch zoning is Zoning is
- Page 24 and 25:
1.6.3 iSCSI HBA A storage unit is a
- Page 26 and 27:
Using software initiators offers th
- Page 28 and 29:
1.7.1 Basic concepts Multiple LUNs
- Page 30 and 31:
5. Boot into the host server system
- Page 32 and 33:
Concepts Thin provisioning provides
- Page 34 and 35:
1.8.2 Data protection and retention
- Page 36 and 37:
20 SAN Boot Implementation and Best
- Page 38 and 39:
2.1 DS5000 overview The DS5000 seri
- Page 40 and 41:
► Controller-based software: - St
- Page 42 and 43:
4. Select Do not Automatically Star
- Page 44 and 45:
8. As shown in Figure 2-7, enter th
- Page 46 and 47:
3. Select Planar SAS from the next
- Page 48 and 49:
2. Select System Settings from the
- Page 50 and 51:
3. Select Configuration Settings as
- Page 52 and 53:
Figure 2-20 Scan for Fibre Devices
- Page 54 and 55:
3. Select Selectable Boot Settings
- Page 56 and 57:
7. Verify that all the information
- Page 58 and 59:
2. We need to add the second storag
- Page 60 and 61:
4. Now enter 1 and press Enter as s
- Page 62 and 63:
8. Next we see the storage subsyste
- Page 64 and 65:
3. On the next panel, enter 01 and
- Page 66 and 67:
2.7.2 Adding a second path to the E
- Page 68 and 69:
2. When you click your storage subs
- Page 70 and 71:
4. Next we select the RAID level, p
- Page 72 and 73:
Figure 2-54 Creating the logical dr
- Page 74 and 75:
6. After the logical drive is creat
- Page 76 and 77:
4. We must now define the host port
- Page 78 and 79:
7. You are asked if this host will
- Page 80 and 81:
Figure 2-69 Assigning the LUN to th
- Page 82 and 83:
2. You can see a window, Manage Hos
- Page 84 and 85:
5. Now that you have the second pat
- Page 86 and 87:
2. To execute a script on the stora
- Page 88 and 89:
5. When the script completes, the r
- Page 90 and 91:
2. If the driver is found, it will
- Page 92 and 93:
Tip: The rest of the installation p
- Page 94 and 95:
2.9.4 Windows 2008 R2 SP1 Multipath
- Page 96 and 97:
5. We can also check the volume inf
- Page 98 and 99:
2.10.1 Installation steps We are go
- Page 100 and 101:
4. After clicking Hard Disks, we cl
- Page 102 and 103:
10.We now need to update the SUSE L
- Page 104 and 105:
13.When we are in the Boot Loader D
- Page 106 and 107:
We are going to install RHEL 5.5 se
- Page 108 and 109:
Figure 2-112 Customizing the Softwa
- Page 110 and 111:
Tip: Note the name of the new mpp i
- Page 112 and 113:
Tip: Make sure that you reboot the
- Page 114 and 115:
2.12 FC SAN Boot implementation for
- Page 116 and 117:
5. Confirm the ESXi installation by
- Page 118 and 119:
3. Verify drive size and click the
- Page 120 and 121:
You can find more information about
- Page 122 and 123:
5. Clean up the alternate disk volu
- Page 124 and 125:
d. Select Activate. The Activate Pa
- Page 126 and 127:
Example 2-13 Checking Storage WWPN
- Page 128 and 129:
NIM preparations We assume that the
- Page 130 and 131:
12.Be sure that the partition alrea
- Page 132 and 133:
The output of this comman, as shown
- Page 134 and 135:
4. Select your AIX version. The Fix
- Page 136 and 137:
3.1 DS8000 overview This section in
- Page 138 and 139:
Figure 3-1 IBM System Storage DS880
- Page 140 and 141:
Figure 3-3 DS8800 base frame with t
- Page 142 and 143:
3.2.3 DS command line interface for
- Page 144 and 145:
Select the DS8000 Subsystem and lau
- Page 146 and 147:
3.3.1 Fibre Channel architecture Fi
- Page 148 and 149:
3.4.2 Downloading and installing a
- Page 150 and 151:
3.4.3 BIOS configuration The first
- Page 152 and 153:
5. Select Configuration Settings, a
- Page 154 and 155:
6. From the Configuration Settings
- Page 156 and 157:
11.Change Selectable Boot Settings
- Page 158 and 159:
17.During POST, you see QLogic repo
- Page 160 and 161:
5. Press Ctrl-E or Alt-E to access
- Page 162 and 163:
Figure 3-31 shows the option to ena
- Page 164 and 165:
13.A new panel will ask you to sele
- Page 166 and 167:
Figure 3-39 Select DVD to install O
- Page 168 and 169:
Logical subsystem A logical subsyst
- Page 170 and 171:
3. Create the Volume Group to recei
- Page 172 and 173:
4. Start your machine and check if
- Page 174 and 175:
Figure 3-49 Installing Windows 2008
- Page 176 and 177:
e. After rebooting the server, chec
- Page 178 and 179:
Redundancy: Avoiding a single point
- Page 180 and 181:
12.Choose the Server Base Scenario
- Page 182 and 183:
14.Click Partitioning and then Cust
- Page 184 and 185:
Figure 3-62 Creating root partition
- Page 186 and 187:
19.Click the Install button to init
- Page 188 and 189:
3. Edit the /etc/sysconfig/kernel,
- Page 190 and 191:
8. Choose the language and click OK
- Page 192 and 193:
17.Decide if you want to include ad
- Page 194 and 195:
21.After finishing the Red Hat inst
- Page 196 and 197:
INITRD_MODULES="processor thermal a
- Page 198 and 199:
Implementation possibilities Implem
- Page 200 and 201:
5. Clean up the alternate disk volu
- Page 202 and 203:
Activating and installing the parti
- Page 204 and 205:
2 hdisk17 ...-W50050768014052D1-LA0
- Page 206 and 207:
► The NIM server is properly conf
- Page 208 and 209:
12.Be sure that the partition alrea
- Page 210 and 211:
Example 3-17 mpio_get_config -Av ou
- Page 212 and 213:
5. Check the configuration as shown
- Page 214 and 215: 11.Confirm the Install options by p
- Page 216 and 217: 16.To check the multipaths and the
- Page 218 and 219: Tip: For /var/log, a separate parti
- Page 220 and 221: 4.1 Overview The XIV Storage System
- Page 222 and 223: 4.2.2 Host FC HBA configuration For
- Page 224 and 225: 5. The Adapter Settings menu is dis
- Page 226 and 227: 11.Select the boot LUN (in our case
- Page 228 and 229: Figure 4-12 Emulex configuration pa
- Page 230 and 231: 7. After the BIOS has been enabled,
- Page 232 and 233: 12.After the Boot Entry confirmatio
- Page 234 and 235: However, as seen in Figure 4-23, it
- Page 236 and 237: Zoning guidelines There are many fa
- Page 238 and 239: Important: For the host system to e
- Page 240 and 241: If a new volume is to be created, E
- Page 242 and 243: 4.4.4 Assigning an XIV Volume to an
- Page 244 and 245: To perform the same operation from
- Page 246 and 247: Attention: For the installation of
- Page 248 and 249: 2. After xpyv is installed, the XIV
- Page 250 and 251: At this point, your Windows host sh
- Page 252 and 253: Figure 4-45 VMware VSphere client:
- Page 254 and 255: For additional XIV considerations,
- Page 256 and 257: Figure 4-49 illustrates the “Prep
- Page 258 and 259: The tool asks for confirmation and
- Page 260 and 261: After the Expert Partitioner panel
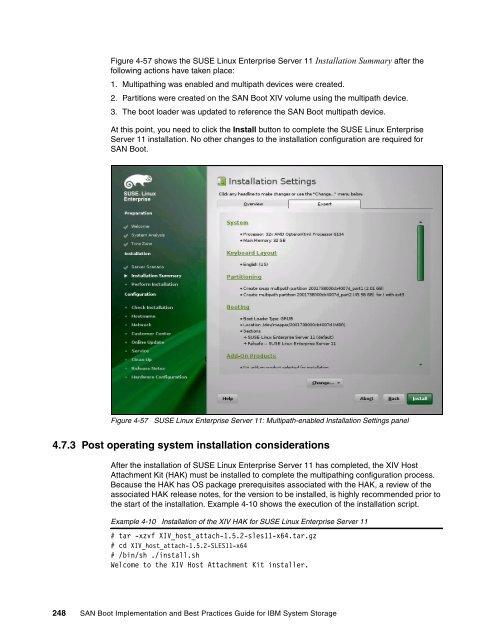
- Page 262 and 263: Figure 4-55 displays the default Bo
- Page 266 and 267: Press [ENTER] to proceed. Would you
- Page 268 and 269: Figure 4-59 illustrates how the mul
- Page 270 and 271: Figure 4-61 illustrates the boot lo
- Page 272 and 273: Optional OS packages (iSCSI support
- Page 274 and 275: 4.9 Installation of AIX 6.1 for SAN
- Page 276 and 277: ii. By typing 77 two times, you can
- Page 278 and 279: 4.9.3 Post operating system install
- Page 280 and 281: The following sections outline some
- Page 282 and 283: Example 4-25 shows the output when
- Page 284 and 285: Figure 4-67 MPIO Policy - Round Rob
- Page 286 and 287: 270 SAN Boot Implementation and Bes
- Page 288 and 289: 5.1 What storage virtualization is
- Page 290 and 291: SAN Volume Controller offers these
- Page 292 and 293: SAN Volume Controller 2145-8A4 Stor
- Page 294 and 295: Enclosures with 24 slots for 2.5-in
- Page 296 and 297: Figure 5-8 shows the recommended ca
- Page 298 and 299: To log in to an IBM SAN Volume Cont
- Page 300 and 301: The functions used in the SAN Boot
- Page 302 and 303: 5.3.1 Considerations before setting
- Page 304 and 305: ► Host zone: Create a host zone f
- Page 306 and 307: Attention: To create a system (clus
- Page 308 and 309: Cluster characteristics: ► In SAN
- Page 310 and 311: IBM Storwize V7000 RAID configurati
- Page 312 and 313: Figure 5-16 Available MDisks Tip: A
- Page 314 and 315:
After creating storage pools, the f
- Page 316 and 317:
Creating a generic volume We choose
- Page 318 and 319:
5.4.6 Creating Fiber Channel hosts
- Page 320 and 321:
Figure 5-27 Select host-port The dr
- Page 322 and 323:
5.4.7 Mapping SAN Boot volume to th
- Page 324 and 325:
3. Add the desired WWPN to the righ
- Page 326 and 327:
Figure 5-38 Node connectivity Verif
- Page 328 and 329:
5.5 Host configuration In this sect
- Page 330 and 331:
4. Select Configuration Settings, a
- Page 332 and 333:
Figure 5-47 Scan Fibre Devices Tip:
- Page 334 and 335:
9. Change Selectable Boot Settings
- Page 336 and 337:
During POST, you can see QLogic rep
- Page 338 and 339:
2. Select the adapter that you want
- Page 340 and 341:
5.5.4 Configuring an Emulex adapter
- Page 342 and 343:
Figure 5-66 Scan Fibre Devices Tip:
- Page 344 and 345:
12.During post, after Emulex banner
- Page 346 and 347:
Tip: Before setting up SAN Boot for
- Page 348 and 349:
7. Browse to the source (media) of
- Page 350 and 351:
5.7.1 Multipath I/O Figure 5-77 Ins
- Page 352 and 353:
4. After the setup completes, you a
- Page 354 and 355:
► You can also verify that SDDDSM
- Page 356 and 357:
Perform the following steps to migr
- Page 358 and 359:
3. Select the Remote volume (2145 f
- Page 360 and 361:
Figure 5-91 vSphere Login To manage
- Page 362 and 363:
3. You can verify the multipathing
- Page 364 and 365:
5.9.1 SAN Boot using SUSE Linux Ent
- Page 366 and 367:
6. Set the clock and time zone. Nex
- Page 368 and 369:
8. Click the Partitioning link to c
- Page 370 and 371:
10.You see a confirmation dialogue
- Page 372 and 373:
14.Change the Boot loader to reflec
- Page 374 and 375:
16.Click Ok. Now the installer will
- Page 376 and 377:
5. Click Next to proceed with the i
- Page 378 and 379:
The next window displays additional
- Page 380 and 381:
8. Select Review and modify partiti
- Page 382 and 383:
10.Select TimeZone and click Next.
- Page 384 and 385:
12.Click Next to start the installa
- Page 386 and 387:
14.The server will boot off of the
- Page 388 and 389:
Example 5-3 multipathd command line
- Page 390 and 391:
5.10 SAN Boot for AIX You can SAN B
- Page 392 and 393:
8. Select 2 for IPL Configuration M
- Page 394 and 395:
12.After the correct IP parameters
- Page 396 and 397:
16.Select 2 for Normal Mode Boot, a
- Page 398 and 399:
10.Press 5 key to Select Boot Optio
- Page 400 and 401:
14.Proceed with Normal Boot, as sho
- Page 402 and 403:
3. Press 2 to Change/Show Installat
- Page 404 and 405:
7. If you do not see the disk that
- Page 406 and 407:
11.Press 1 to start the installatio
- Page 408 and 409:
5.10.5 SDDPCM 7. After the system f
- Page 410 and 411:
394 SAN Boot Implementation and Bes
- Page 412 and 413:
6.1 iSCSI overview The Internet Sma
- Page 414 and 415:
6.1.2 iSCSI target 6.1.3 Nodes 6.1.
- Page 416 and 417:
6.2 iSCSI and DS5000 storage subsys
- Page 418 and 419:
6.4 Step-by-step iSCSI SAN Boot imp
- Page 420 and 421:
3. Disable any onboard or internal
- Page 422 and 423:
3. From the Fast!UTIL Options windo
- Page 424 and 425:
Figure 6-10 Initiator IP Settings 6
- Page 426 and 427:
9. Change the Adapter Boot Mode to
- Page 428 and 429:
3. You are presented with a panel f
- Page 430 and 431:
6. You are presented with a confirm
- Page 432 and 433:
c. A wizard will guide you through
- Page 434 and 435:
2. Next, we create the host definit
- Page 436 and 437:
c. In the next window, we specify t
- Page 438 and 439:
Figure 6-30 Select Host type f. Fin
- Page 440 and 441:
. In the Define Additional Mapping
- Page 442 and 443:
2. From the Add Host Port Identifie
- Page 444 and 445:
3. From the Fast!UTIL Options windo
- Page 446 and 447:
6.5 Operating system installation A
- Page 448 and 449:
4. The next window displays additio
- Page 450 and 451:
Figure 6-47 Master Boot Record (MBR
- Page 452 and 453:
7. Follow the installation wizard u
- Page 454 and 455:
Figure 6-51 SUSE Linux Enterprise S
- Page 456 and 457:
5. The next panel displays the iSCS
- Page 458 and 459:
Figure 6-56 Installation Settings 8
- Page 460 and 461:
Example 6-1 multipathd command line
- Page 462 and 463:
Example 6-3 Output of multipath -ll
- Page 464 and 465:
6.5.5 Failover/failback verificatio
- Page 466 and 467:
multipath -ll output does not show
- Page 468 and 469:
Online resources Help from IBM Thes
- Page 470 and 471:
discovery order 202 Disk Mirroring
- Page 472 and 473:
M Maintenance menu 187 Manage Host
- Page 474 and 475:
Switched-fabric 8, 130 switches 286
- Page 476:
SAN Boot Implementation and Best Pr