5pm cst SATURDAYS (April 11 - June 30)
5pm cst SATURDAYS (April 11 - June 30)
5pm cst SATURDAYS (April 11 - June 30)

Create successful ePaper yourself
Turn your PDF publications into a flip-book with our unique Google optimized e-Paper software.
H108<br />
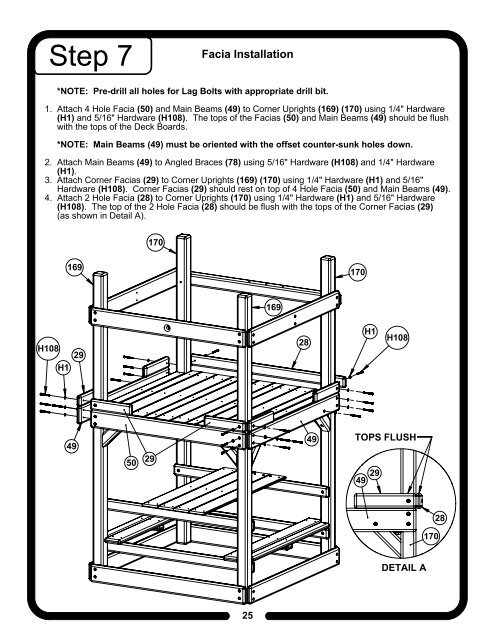
Step 7<br />
H1<br />
169<br />
49<br />
29<br />
50 29<br />
170<br />
Facia Installation<br />
*NOTE: Pre-drill all holes for Lag Bolts with appropriate drill bit.<br />
1. Attach 4 Hole Facia (50) and Main Beams (49) to Corner Uprights (169) (170) using 1/4" Hardware<br />
(H1) and 5/16" Hardware (H108). The tops of the Facias (50) and Main Beams (49) should be flush<br />
with the tops of the Deck Boards.<br />
*NOTE: Main Beams (49) must be oriented with the offset counter-sunk holes down.<br />
2. Attach Main Beams (49) to Angled Braces (78) using 5/16" Hardware (H108) and 1/4" Hardware<br />
(H1).<br />
3. Attach Corner Facias (29) to Corner Uprights (169) (170) using 1/4" Hardware (H1) and 5/16"<br />
Hardware (H108). Corner Facias (29) should rest on top of 4 Hole Facia (50) and Main Beams (49).<br />
4. Attach 2 Hole Facia (28) to Corner Uprights (170) using 1/4" Hardware (H1) and 5/16" Hardware<br />
(H108). The top of the 2 Hole Facia (28) should be flush with the tops of the Corner Facias (29)<br />
(as shown in Detail A).<br />
25<br />
169<br />
28<br />
49<br />
170<br />
49<br />
H1<br />
29<br />
H108<br />
TOPS FLUSH<br />
DETAIL A<br />
170<br />
28