5pm cst SATURDAYS (April 11 - June 30)
5pm cst SATURDAYS (April 11 - June 30)
5pm cst SATURDAYS (April 11 - June 30)

You also want an ePaper? Increase the reach of your titles
YUMPU automatically turns print PDFs into web optimized ePapers that Google loves.
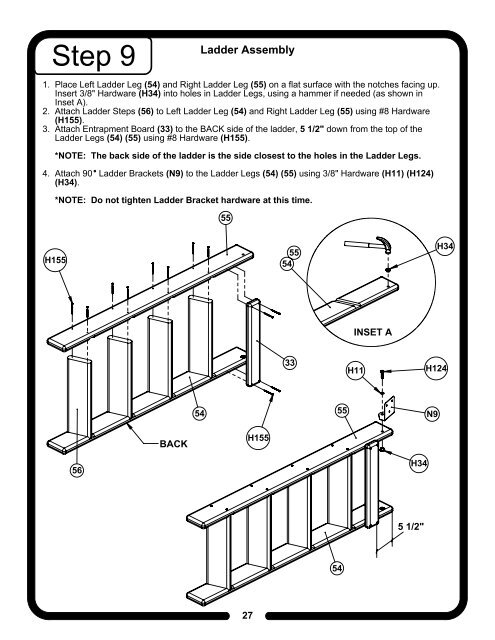
Step 9<br />
H155<br />
56<br />
BACK<br />
Ladder Assembly<br />
1. Place Left Ladder Leg (54) and Right Ladder Leg (55) on a flat surface with the notches facing up.<br />
Insert 3/8" Hardware (H34) into holes in Ladder Legs, using a hammer if needed (as shown in<br />
Inset A).<br />
2. Attach Ladder Steps (56) to Left Ladder Leg (54) and Right Ladder Leg (55) using #8 Hardware<br />
(H155).<br />
3. Attach Entrapment Board (33) to the BACK side of the ladder, 5 1/2" down from the top of the<br />
Ladder Legs (54) (55) using #8 Hardware (H155).<br />
*NOTE: The back side of the ladder is the side closest to the holes in the Ladder Legs.<br />
4. Attach 90 Ladder Brackets (N9) to the Ladder Legs (54) (55) using 3/8" Hardware (H<strong>11</strong>) (H124)<br />
(H34).<br />
*NOTE: Do not tighten Ladder Bracket hardware at this time.<br />
54<br />
55<br />
27<br />
H155<br />
55<br />
54<br />
33<br />
54<br />
55<br />
INSET A<br />
H<strong>11</strong><br />
H34<br />
5 1/2"<br />
H124<br />
N9<br />
H34