211-125A Table Assembly - Atlanta Attachment Co.
211-125A Table Assembly - Atlanta Attachment Co.
211-125A Table Assembly - Atlanta Attachment Co.

You also want an ePaper? Increase the reach of your titles
YUMPU automatically turns print PDFs into web optimized ePapers that Google loves.
2<strong>211</strong>ES (770)963-7369 FAX(770)963-7641<br />
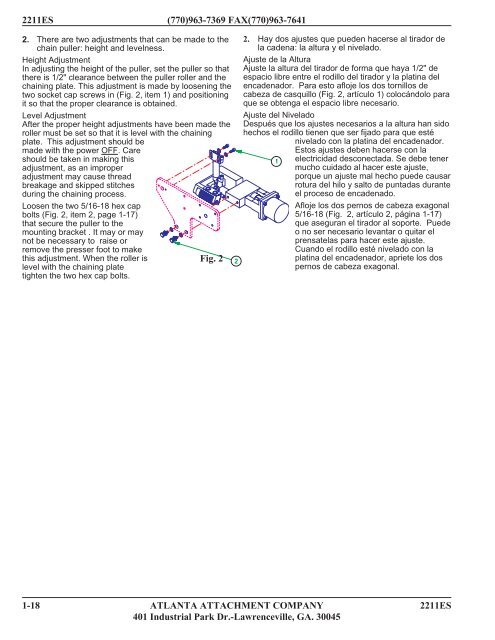
2. There are two adjustments that can be made to the<br />
chain puller: height and levelness.<br />
Height Adjustment<br />
In adjusting the height of the puller, set the puller so that<br />
there is 1/2" clearance between the puller roller and the<br />
chaining plate. This adjustment is made by loosening the<br />
two socket cap screws in (Fig. 2, item 1) and positioning<br />
it so that the proper clearance is obtained.<br />
Level Adjustment<br />
After the proper height adjustments have been made the<br />
roller must be set so that it is level with the chaining<br />
plate. This adjustment should be<br />
made with the power OFF. Care<br />
should be taken in making this<br />
adjustment, as an improper<br />
adjustment may cause thread<br />
breakage and skipped stitches<br />
during the chaining process.<br />
Loosen the two 5/16-18 hex cap<br />
bolts (Fig. 2, item 2, page 1-17)<br />
that secure the puller to the<br />
mounting bracket . It may or may<br />
not be necessary to raise or<br />
remove the presser foot to make<br />
this adjustment. When the roller is<br />
Fig. 2<br />
level with the chaining plate<br />
tighten the two hex cap bolts.<br />
2. Hay dos ajustes que pueden hacerse al tirador de<br />
la cadena: la altura y el nivelado.<br />
Ajuste de la Altura<br />
Ajuste la altura del tirador de forma que haya 1/2" de<br />
espacio libre entre el rodillo del tirador y la platina del<br />
encadenador. Para esto afloje los dos tornillos de<br />
cabeza de casquillo (Fig. 2, artículo 1) colocándolo para<br />
que se obtenga el espacio libre necesario.<br />
Ajuste del Nivelado<br />
Después que los ajustes necesarios a la altura han sido<br />
hechos el rodillo tienen que ser fijado para que esté<br />
nivelado con la platina del encadenador.<br />
Estos ajustes deben hacerse con la<br />
electricidad desconectada. Se debe tener<br />
mucho cuidado al hacer este ajuste,<br />
porque un ajuste mal hecho puede causar<br />
rotura del hilo y salto de puntadas durante<br />
el proceso de encadenado.<br />
Afloje los dos pernos de cabeza exagonal<br />
5/16-18 (Fig. 2, artículo 2, página 1-17)<br />
que aseguran el tirador al soporte. Puede<br />
o no ser necesario levantar o quitar el<br />
prensatelas para hacer este ajuste.<br />
Cuando el rodillo esté nivelado con la<br />
platina del encadenador, apriete los dos<br />
pernos de cabeza exagonal.<br />
1-18 ATLANTA ATTACHMENT COMPANY 2<strong>211</strong>ES<br />
401 Industrial Park Dr.-Lawrenceville, GA. 30045