211-125A Table Assembly - Atlanta Attachment Co.
211-125A Table Assembly - Atlanta Attachment Co.
211-125A Table Assembly - Atlanta Attachment Co.

Create successful ePaper yourself
Turn your PDF publications into a flip-book with our unique Google optimized e-Paper software.
2<strong>211</strong>ES (770)963-7369 FAX(770)963-7641<br />
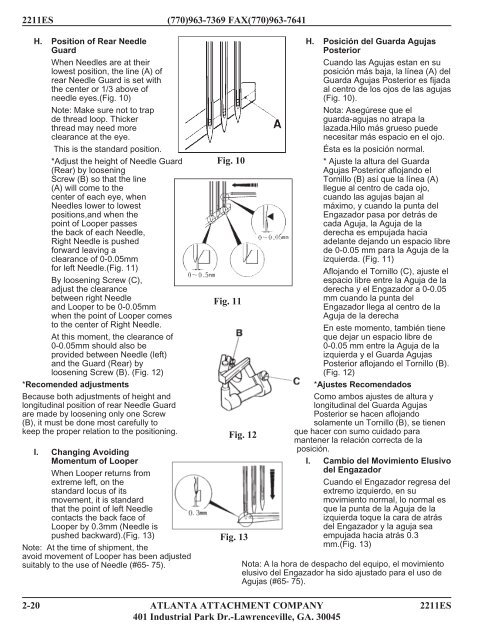
H. Position of Rear Needle<br />
Guard<br />
When Needles are at their<br />
lowest position, the line (A) of<br />
rear Needle Guard is set with<br />
the center or 1/3 above of<br />
needle eyes.(Fig. 10)<br />
Note: Make sure not to trap<br />
de thread loop. Thicker<br />
thread may need more<br />
clearance at the eye.<br />
This is the standard position.<br />
*Adjust the height of Needle Guard<br />
(Rear) by loosening<br />
Screw (B) so that the line<br />
(A) will come to the<br />
center of each eye, when<br />
Needles lower to lowest<br />
positions,and when the<br />
point of Looper passes<br />
the back of each Needle,<br />
Right Needle is pushed<br />
forward leaving a<br />
clearance of 0-0.05mm<br />
for left Needle.(Fig. 11)<br />
By loosening Screw (C),<br />
adjust the clearance<br />
between right Needle<br />
and Looper to be 0-0.05mm<br />
when the point of Looper comes<br />
to the center of Right Needle.<br />
At this moment, the clearance of<br />
0-0.05mm should also be<br />
provided between Needle (left)<br />
and the Guard (Rear) by<br />
loosening Screw (B). (Fig. 12)<br />
*Recomended adjustments<br />
Because both adjustments of height and<br />
longitudinal position of rear Needle Guard<br />
are made by loosening only one Screw<br />
(B), it must be done most carefully to<br />
keep the proper relation to the positioning.<br />
I. Changing Avoiding<br />
Momentum of Looper<br />
When Looper returns from<br />
extreme left, on the<br />
standard locus of its<br />
movement, it is standard<br />
that the point of left Needle<br />
contacts the back face of<br />
Looper by 0.3mm (Needle is<br />
pushed backward).(Fig. 13)<br />
Note: At the time of shipment, the<br />
avoid movement of Looper has been adjusted<br />
suitably to the use of Needle (#65- 75).<br />
Fig. 10<br />
Fig. 11<br />
Fig. 12<br />
Fig. 13<br />
H. Posición del Guarda Agujas<br />
Posterior<br />
Cuando las Agujas estan en su<br />
posición más baja, la línea (A) del<br />
Guarda Agujas Posterior es fijada<br />
al centro de los ojos de las agujas<br />
(Fig. 10).<br />
Nota: Asegúrese que el<br />
guarda-agujas no atrapa la<br />
lazada.Hilo más grueso puede<br />
necesitar más espacio en el ojo.<br />
Ésta es la posición normal.<br />
* Ajuste la altura del Guarda<br />
Agujas Posterior aflojando el<br />
Tornillo (B) así que la línea (A)<br />
llegue al centro de cada ojo,<br />
cuando las agujas bajan al<br />
máximo, y cuando la punta del<br />
Engazador pasa por detrás de<br />
cada Aguja, la Aguja de la<br />
derecha es empujada hacia<br />
adelante dejando un espacio libre<br />
de 0-0.05 mm para la Aguja de la<br />
izquierda. (Fig. 11)<br />
Aflojando el Tornillo (C), ajuste el<br />
espacio libre entre la Aguja de la<br />
derecha y el Engazador a 0-0.05<br />
mm cuando la punta del<br />
Engazador llega al centro de la<br />
Aguja de la derecha<br />
En este momento, también tiene<br />
que dejar un espacio libre de<br />
0-0.05 mm entre la Aguja de la<br />
izquierda y el Guarda Agujas<br />
Posterior aflojando el Tornillo (B).<br />
(Fig. 12)<br />
*Ajustes Recomendados<br />
<strong>Co</strong>mo ambos ajustes de altura y<br />
longitudinal del Guarda Agujas<br />
Posterior se hacen aflojando<br />
solamente un Tornillo (B), se tienen<br />
que hacer con sumo cuidado para<br />
mantener la relación correcta de la<br />
posición.<br />
I. Cambio del Movimiento Elusivo<br />
del Engazador<br />
Cuando el Engazador regresa del<br />
extremo izquierdo, en su<br />
movimiento normal, lo normal es<br />
que la punta de la Aguja de la<br />
izquierda toque la cara de atrás<br />
del Engazador y la aguja sea<br />
empujada hacia atrás 0.3<br />
mm.(Fig. 13)<br />
Nota: A la hora de despacho del equipo, el movimiento<br />
elusivo del Engazador ha sido ajustado para el uso de<br />
Agujas (#65- 75).<br />
2-20 ATLANTA ATTACHMENT COMPANY 2<strong>211</strong>ES<br />
401 Industrial Park Dr.-Lawrenceville, GA. 30045