211-125A Table Assembly - Atlanta Attachment Co.
211-125A Table Assembly - Atlanta Attachment Co.
211-125A Table Assembly - Atlanta Attachment Co.

You also want an ePaper? Increase the reach of your titles
YUMPU automatically turns print PDFs into web optimized ePapers that Google loves.
2<strong>211</strong>ES (770)963-7369 FAX(770)963-7641<br />
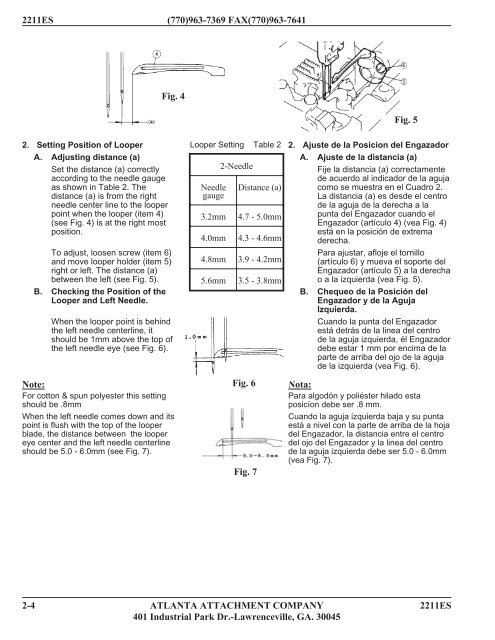
2. Setting Position of Looper<br />
A. Adjusting distance (a)<br />
Set the distance (a) correctly<br />
according to the needle gauge<br />
as shown in <strong>Table</strong> 2. The<br />
distance (a) is from the right<br />
needle center line to the looper<br />
point when the looper (item 4)<br />
(see Fig. 4) is at the right most<br />
position.<br />
To adjust, loosen screw (item 6)<br />
and move looper holder (item 5)<br />
right or left. The distance (a)<br />
between the left (see Fig. 5).<br />
B. Checking the Position of the<br />
Looper and Left Needle.<br />
Fig. 4<br />
When the looper point is behind<br />
the left needle centerline, it<br />
should be 1mm above the top of<br />
the left needle eye (see Fig. 6).<br />
Note:<br />
For cotton & spun polyester this setting<br />
should be .8mm<br />
When the left needle comes down and its<br />
point is flush with the top of the looper<br />
blade, the distance between the looper<br />
eye center and the left needle centerline<br />
should be 5.0 - 6.0mm (see Fig. 7).<br />
Looper Setting <strong>Table</strong> 2<br />
Needle<br />
gauge<br />
2-Needle<br />
Distance (a)<br />
3.2mm 4.7 - 5.0mm<br />
4.0mm 4.3 - 4.6mm<br />
4.8mm 3.9 - 4.2mm<br />
5.6mm 3.5 - 3.8mm<br />
Fig. 6<br />
Fig. 7<br />
Fig. 5<br />
2. Ajuste de la Posicion del Engazador<br />
A. Ajuste de la distancia (a)<br />
Fije la distancia (a) correctamente<br />
de acuerdo al indicador de la aguja<br />
como se muestra en el Cuadro 2.<br />
La distancia (a) es desde el centro<br />
de la aguja de la derecha a la<br />
punta del Engazador cuando el<br />
Engazador (artículo 4) (vea Fig. 4)<br />
está en la posición de extrema<br />
derecha.<br />
Para ajustar, afloje el tornillo<br />
(artículo 6) y mueva el soporte del<br />
Engazador (artículo 5) a la derecha<br />
o a la izquierda (vea Fig. 5).<br />
B. Chequeo de la Posición del<br />
Engazador y de la Aguja<br />
Izquierda.<br />
Cuando la punta del Engazador<br />
está detrás de la linea del centro<br />
de la aguja izquierda, él Engazador<br />
debe estar 1 mm por encima de la<br />
parte de arriba del ojo de la aguja<br />
de la izquierda (vea Fig. 6).<br />
Nota:<br />
Para algodón y poliéster hilado esta<br />
posicíon debe ser .8 mm.<br />
Cuando la aguja izquierda baja y su punta<br />
está a nivel con la parte de arriba de la hoja<br />
del Engazador, la distancia entre el centro<br />
del ojo del Engazador y la linea del centro<br />
de la aguja izquierda debe ser 5.0 - 6.0mm<br />
(vea Fig. 7).<br />
2-4 ATLANTA ATTACHMENT COMPANY 2<strong>211</strong>ES<br />
401 Industrial Park Dr.-Lawrenceville, GA. 30045