211-125A Table Assembly - Atlanta Attachment Co.
211-125A Table Assembly - Atlanta Attachment Co.
211-125A Table Assembly - Atlanta Attachment Co.

You also want an ePaper? Increase the reach of your titles
YUMPU automatically turns print PDFs into web optimized ePapers that Google loves.
2<strong>211</strong>ES (770)963-7369 FAX(770)963-7641<br />
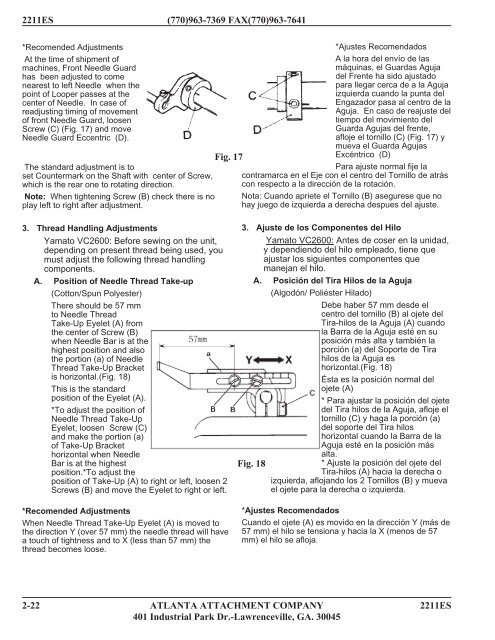
*Recomended Adjustments<br />
At the time of shipment of<br />
machines, Front Needle Guard<br />
has been adjusted to come<br />
nearest to left Needle when the<br />
point of Looper passes at the<br />
center of Needle. In case of<br />
readjusting timing of movement<br />
of front Needle Guard, loosen<br />
Screw (C) (Fig. 17) and move<br />
Needle Guard Eccentric (D).<br />
The standard adjustment is to<br />
set <strong>Co</strong>untermark on the Shaft with center of Screw,<br />
which is the rear one to rotating direction.<br />
Note: When tightening Screw (B) check there is no<br />
play left to right after adjustment.<br />
Fig. 17<br />
3. Thread Handling Adjustments<br />
Yamato VC2600: Before sewing on the unit,<br />
depending on present thread being used, you<br />
must adjust the following thread handling<br />
components.<br />
A. Position of Needle Thread Take-up<br />
(<strong>Co</strong>tton/Spun Polyester)<br />
There should be 57 mm<br />
to Needle Thread<br />
Take-Up Eyelet (A) from<br />
the center of Screw (B)<br />
when Needle Bar is at the<br />
highest position and also<br />
the portion (a) of Needle<br />
Thread Take-Up Bracket<br />
is horizontal.(Fig. 18)<br />
This is the standard<br />
position of the Eyelet (A).<br />
*To adjust the position of<br />
Needle Thread Take-Up<br />
Eyelet, loosen Screw (C)<br />
and make the portion (a)<br />
of Take-Up Bracket<br />
horizontal when Needle<br />
Bar is at the highest<br />
position.*To adjust the<br />
position of Take-Up (A) to right or left, loosen 2<br />
Screws (B) and move the Eyelet to right or left.<br />
*Recomended Adjustments<br />
When Needle Thread Take-Up Eyelet (A) is moved to<br />
the direction Y (over 57 mm) the needle thread will have<br />
a touch of tightness and to X (less than 57 mm) the<br />
thread becomes loose.<br />
*Ajustes Recomendados<br />
A la hora del envío de las<br />
máquinas, el Guardas Aguja<br />
del Frente ha sido ajustado<br />
para llegar cerca de a la Aguja<br />
izquierda cuando la punta del<br />
Engazador pasa al centro de la<br />
Aguja. En caso de reajuste del<br />
tiempo del movimiento del<br />
Guarda Agujas del frente,<br />
afloje el tornillo (C) (Fig. 17) y<br />
mueva el Guarda Agujas<br />
Excéntrico (D)<br />
Para ajuste normal fije la<br />
contramarca en el Eje con el centro del Tornillo de atrás<br />
con respecto a la dirección de la rotación.<br />
Nota: Cuando apriete el Tornillo (B) asegurese que no<br />
hay juego de izquierda a derecha despues del ajuste.<br />
3. Ajuste de los <strong>Co</strong>mponentes del Hilo<br />
Yamato VC2600: Antes de coser en la unidad,<br />
y dependiendo del hilo empleado, tiene que<br />
ajustar los siguientes componentes que<br />
manejan el hilo.<br />
A. Posición del Tira Hilos de la Aguja<br />
(Algodón/ Poliéster Hilado)<br />
Debe haber 57 mm desde el<br />
centro del tornillo (B) al ojete del<br />
Tira-hilos de la Aguja (A) cuando<br />
la Barra de la Aguja esté en su<br />
posición más alta y también la<br />
porción (a) del Soporte de Tira<br />
hilos de la Aguja es<br />
horizontal.(Fig. 18)<br />
Ésta es la posición normal del<br />
ojete (A)<br />
* Para ajustar la posición del ojete<br />
del Tira hilos de la Aguja, afloje el<br />
tornillo (C) y haga la porción (a)<br />
del soporte del Tira hilos<br />
horizontal cuando la Barra de la<br />
Aguja esté en la posición más<br />
alta.<br />
Fig. 18<br />
* Ajuste la posición del ojete del<br />
Tira-hilos (A) hacia la derecha o<br />
izquierda, aflojando los 2 Tornillos (B) y mueva<br />
el ojete para la derecha o izquierda.<br />
*Ajustes Recomendados<br />
Cuando el ojete (A) es movido en la dirección Y (más de<br />
57 mm) el hilo se tensiona y hacia la X (menos de 57<br />
mm) el hilo se afloja.<br />
2-22 ATLANTA ATTACHMENT COMPANY 2<strong>211</strong>ES<br />
401 Industrial Park Dr.-Lawrenceville, GA. 30045