AXIS P5532/P5534 Installation Guide - Axis Communications
AXIS P5532/P5534 Installation Guide - Axis Communications
AXIS P5532/P5534 Installation Guide - Axis Communications

You also want an ePaper? Increase the reach of your titles
YUMPU automatically turns print PDFs into web optimized ePapers that Google loves.
<strong>AXIS</strong> <strong>P5532</strong>/<strong>P5534</strong> <strong>Installation</strong> <strong>Guide</strong> Page 9<br />
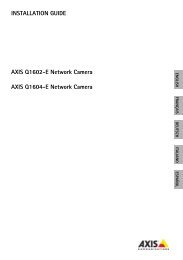
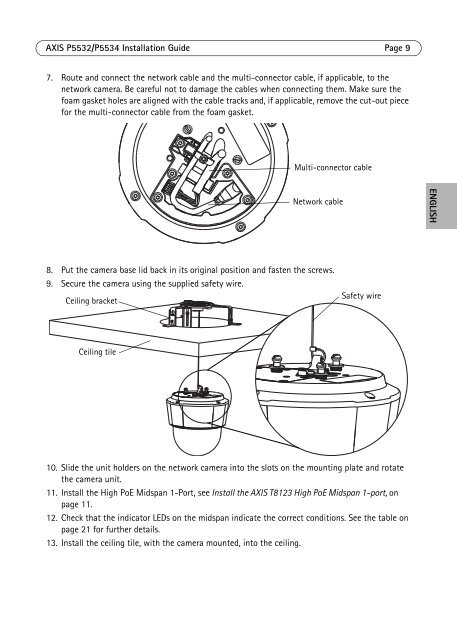
7. Route and connect the network cable and the multi-connector cable, if applicable, to the<br />
network camera. Be careful not to damage the cables when connecting them. Make sure the<br />
foam gasket holes are aligned with the cable tracks and, if applicable, remove the cut-out piece<br />
for the multi-connector cable from the foam gasket.<br />
Multi-connector cable<br />
Network cable<br />
ENGLISH<br />
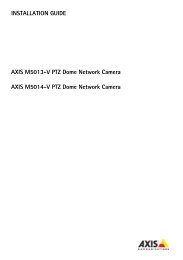
8. Put the camera base lid back in its original position and fasten the screws.<br />
9. Secure the camera using the supplied safety wire.<br />
Ceiling bracket<br />
Safety wire<br />
Ceiling tile<br />
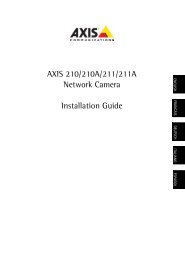
10. Slide the unit holders on the network camera into the slots on the mounting plate and rotate<br />
the camera unit.<br />
11. Install the High PoE Midspan 1-Port, see Install the <strong>AXIS</strong> T8123 High PoE Midspan 1-port, on<br />
page 11.<br />
12. Check that the indicator LEDs on the midspan indicate the correct conditions. See the table on<br />
page 21 for further details.<br />
13. Install the ceiling tile, with the camera mounted, into the ceiling.