D Einbau- und Bedienungsanleitung RolloTron ... - Rademacher
D Einbau- und Bedienungsanleitung RolloTron ... - Rademacher
D Einbau- und Bedienungsanleitung RolloTron ... - Rademacher

Create successful ePaper yourself
Turn your PDF publications into a flip-book with our unique Google optimized e-Paper software.
5.<br />
6.<br />
7.<br />
24<br />
<br />
<br />
<br />
i D ES F EN NL<br />
<br />
<br />
<br />
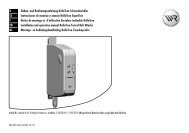
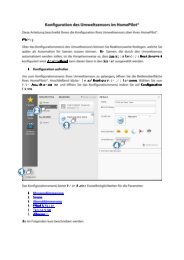
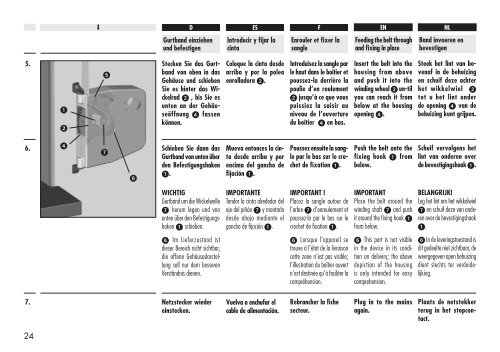
Gurtband einziehen<br />
<strong>und</strong> befestigen<br />
Stecken Sie das Gurtband<br />
von oben in das<br />
Gehäuse <strong>und</strong> schieben<br />
Sie es hinter das Wickelrad<br />
, bis Sie es<br />
unten an der Gehäuseöffnung<br />
fassen<br />
können.<br />
Schieben Sie dann das<br />
Gurtband von unten über<br />
den Befestigungshaken<br />
.<br />
WICHTIG<br />
Gurtband um die Wickelwelle<br />
herum legen <strong>und</strong> von<br />
unten über den Befestigungshaken<br />
schieben.<br />
Im Lieferzustand ist<br />
dieser Bereich nicht sichtbar,<br />
die offene Gehäusedarstellung<br />
soll nur dem besseren<br />
Verständnis dienen.<br />
Netzstecker wieder<br />
einstecken.<br />
Introducir y fijar la<br />
cinta<br />
Coloque la cinta desde<br />
arriba y por la polea<br />
enrolladora .<br />
Mueva entonces la cinta<br />
desde arriba y por<br />
encima del gancho de<br />
fijación .<br />
IMPORTANTE<br />
Tender la cinta alrededor del<br />
eje del piñón y montarla<br />
desde abajo mediante el<br />
gancho de fijación .<br />
Vuelva a enchufar el<br />
cable de alimentación.<br />
Enrouler et fixer la<br />
sangle<br />
Introduisez la sangle par<br />
le haut dans le boîtier et<br />
poussez-la derrière la<br />
poulie d’en roulement<br />
jusqu’à ce que vous<br />
puissiez la saisir au<br />
niveau de l’ouverture<br />
du boîtier en bas.<br />
Poussezensuitelasangle<br />
par le bas sur le crochet<br />
de fixation .<br />
IMPORTANT !<br />
Placez la sangle autour de<br />
l’arbre d’enroulement et<br />
poussez-la par le bas sur le<br />
crochet de fixation .<br />
Lorsque l’appareil se<br />
trouve à l’état de la livraison<br />
cette zone n’est pas visible;<br />
l’illustration du boîtier ouvert<br />
n’est destinée qu’à faciliter la<br />
compréhension.<br />
Rebrancher la fiche<br />
secteur.<br />
Feeding the belt through<br />
and fixing in place<br />
Insert the belt into the<br />
housing from above<br />
and push it into the<br />
winding wheel un-til<br />
you can reach it from<br />
below at the housing<br />
opening .<br />
Push the belt onto the<br />
fixing hook from<br />
below.<br />
IMPORTANT<br />
Place the belt aro<strong>und</strong> the<br />
winding shaft and push<br />
it aro<strong>und</strong> the fixing hook <br />
from below.<br />
This part is not visible<br />
in the device in its condition<br />
on delivery; the above<br />
depiction of the housing<br />
is only intended for easy<br />
comprehension.<br />
Plug in to the mains<br />
again.<br />
Band invoeren en<br />
bevestigen<br />
Steek het lint van bovenaf<br />
in de behuizing<br />
en schuif deze achter<br />
het wikkelwiel <br />
tot u het lint onder<br />
de opening van de<br />
behuizing kunt grijpen.<br />
Schuif vervolgens het<br />
lint van onderen over<br />
de bevestigingshaak .<br />
BELANGRIJK!<br />
Leg het lint om het wikkelwiel<br />
en schuif deze van onderen<br />
over de bevestigingshaak<br />
.<br />
In de leveringstoestand is<br />
dit gedeelte niet zichtbaar, de<br />
weergegeven open behuizing<br />
dient slechts ter verduidelijking.<br />
Plaats de netstekker<br />
terug in het stopcontact.