Manuel d'installation et de configuration - Alcatel-Lucent Eye-box ...
Manuel d'installation et de configuration - Alcatel-Lucent Eye-box ...
Manuel d'installation et de configuration - Alcatel-Lucent Eye-box ...

You also want an ePaper? Increase the reach of your titles
YUMPU automatically turns print PDFs into web optimized ePapers that Google loves.
Chapitre 11 <br />
_<br />
_<br />
_<br />
c<br />
h<br />
a<br />
n<br />
g<br />
e<br />
-<br />
e<br />
n<br />
d<br />
_<br />
_<br />
_<br />
_<br />
_<br />
_<br />
c<br />
h<br />
a<br />
n<br />
g<br />
e<br />
-<br />
b<br />
e<br />
g<br />
i<br />
n<br />
_<br />
_<br />
_<br />
_<br />
_<br />
_<br />
c<br />
h<br />
a<br />
n<br />
g<br />
e<br />
-<br />
e<br />
n<br />
d<br />
_<br />
_<br />
_<br />
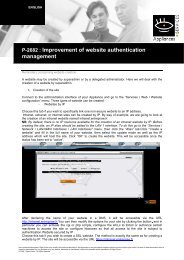
3. Dans le champ Nom du domaine SIP, saisissez le nom du domaine à utiliser pour les<br />
adresses SIP. Ce domaine est géré par le serveur DNS <strong>de</strong> l'Exten<strong>de</strong>d Communication<br />
Server. Ce nom peut être i<strong>de</strong>ntique au Nom <strong>de</strong> domaine <strong>de</strong> l'Appliance.<br />
4. Activez la case à cocher Création automatique <strong>de</strong> la zone DNS associée afin que <strong>de</strong>s<br />
champs spécifiques soient automatiquement ajoutés au DNS <strong>de</strong> l'Exten<strong>de</strong>d<br />
Communication Server.<br />
5. Sélectionnez l'adresse IP publique du serveur dans la liste déroulante.<br />
6. Dans le champ Plage <strong>de</strong> numérotation <strong>de</strong>s postes VoIP, saisissez une plage<br />
comprenant au moins cent numéros.<br />
7. Cliquez sur OK.<br />
8. Sélectionnez l'ongl<strong>et</strong> Certificat SSL.<br />
9. Sélectionnez le certificat à utiliser pour le nom <strong>de</strong> domaine VoIP - SIP.<br />
10. Activez le serveur <strong>de</strong> téléphonie sur Intern<strong>et</strong>.<br />
11-6