E Light System DALI
E Light System DALI
E Light System DALI

Create successful ePaper yourself
Turn your PDF publications into a flip-book with our unique Google optimized e-Paper software.
<strong>Light</strong> Timer<br />
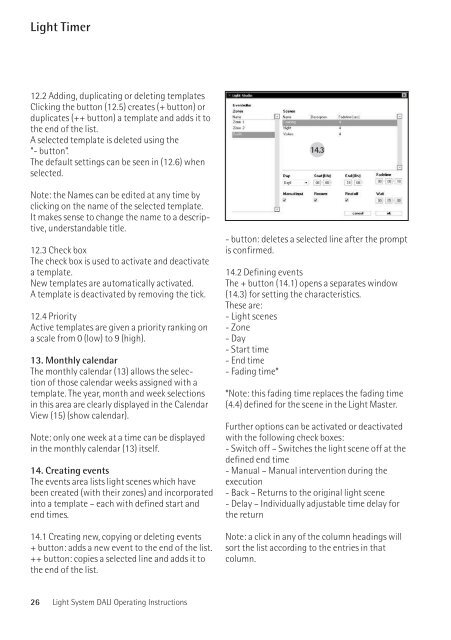
12.2 Adding, duplicating or deleting templates<br />
Clicking the button (12.5) creates (+ button) or<br />
duplicates (++ button) a template and adds it to<br />
the end of the list.<br />
A selected template is deleted using the<br />
“- button”.<br />
The default settings can be seen in (12.6) when<br />
selected.<br />
Note: the Names can be edited at any time by<br />
clicking on the name of the selected template.<br />
It makes sense to change the name to a descriptive,<br />
understandable title.<br />
12.3 Check box<br />
The check box is used to activate and deactivate<br />
a template.<br />
New templates are automatically activated.<br />
A template is deactivated by removing the tick.<br />
12.4 Priority<br />
Active templates are given a priority ranking on<br />
a scale from 0 (low) to 9 (high).<br />
. Monthly calendar<br />
The monthly calendar (13) allows the selection<br />
of those calendar weeks assigned with a<br />
template. The year, month and week selections<br />
in this area are clearly displayed in the Calendar<br />
View (15) (show calendar).<br />
Note: only one week at a time can be displayed<br />
in the monthly calendar (13) itself.<br />
. Creating events<br />
The events area lists light scenes which have<br />
been created (with their zones) and incorporated<br />
into a template – each with defined start and<br />
end times.<br />
14.1 Creating new, copying or deleting events<br />
+ button: adds a new event to the end of the list.<br />
++ button: copies a selected line and adds it to<br />
the end of the list.<br />
- button: deletes a selected line after the prompt<br />
is confirmed.<br />
14.2 Defining events<br />
The + button (14.1) opens a separates window<br />
(14.3) for setting the characteristics.<br />
These are:<br />
- <strong>Light</strong> scenes<br />
- Zone<br />
- Day<br />
- Start time<br />
- End time<br />
- Fading time*<br />
*Note: this fading time replaces the fading time<br />
(4.4) defined for the scene in the <strong>Light</strong> Master.<br />
Further options can be activated or deactivated<br />
with the following check boxes:<br />
- Switch off – Switches the light scene off at the<br />
defined end time<br />
- Manual – Manual intervention during the<br />
execution<br />
- Back – Returns to the original light scene<br />
- Delay – Individually adjustable time delay for<br />
the return<br />
Note: a click in any of the column headings will<br />
sort the list according to the entries in that<br />
column.<br />
.<br />
<strong>Light</strong> Timer<br />
. Calendar View<br />
The Calendar View is displayed as a weekly view<br />
(7 days) with an hourly time scale.<br />
Selecting a template (12.2) will change the<br />
weekly view (15) to the template view (12.7).<br />
The time period for templates is defined and the<br />
events created within this template view.<br />
To change back to the weekly view (15), click on<br />
“show calendar“ (12.8).<br />
15.1 Navigation<br />
The buttons at (15.1) are directly related to the<br />
Calendar View (13). Buttons “Cursor left” and<br />
“Cursor right” will page one calendar week<br />
backwards or forwards respectively. The button<br />
between the cursors displays the current day,<br />
“Today”.<br />
6 <strong>Light</strong> <strong>System</strong> <strong>DALI</strong> Operating Instructions <strong>Light</strong> <strong>System</strong> <strong>DALI</strong> Operating Instructions<br />
.6<br />
.<br />
.<br />
English