- Page 1:
FR GB DE IT ES NL SE PT Manuel d’
- Page 4 and 5:
Please read the instructions for us
- Page 6 and 7:
Machine Mass (Kilograms) Positive B
- Page 8 and 9:
8 P/N 9 0 -9 Location: Rear of Cowl
- Page 10 and 11:
General Information Carbon monoxide
- Page 12 and 13:
SAFETY INSTRUCTIONS SAFETY FIRST! W
- Page 14 and 15:
PARTS IDENTIFICATION (WHAT IS WHAT)
- Page 16 and 17:
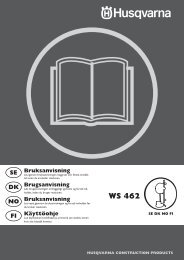
Assemble the following items before
- Page 18 and 19:
Install Water Tank (P) (if equipped
- Page 20 and 21:
. Connect Water tank hose to blade
- Page 22 and 23:
Transporting & Lifting Machine: •
- Page 24 and 25:
Fitting the Diamond Blade (H): Inst
- Page 26 and 27:
SERVICE DAILY: . Check engine oil l
- Page 28 and 29:
Blade Shaft Drive Belt Tension: Dri
- Page 30:
0 WIRING DIAGRAM
- Page 33 and 34: Dual Pointer Assembly 542 20 22-70
- Page 35: CONTACT INFORMATION Construction Pr
- Page 38 and 39: 38 Lea las instrucciones de uso ant
- Page 40 and 41: 40 Peso de la máquina (kilogramos)
- Page 42 and 43: 42 P/N 542 19 05-93 Location: Rear
- Page 44 and 45: Información general El monóxido d
- Page 46 and 47: INSTRUCCIONES DE SEGURIDAD ¡LA SEG
- Page 48 and 49: IDENTIFICACIÓN DE LAS PIEZAS (QUÉ
- Page 50 and 51: Antes de operar la máquina por pri
- Page 52 and 53: Instale el tanque de agua (P) (de i
- Page 54 and 55: 7. Conecte la manguera del tanque d
- Page 56 and 57: Transporte e izado de la máquina:
- Page 58 and 59: Colocación de la cuchilla adiamant
- Page 60 and 61: SERVICIO DIARIO: 1. Controle el niv
- Page 62 and 63: Tensión de la correa de transmisi
- Page 64: 64 DIAGRAMA DE CABLEADO
- Page 67 and 68: Ensamblado del puntero doble Conjun
- Page 69: INFORMACIÓN DE CONTACTO Husqvarna
- Page 72 and 73: 72 SYMBOLES et AUTOCOLLANTS Veiller
- Page 74 and 75: 74 Masse de la machine (kg) Borne p
- Page 76 and 77: 76 P/N 542 19 05-93 Location: Rear
- Page 78 and 79: Information générale Le monoxyde
- Page 80 and 81: INSTRUCTIONS DE SÉCURITÉ SÉCURIT
- Page 82 and 83: A. Flèche avant : Sert à guider l
- Page 86 and 87: Poser le réservoir d’eau (P) (le
- Page 88 and 89: 7. Raccorder le flexible du réserv
- Page 90 and 91: Transport et levage de la machine :
- Page 92 and 93: Pose du disque diamanté (H) : Le d
- Page 94 and 95: À FAIRE CHAQUE JOUR : 1. Vérifier
- Page 96 and 97: Tension de la courroie d’entraîn
- Page 98: 98 SCHÉMA DE CÂBLAGE
- Page 101 and 102: Flèche double 542 20 22-70 Kit com
- Page 103: INFORMATIONS DE CONTACT Constructio
- Page 106 and 107: Lesen Sie bitte vor der ersten Inbe
- Page 108 and 109: Gewicht der Maschine (kg) Positive
- Page 110 and 111: 8 P/N 9 0 -9 Location: Rear of Cowl
- Page 112 and 113: 0 SICHERHEITSHINWEISE ACHTUNG GIFTI
- Page 114 and 115: SICHERHEITSHINWEISE SICHERHEIT IST
- Page 116 and 117: BESCHREIBUNG DER EINZELNEN TEILE A.
- Page 118 and 119: Vor der ersten Inbetriebnahme der M
- Page 120 and 121: Einbau des Wassertanks (P) (falls z
- Page 122 and 123: . Schließen Sie den Schlauch des W
- Page 124 and 125: Transport und Anheben der Maschine:
- Page 126 and 127: Anbringen der Diamanttrennscheibe (
- Page 128 and 129: TÄGLICH: . Motorölstand prüfen.
- Page 130 and 131: Spannung des Antriebsriemens der Tr
- Page 132: 0 SCHALTBILD
- Page 135 and 136:
Doppelmarkierer 542 20 22-70 Komple
- Page 137:
KONTAKTINFORMATIONEN Construction P
- Page 140 and 141:
38 Lees de gebruiksinstructies alvo
- Page 142 and 143:
40 Machinegewicht (kilogram) Positi
- Page 144 and 145:
42 P/N 542 19 05-93 Location: Rear
- Page 146 and 147:
Algemene informatie Koolmonoxide (C
- Page 148 and 149:
Bedien deze machine NIET tenzij u d
- Page 150 and 151:
48 ONDERDELENIDENTIFICATIE (WAT IS
- Page 152 and 153:
Monteer de volgende onderdelen alvo
- Page 154 and 155:
Waterreservoir (P) installeren (ind
- Page 156 and 157:
7. Sluit de slang van het Waterrese
- Page 158 and 159:
Machine vervoeren & hijsen: • Hij
- Page 160 and 161:
Diamantblad (H) installeren: Instal
- Page 162 and 163:
DAGELIJKS ONDERHOUD: 1. Controleer
- Page 164 and 165:
Spanning van de aandrijfriem van de
- Page 166:
64 BEDRADINGDIAGRAM
- Page 169 and 170:
Dubbele geleiderassemblage 542 20 2
- Page 171:
CONTACTGEGEVENS Construction Produc
- Page 174 and 175:
72 Leggere le istruzioni per l’us
- Page 176 and 177:
74 Peso della macchina (chilogrammi
- Page 178 and 179:
76 P/N 542 19 05-93 Location: Rear
- Page 180 and 181:
Informazioni generali L’ossido di
- Page 182 and 183:
ISTRUZIONI PER LA SICUREZZA SICUREZ
- Page 184 and 185:
82 IDENTIFICAZIONE DEI COMPONENTI A
- Page 186 and 187:
Montare i seguenti componenti prima
- Page 188 and 189:
Installazione della tanica dell’a
- Page 190 and 191:
7. Collegare il tubo flessibile del
- Page 192 and 193:
Trasporto e sollevamento della macc
- Page 194 and 195:
Installazione del disco diamantato
- Page 196 and 197:
94 MANUTENZIONE e LUBRIFICAZIONE GU
- Page 198 and 199:
96 MANUTENZIONE e LUBRIFICAZIONE Te
- Page 200:
98 SCHEMA CIRCUITALE
- Page 203 and 204:
Puntatore doppio 542 20 22-70 Kit c
- Page 205 and 206:
RECAPITI Construction Products Nort
- Page 207 and 208:
Índice Secção Página Índice e
- Page 209 and 210:
Interruptor de segurança da água
- Page 211 and 212:
P/N 542 19 07-33 Location: Front of
- Page 213 and 214:
Generalidades ADVERTÊNCIA! Antes d
- Page 215 and 216:
INSTRUÇÕES DE SEGURANÇA ADVERTÊ
- Page 217 and 218:
INSTRUÇÕES DE SEGURANÇA A SEGURA
- Page 219 and 220:
IDENTIFICAÇÃO E DESCRIÇÃO DAS P
- Page 221 and 222:
Proceder à montagem dos elementos
- Page 223 and 224:
Instalar o depósito de água (P) (
- Page 225 and 226:
7. Conectar o tubo flexível do dep
- Page 227 and 228:
Transporte e levantamento da máqui
- Page 229 and 230:
Colocação do disco de diamante (H
- Page 231 and 232:
SERVIÇO DIÁRIO: 1. Verificar o n
- Page 233 and 234:
Tensão da correia de transmissão
- Page 235:
DIAGRAMA DAS LIGAÇÕES 133
- Page 238 and 239:
Conjunto do ponteiro duplo Conjunto
- Page 240 and 241:
138 INFORMAÇÕES DE CONTACTO Const
- Page 242 and 243:
140 Läs bruksanvisningen innan du
- Page 244 and 245:
142 Maskinvikt (kilogram). Positiv
- Page 246 and 247:
144 P/N 542 19 05-93 Location: Rear
- Page 248 and 249:
Allmän information Kolos, koloxid
- Page 250 and 251:
SÄKERHETSANVISNINGAR SÄKERHET FÖ
- Page 252 and 253:
A. Främre pekare: Används till at
- Page 254 and 255:
Montera följande saker innan du k
- Page 256 and 257:
Installera vattentanken (P) (om så
- Page 258 and 259:
7. Anslut vattentankslangen till bl
- Page 260 and 261:
Transportera och lyfta maskinen:
- Page 262 and 263:
Sätta på diamantbladet (H): Insta
- Page 264 and 265:
SERVICE VARJE DAG: 1. Kontrollera m
- Page 266 and 267:
Bladaxeldrevets rempänning: Drivre
- Page 268:
166 KOPPLINGSCHEMA
- Page 271 and 272:
Dubbel pekarenhet 542 20 22-70 Komp
- Page 273:
KONTAKTINFORMATION Construction Pro