Sony DSC-TX9 - DSC-TX9 Istruzioni per l'uso Inglese
Sony DSC-TX9 - DSC-TX9 Istruzioni per l'uso Inglese
Sony DSC-TX9 - DSC-TX9 Istruzioni per l'uso Inglese
You also want an ePaper? Increase the reach of your titles
YUMPU automatically turns print PDFs into web optimized ePapers that Google loves.
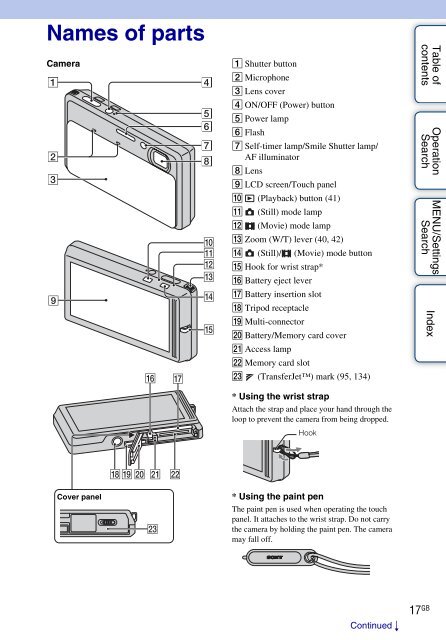
Names of parts<br />
Camera<br />
A Shutter button<br />
B Microphone<br />
C Lens cover<br />
D ON/OFF (Power) button<br />
E Power lamp<br />
F Flash<br />
G Self-timer lamp/Smile Shutter lamp/<br />
AF illuminator<br />
H Lens<br />
I LCD screen/Touch panel<br />
J (Playback) button (41)<br />
K (Still) mode lamp<br />
L (Movie) mode lamp<br />
M Zoom (W/T) lever (40, 42)<br />
N (Still)/ (Movie) mode button<br />
O Hook for wrist strap*<br />
P Battery eject lever<br />
Q Battery insertion slot<br />
R Tripod receptacle<br />
S Multi-connector<br />
T Battery/Memory card cover<br />
U Access lamp<br />
V Memory card slot<br />
W (TransferJet) mark (95, 134)<br />
Table of<br />
contents<br />
O<strong>per</strong>ation<br />
Search<br />
MENU/Settings<br />
Search<br />
Index<br />
* Using the wrist strap<br />
Attach the strap and place your hand through the<br />
loop to prevent the camera from being dropped.<br />
Hook<br />
Cover panel<br />
* Using the paint pen<br />
The paint pen is used when o<strong>per</strong>ating the touch<br />
panel. It attaches to the wrist strap. Do not carry<br />
the camera by holding the paint pen. The camera<br />
may fall off.<br />
Continued r<br />
17 GB


