Polkupyörän käyttöopas Bruksanvisning för cykel Bicycle ... - Helkama
Polkupyörän käyttöopas Bruksanvisning för cykel Bicycle ... - Helkama
Polkupyörän käyttöopas Bruksanvisning för cykel Bicycle ... - Helkama

Erfolgreiche ePaper selbst erstellen
Machen Sie aus Ihren PDF Publikationen ein blätterbares Flipbook mit unserer einzigartigen Google optimierten e-Paper Software.
GETTING STARTED<br />
1. Seat adjustment<br />
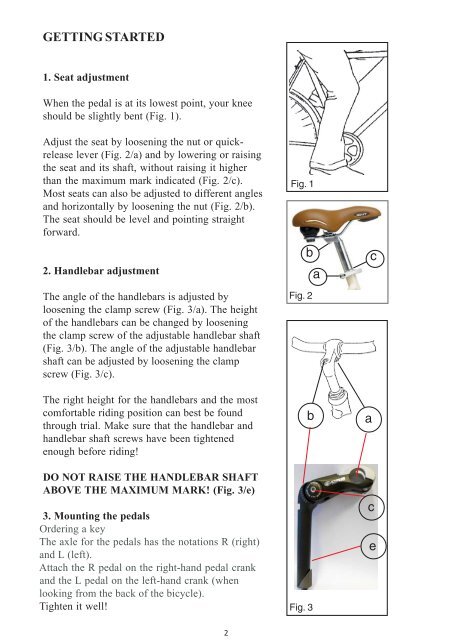
When the pedal is at its lowest point, your knee<br />
should be slightly bent (Fig. 1).<br />
Adjust the seat by loosening the nut or quickrelease<br />
lever (Fig. 2/a) and by lowering or raising<br />
the seat and its shaft, without raising it higher<br />
than the maximum mark indicated (Fig. 2/c).<br />
Most seats can also be adjusted to different angles<br />
and horizontally by loosening the nut (Fig. 2/b).<br />
The seat should be level and pointing straight<br />
forward.<br />
2. Handlebar adjustment<br />
The angle of the handlebars is adjusted by<br />
loosening the clamp screw (Fig. 3/a). The height<br />
of the handlebars can be changed by loosening<br />
the clamp screw of the adjustable handlebar shaft<br />
(Fig. 3/b). The angle of the adjustable handlebar<br />
shaft can be adjusted by loosening the clamp<br />
screw (Fig. 3/c).<br />
The right height for the handlebars and the most<br />
comfortable riding position can best be found<br />
through trial. Make sure that the handlebar and<br />
handlebar shaft screws have been tightened<br />
enough before riding!<br />
DO NOT RAISE THE HANDLEBAR SHAFT<br />
ABOVE THE MAXIMUM MARK! (Fig. 3/e)<br />
3. Mounting the pedals<br />
Ordering a key<br />
The axle for the pedals has the notations R (right)<br />
and L (left).<br />
Attach the R pedal on the right-hand pedal crank<br />
and the L pedal on the left-hand crank (when<br />
looking from the back of the bicycle).<br />
Tighten it well!<br />
Fig. 1<br />
Fig. 2<br />
Fig. 3<br />
b<br />
a<br />
b<br />
c<br />
a<br />
c<br />
e<br />
2