these Open Championship Clubs choose to relief grind - Pitchcare
these Open Championship Clubs choose to relief grind - Pitchcare
these Open Championship Clubs choose to relief grind - Pitchcare

You also want an ePaper? Increase the reach of your titles
YUMPU automatically turns print PDFs into web optimized ePapers that Google loves.
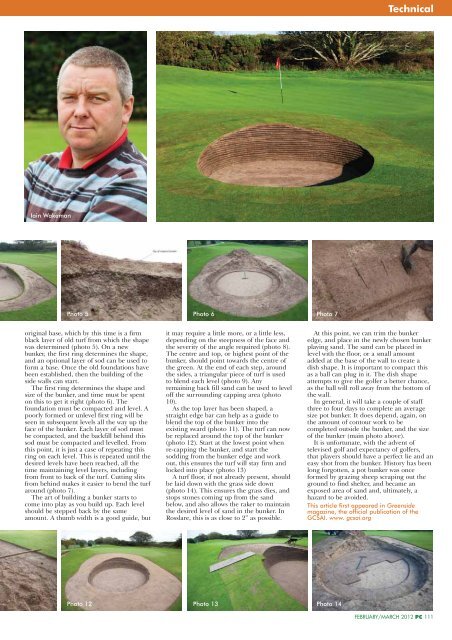
Iain Wakeman<br />
Pho<strong>to</strong> 5<br />
original base, which by this time is a firm<br />
black layer of old turf from which the shape<br />
was determined (pho<strong>to</strong> 5). On a new<br />
bunker, the first ring determines the shape,<br />
and an optional layer of sod can be used <strong>to</strong><br />
form a base. Once the old foundations have<br />
been established, then the building of the<br />
side walls can start.<br />
The first ring determines the shape and<br />
size of the bunker, and time must be spent<br />
on this <strong>to</strong> get it right (pho<strong>to</strong> 6). The<br />
foundation must be compacted and level. A<br />
poorly formed or unlevel first ring will be<br />
seen in subsequent levels all the way up the<br />
face of the bunker. Each layer of sod must<br />
be compacted, and the backfill behind this<br />
sod must be compacted and levelled. From<br />
this point, it is just a case of repeating this<br />
ring on each level. This is repeated until the<br />
desired levels have been reached, all the<br />
time maintaining level layers, including<br />
from front <strong>to</strong> back of the turf. Cutting slits<br />
from behind makes it easier <strong>to</strong> bend the turf<br />
around (pho<strong>to</strong> 7).<br />
The art of building a bunker starts <strong>to</strong><br />
come in<strong>to</strong> play as you build up. Each level<br />
should be stepped back by the same<br />
amount. A thumb width is a good guide, but<br />
Pho<strong>to</strong> 6 Pho<strong>to</strong> 7<br />
it may require a little more, or a little less,<br />
depending on the steepness of the face and<br />
the severity of the angle required (pho<strong>to</strong> 8).<br />
The centre and <strong>to</strong>p, or highest point of the<br />
bunker, should point <strong>to</strong>wards the centre of<br />
the green. At the end of each step, around<br />
the sides, a triangular piece of turf is used<br />
<strong>to</strong> blend each level (pho<strong>to</strong> 9). Any<br />
remaining back fill sand can be used <strong>to</strong> level<br />
off the surrounding capping area (pho<strong>to</strong><br />
10).<br />
As the <strong>to</strong>p layer has been shaped, a<br />
straight edge bar can help as a guide <strong>to</strong><br />
blend the <strong>to</strong>p of the bunker in<strong>to</strong> the<br />
existing sward (pho<strong>to</strong> 11). The turf can now<br />
be replaced around the <strong>to</strong>p of the bunker<br />
(pho<strong>to</strong> 12). Start at the lowest point when<br />
re-capping the bunker, and start the<br />
sodding from the bunker edge and work<br />
out, this ensures the turf will stay firm and<br />
locked in<strong>to</strong> place (pho<strong>to</strong> 13)<br />
A turf floor, if not already present, should<br />
be laid down with the grass side down<br />
(pho<strong>to</strong> 14). This ensures the grass dies, and<br />
s<strong>to</strong>ps s<strong>to</strong>nes coming up from the sand<br />
below, and also allows the raker <strong>to</strong> maintain<br />
the desired level of sand in the bunker. In<br />
Rosslare, this is as close <strong>to</strong> 2” as possible.<br />
Pho<strong>to</strong> 12 Pho<strong>to</strong> 13 Pho<strong>to</strong> 14<br />
Technical<br />
At this point, we can trim the bunker<br />
edge, and place in the newly chosen bunker<br />
playing sand. The sand can be placed in<br />
level with the floor, or a small amount<br />
added at the base of the wall <strong>to</strong> create a<br />
dish shape. It is important <strong>to</strong> compact this<br />
as a ball can plug in it. The dish shape<br />
attempts <strong>to</strong> give the golfer a better chance,<br />
as the ball will roll away from the bot<strong>to</strong>m of<br />
the wall.<br />
In general, it will take a couple of staff<br />
three <strong>to</strong> four days <strong>to</strong> complete an average<br />
size pot bunker. It does depend, again, on<br />
the amount of con<strong>to</strong>ur work <strong>to</strong> be<br />
completed outside the bunker, and the size<br />
of the bunker (main pho<strong>to</strong> above).<br />
It is unfortunate, with the advent of<br />
televised golf and expectancy of golfers,<br />
that players should have a perfect lie and an<br />
easy shot from the bunker. His<strong>to</strong>ry has been<br />
long forgotten, a pot bunker was once<br />
formed by grazing sheep scraping out the<br />
ground <strong>to</strong> find shelter, and became an<br />
exposed area of sand and, ultimately, a<br />
hazard <strong>to</strong> be avoided.<br />
This article first appeared in Greenside<br />
magazine, the official publication of the<br />
GCSAI. www. gcsai.org<br />
FEBRUARY/MARCH 2012 PC 111