

File - Canadian Wayfarer Association
File - Canadian Wayfarer Association
File - Canadian Wayfarer Association

Create successful ePaper yourself
Turn your PDF publications into a flip-book with our unique Google optimized e-Paper software.
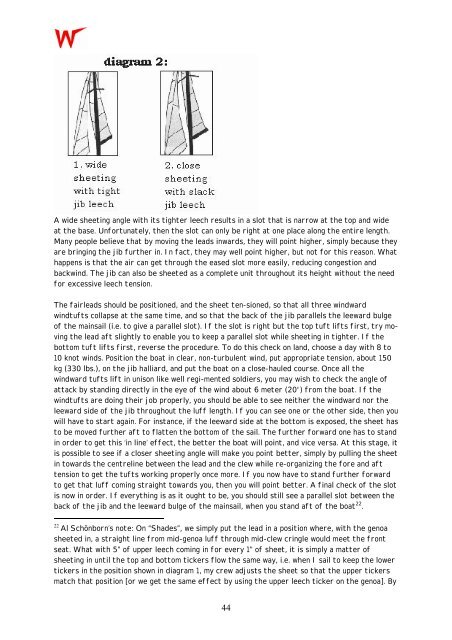
A wide sheeting angle with its tighter leech results in a slot that is narrow at the top and wide<br />
at the base. Unfortunately, then the slot can only be right at one place along the entire length.<br />
Many people believe that by moving the leads inwards, they will point higher, simply because they<br />
are bringing the jib further in. In fact, they may well point higher, but not for this reason. What<br />
happens is that the air can get through the eased slot more easily, reducing congestion and<br />
backwind. The jib can also be sheeted as a complete unit throughout its height without the need<br />
for excessive leech tension.<br />
The fairleads should be positioned, and the sheet ten-sioned, so that all three windward<br />
windtufts collapse at the same time, and so that the back of the jib parallels the leeward bulge<br />
of the mainsail (i.e. to give a parallel slot). If the slot is right but the top tuft lifts first, try moving<br />
the lead aft slightly to enable you to keep a parallel slot while sheeting in tighter. If the<br />
bottom tuft lifts first, reverse the procedure. To do this check on land, choose a day with 8 to<br />
10 knot winds. Position the boat in clear, non-turbulent wind, put appropriate tension, about 150<br />
kg (330 lbs.), on the jib halliard, and put the boat on a close-hauled course. Once all the<br />
windward tufts lift in unison like well regi-mented soldiers, you may wish to check the angle of<br />
attack by standing directly in the eye of the wind about 6 meter (20') from the boat. If the<br />
windtufts are doing their job properly, you should be able to see neither the windward nor the<br />
leeward side of the jib throughout the luff length. If you can see one or the other side, then you<br />
will have to start again. For instance, if the leeward side at the bottom is exposed, the sheet has<br />
to be moved further aft to flatten the bottom of the sail. The further forward one has to stand<br />
in order to get this ‘in line’ effect, the better the boat will point, and vice versa. At this stage, it<br />
is possible to see if a closer sheeting angle will make you point better, simply by pulling the sheet<br />
in towards the centreline between the lead and the clew while re-organizing the fore and aft<br />
tension to get the tufts working properly once more. If you now have to stand further forward<br />
to get that luff coming straight towards you, then you will point better. A final check of the slot<br />
is now in order. If everything is as it ought to be, you should still see a parallel slot between the<br />
back of the jib and the leeward bulge of the mainsail, when you stand aft of the boat 22 .<br />
22 Al Schönborn’s note: On “Shades”, we simply put the lead in a position where, with the genoa<br />
sheeted in, a straight line from mid-genoa luff through mid-clew cringle would meet the front<br />
seat. What with 5” of upper leech coming in for every 1” of sheet, it is simply a matter of<br />
sheeting in until the top and bottom tickers flow the same way, i.e. when I sail to keep the lower<br />
tickers in the position shown in diagram 1, my crew adjusts the sheet so that the upper tickers<br />
match that position [or we get the same effect by using the upper leech ticker on the genoa]. By<br />
44