

File - Canadian Wayfarer Association
File - Canadian Wayfarer Association
File - Canadian Wayfarer Association

You also want an ePaper? Increase the reach of your titles
YUMPU automatically turns print PDFs into web optimized ePapers that Google loves.
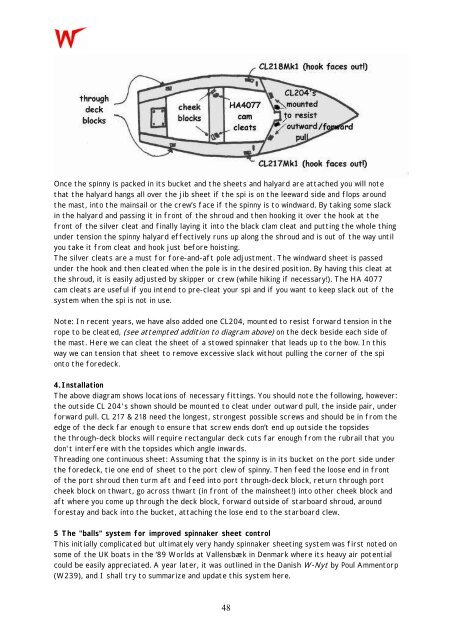
Once the spinny is packed in its bucket and the sheets and halyard are attached you will note<br />
that the halyard hangs all over the jib sheet if the spi is on the leeward side and flops around<br />
the mast, into the mainsail or the crew’s face if the spinny is to windward. By taking some slack<br />
in the halyard and passing it in front of the shroud and then hooking it over the hook at the<br />
front of the silver cleat and finally laying it into the black clam cleat and putting the whole thing<br />
under tension the spinny halyard effectively runs up along the shroud and is out of the way until<br />
you take it from cleat and hook just before hoisting.<br />
The silver cleats are a must for fore-and-aft pole adjustment. The windward sheet is passed<br />
under the hook and then cleated when the pole is in the desired position. By having this cleat at<br />
the shroud, it is easily adjusted by skipper or crew (while hiking if necessary!). The HA 4077<br />
cam cleats are useful if you intend to pre-cleat your spi and if you want to keep slack out of the<br />
system when the spi is not in use.<br />
Note: In recent years, we have also added one CL204, mounted to resist forward tension in the<br />
rope to be cleated, (see attempted addition to diagram above) on the deck beside each side of<br />
the mast. Here we can cleat the sheet of a stowed spinnaker that leads up to the bow. In this<br />
way we can tension that sheet to remove excessive slack without pulling the corner of the spi<br />
onto the foredeck.<br />
4.Installation<br />
The above diagram shows locations of necessary fittings. You should note the following, however:<br />
the outside CL 204's shown should be mounted to cleat under outward pull, the inside pair, under<br />
forward pull. CL 217 & 218 need the longest, strongest possible screws and should be in from the<br />
edge of the deck far enough to ensure that screw ends don’t end up outside the topsides<br />
the through-deck blocks will require rectangular deck cuts far enough from the rubrail that you<br />
don't interfere with the topsides which angle inwards.<br />
Threading one continuous sheet: Assuming that the spinny is in its bucket on the port side under<br />
the foredeck, tie one end of sheet to the port clew of spinny. Then feed the loose end in front<br />
of the port shroud then turm aft and feed into port through-deck block, return through port<br />
cheek block on thwart, go across thwart (in front of the mainsheet!) into other cheek block and<br />
aft where you come up through the deck block, forward outside of starboard shroud, around<br />
forestay and back into the bucket, attaching the lose end to the starboard clew.<br />
5 The "balls" system for improved spinnaker sheet control<br />
This initially complicated but ultimately very handy spinnaker sheeting system was first noted on<br />
some of the UK boats in the ‘89 Worlds at Vallensbæk in Denmark where its heavy air potential<br />
could be easily appreciated. A year later, it was outlined in the Danish W-Nyt by Poul Ammentorp<br />
(W239), and I shall try to summarize and update this system here.<br />
48