

Akai XR20 Reference Manual - V1.3 - zZounds.com
Akai XR20 Reference Manual - V1.3 - zZounds.com
Akai XR20 Reference Manual - V1.3 - zZounds.com

Create successful ePaper yourself
Turn your PDF publications into a flip-book with our unique Google optimized e-Paper software.
10 STEPS TO INSTANT GRATIFICATION (SETUP AND CHECKOUT)<br />
1. Connect the Main outputs (either left or right for a mono monitoring system, or both for<br />
stereo) to a musical instrument amplifier, PA, or plug headphones into the headphone<br />
output on the back of the <strong>XR20</strong>. The amp and <strong>XR20</strong> volume control (on back) should be all<br />
the way down (counter-clockwise).<br />
2. Leave the MIDI OUT jack (rear panel) disconnected for now.<br />
3. Plug the <strong>XR20</strong>'s AC adapter into the wall. The smaller plug inserts in the 12V DC Power<br />
jack on the back.<br />
4. Turn on the rear panel ON/OFF switch, and then turn on the amplifier.<br />
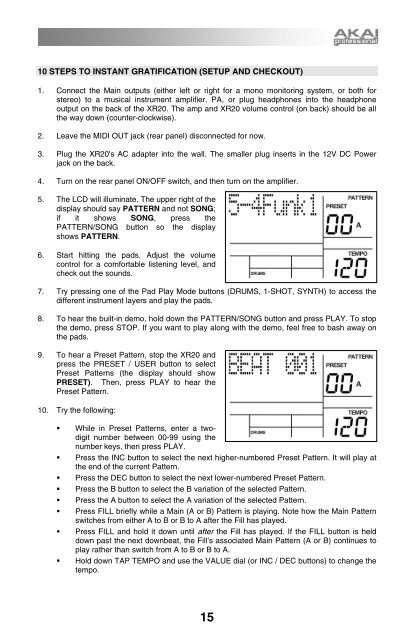
5. The LCD will illuminate. The upper right of the<br />
display should say PATTERN and not SONG;<br />
if it shows SONG, press the<br />
PATTERN/SONG button so the display<br />
shows PATTERN.<br />
6. Start hitting the pads. Adjust the volume<br />
control for a <strong>com</strong>fortable listening level, and<br />
check out the sounds.<br />
7. Try pressing one of the Pad Play Mode buttons (DRUMS, 1-SHOT, SYNTH) to access the<br />
different instrument layers and play the pads.<br />
8. To hear the built-in demo, hold down the PATTERN/SONG button and press PLAY. To stop<br />
the demo, press STOP. If you want to play along with the demo, feel free to bash away on<br />
the pads.<br />
9. To hear a Preset Pattern, stop the <strong>XR20</strong> and<br />
press the PRESET / USER button to select<br />
Preset Patterns (the display should show<br />
PRESET). Then, press PLAY to hear the<br />
Preset Pattern.<br />
10. Try the following:<br />
While in Preset Patterns, enter a twodigit<br />
number between 00-99 using the<br />
number keys, then press PLAY.<br />
Press the INC button to select the next higher-numbered Preset Pattern. It will play at<br />
the end of the current Pattern.<br />
Press the DEC button to select the next lower-numbered Preset Pattern.<br />
Press the B button to select the B variation of the selected Pattern.<br />
Press the A button to select the A variation of the selected Pattern.<br />
Press FILL briefly while a Main (A or B) Pattern is playing. Note how the Main Pattern<br />
switches from either A to B or B to A after the Fill has played.<br />
Press FILL and hold it down until after the Fill has played. If the FILL button is held<br />
down past the next downbeat, the Fill's associated Main Pattern (A or B) continues to<br />
play rather than switch from A to B or B to A.<br />
Hold down TAP TEMPO and use the VALUE dial (or INC / DEC buttons) to change the<br />
tempo.<br />
15


