564 Space Saver Fireplace - Lopi
564 Space Saver Fireplace - Lopi
564 Space Saver Fireplace - Lopi
Create successful ePaper yourself
Turn your PDF publications into a flip-book with our unique Google optimized e-Paper software.
44 Finalizing the Installation (for qualified installers only)<br />
Steps for Finalizing the Installation<br />
1. Remove the glass (see page 46).<br />
NOTE : If using propane (LP) convert the appliance prior to installing the logs.<br />
2. We recommend you purge the gas line at this time (with the glass removed). This allows gas to be<br />
detected once it enters the firebox, ensuring gas does not build up.<br />
3. Install the logs (see page 48).<br />
4. Turn on the gas to the fireplace. Turn on gas to the heater. Leak test all gas joints prior to starting the<br />
appliance. Start the pilot.<br />
Starting the Pilot Flame<br />
WARNING : When lighting or re-lighting the pilot, the glass must be removed (see<br />
page 44).<br />
a Remove the glass (see page 44 for details).<br />
b Push the gas control knob in slightly and turn it to the "OFF" position. The knob will not turn from<br />
"ON" to "OFF" unless the knob is depressed slightly. Wait five minutes to let any gas that may have<br />
accumulated inside the firebox escape. If you smell leaking gas, follow the directions on the cover "IF<br />
YOU SMELL GAS".<br />
c Turn the gas control knob to the "PILOT" position and press the knob in, this will allow gas to flow to<br />
the pilot light. Press the button on the pilot igniter repeatedly until you see the pilot light.<br />
WARNING: If the pilot does not light after 15 seconds, release the knob and call<br />
your dealer for service. Do not attempt to light pilot until service has<br />
been performed.<br />
NOTE:<br />
You may wish to remove the log set to gain a better view of the pilot (see page 48).<br />
d Keep the gas control knob depressed for 30 seconds once it is lit.<br />
e Release the gas control knob. If the pilot goes out, repeat step C. If the pilot refuses to stay lit, call<br />
your dealer for service. With the pilot lit, proceed to step “f”.<br />
f Replace the glass.<br />
g Turn the gas control knob counter-clockwise to "ON". The pilot is now lit and the heater can be turned<br />
on and off.<br />
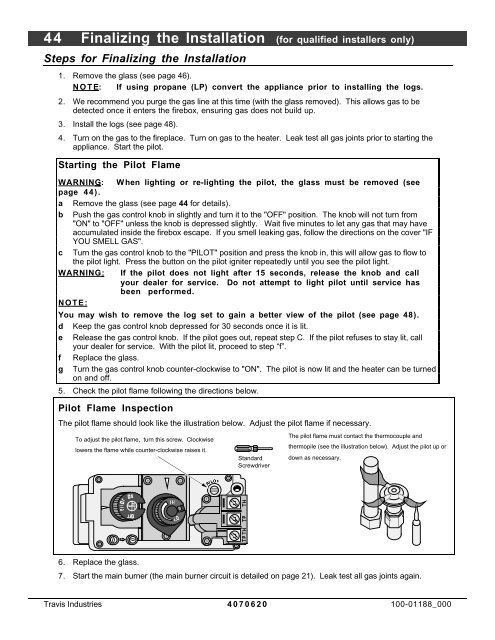
5. Check the pilot flame following the directions below.<br />
Pilot Flame Inspection<br />
The pilot flame should look like the illustration below. Adjust the pilot flame if necessary.<br />
To adjust the pilot flame, turn this screw. Clockwise<br />
lowers the flame while counter-clockwise raises it.<br />
Standard<br />
Screwdriver<br />
The pilot flame must contact the thermocouple and<br />
thermopile (see the illustration below). Adjust the pilot up or<br />
down as necessary.<br />
6. Replace the glass.<br />
7. Start the main burner (the main burner circuit is detailed on page 21). Leak test all gas joints again.<br />
Travis Industries 4070620 100-01188_000


