Collapsible Core Design & Assembly Guide - DME
Collapsible Core Design & Assembly Guide - DME
Collapsible Core Design & Assembly Guide - DME

You also want an ePaper? Increase the reach of your titles
YUMPU automatically turns print PDFs into web optimized ePapers that Google loves.
8<br />
<strong>DME</strong><br />
<strong>Collapsible</strong> <strong>Core</strong><br />
Grinding Recommendations – <strong>Collapsible</strong> <strong>Core</strong><br />
a – General<br />
1. <strong>Core</strong>s and pins must be clean prior to assembly for grinding. A coating of lightweight rust preventive is recommended.<br />
2. Assemble core to pin as specified in installation drawing, using three set screws (supplied) tightened against pin to prevent shifting during<br />
grinding. Concentricity of core pin is extremely important.<br />
NOTE: <strong>Core</strong>s are assembled prior to shipment, but must be re-set by grinder because of possibility of movement in transit.<br />
3. During grinding, do not use air blast or water jet at high pressure for cooling since this may force grinding grit between segments.<br />
4. Select a grinding wheel suitable for grinding A.I.S.I. type A2 Steel (air hardening tool steel) of approximately 55 Rockwell C.<br />
b – procedure<br />
1. With core assembly prepared as outlined above, rough-grind desired molding and seal-off diameters approximately .008” oversize. During<br />
rough grind place clamping ring (available) as far forward (toward nose of core) as possible. If necessary, the maximum distance the<br />
clamping ring may be located away from the core face is not to exceed the following dimensions:<br />
CORE TYPE MAX. DISTANCE OF CLAMPING<br />
RING SCREW FROM CORE FACE<br />
CC-100 SERIES 1.150 inches<br />
CC-200 SERIES 1.250 inches<br />
CC-300 SERIES 1.500 inches<br />
CC-400 SERIES 1.875 inches<br />
CC-500 SERIES 2.125 inches<br />
CC-600 SERIES 2.375 inches<br />
CC-700 SERIES 2.375 inches<br />
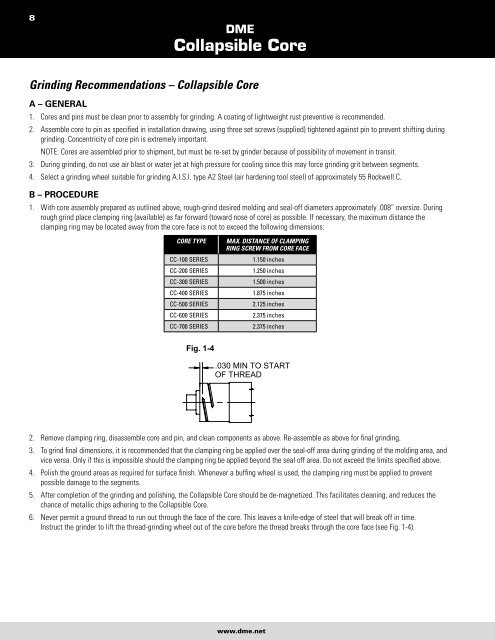
Fig. 1-4<br />
.030 MIN TO START<br />
OF THREAD<br />
2. Remove clamping ring, disassemble core and pin, and clean components as above. Re-assemble as above for final grinding.<br />
3. To grind final dimensions, it is recommended that the clamping ring be applied over the seal-off area during grinding of the molding area, and<br />
vice versa. Only if this is impossible should the clamping ring be applied beyond the seal off area. Do not exceed the limits specified above.<br />
4. Polish the ground areas as required for surface finish. Whenever a buffing wheel is used, the clamping ring must be applied to prevent<br />
possible damage to the segments.<br />
5. After completion of the grinding and polishing, the <strong>Collapsible</strong> <strong>Core</strong> should be de-magnetized. This facilitates cleaning, and reduces the<br />
chance of metallic chips adhering to the <strong>Collapsible</strong> <strong>Core</strong>.<br />
6. Never permit a ground thread to run out through the face of the core. This leaves a knife-edge of steel that will break off in time.<br />
Instruct the grinder to lift the thread-grinding wheel out of the core before the thread breaks through the core face (see Fig. 1-4).<br />
www.dme.net