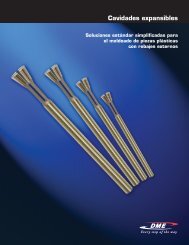
Collapsible Core Design & Assembly Guide - DME
Collapsible Core Design & Assembly Guide - DME
Collapsible Core Design & Assembly Guide - DME

Create successful ePaper yourself
Turn your PDF publications into a flip-book with our unique Google optimized e-Paper software.
60<br />
Alterations to <strong>Collapsible</strong> Minicores<br />
<strong>DME</strong><br />
<strong>Collapsible</strong> Minicore<br />
in shorTeninG The lenGTh (o.a.l.) of a Minicore, The folloWinG procedure MusT be used:<br />
First, the Minicore should be removed from its original center pin and the core thoroughly cleaned. The core is then placed on the tapered<br />
work arbor supplied with the Minicore for grinding. The work arbor has a taper ground on the front end that matches the Minicore I.D. and has<br />
centers both front and rear. Insert the tapered end of the work arbor into the <strong>Collapsible</strong> Minicore until the diameter of the Minicore, when<br />
measured over the positive collapse bumps, coincides with this diameter as measured while the Minicore is on its own center pin with the<br />
specified grinding head space dimension of 1.562 +.005/-.000.<br />
When using a work arbor (with no head or blades) or even a special work center pin (with head and blades), do not attempt to locate the<br />
Minicore for grinding by setting its standard grinding head space. This will almost never be the correct setting for the Minicore since each core<br />
is individually custom fitted with a specific pin. If a special work pin is used with an alignment flat on its head, it must be oriented parallel to<br />
and on the same side as alignment flat on core.<br />
To shorten the Minicore to a new length, the core is fixtured to the arbor using three set screws near the head of the core. The three collapsing<br />
segments must be held rigidly under a clamping ring located near the top of the core. See grinding set-up drawing for additional information.<br />
Then material is removed from the top (front) of the Minicore on a cylindrical grinder. The grinding wheel goes through the entire material of the<br />
Minicore segments and cuts into the arbor to ensure a clean front surface. Remove burrs carefully but do not break any sharp corners, which<br />
would allow plastic material to form where it would interfere with collapse of the segments.The Minicores collapse per side will be reduced by<br />
.020 in./in. x amount Minicore is shortened.<br />
It is now obvious why an arbor or special work center pin is used. If this grinding was performed on the Minicore’s regular center pin, the taper<br />
would be destroyed.<br />
When a Minicore has to be reground after its thread profiles have been finished and the centers on the regular pin have been removed, again an<br />
arbor or special center pin is used.<br />
The tapered end of the work arbor is inserted into the Minicore until the ground diameters of the Minicore coincide with those measured on<br />
the core with its regular center pin. The Minicore is fixtured on the work arbor with set screws and clamping ring as described above. It is now<br />
possible to change the diameters on the molding end of the Minicore segments, or to deepen or enlarge the thread profiles. If alterations are<br />
required that affect the O.D. of the center pin blades, a new custom fitted center pin may be required so that centers can be used to grind the<br />
Minicore and center pin uniformly.<br />
After all finish grinding and polishing operations on the Minicore, it is important to demagnetize the core to prevent the adhesion of any metal<br />
particles that might find their way into cavities during molding.<br />
www.dme.net