

PSR-E333/YPT-330 Owner's Manual - Yamaha Downloads
PSR-E333/YPT-330 Owner's Manual - Yamaha Downloads
PSR-E333/YPT-330 Owner's Manual - Yamaha Downloads

Create successful ePaper yourself
Turn your PDF publications into a flip-book with our unique Google optimized e-Paper software.
8<br />
Setting Up<br />
Introduction<br />
Be sure to do the following operations BEFORE turning on the power.<br />
Power Requirements<br />
Although the instrument will run either from an optional AC adaptor or batteries, <strong>Yamaha</strong> recommends use of an<br />
AC adaptor whenever possible. An AC adaptor is more environmentally friendly than batteries and does not<br />
deplete resources.<br />
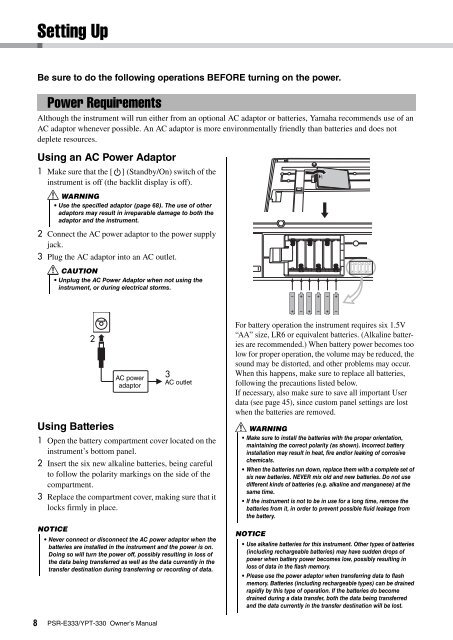
Using an AC Power Adaptor<br />
1 Make sure that the [ ] (Standby/On) switch of the<br />
instrument is off (the backlit display is off).<br />
WARNING<br />
• Use the specified adaptor (page 68). The use of other<br />
adaptors may result in irreparable damage to both the<br />
adaptor and the instrument.<br />
2 Connect the AC power adaptor to the power supply<br />
jack.<br />
3 Plug the AC adaptor into an AC outlet.<br />
CAUTION<br />
• Unplug the AC Power Adaptor when not using the<br />
instrument, or during electrical storms.<br />
2<br />
Using Batteries<br />
AC power<br />
adaptor<br />
1 Open the battery compartment cover located on the<br />
instrument’s bottom panel.<br />
2 Insert the six new alkaline batteries, being careful<br />
to follow the polarity markings on the side of the<br />
compartment.<br />
3 Replace the compartment cover, making sure that it<br />
locks firmly in place.<br />
NOTICE<br />
• Never connect or disconnect the AC power adaptor when the<br />
batteries are installed in the instrument and the power is on.<br />
Doing so will turn the power off, possibly resulting in loss of<br />
the data being transferred as well as the data currently in the<br />
transfer destination during transferring or recording of data.<br />
<strong>PSR</strong>-<strong>E333</strong>/<strong>YPT</strong>-<strong>330</strong> Owner’s <strong>Manual</strong><br />
3<br />
AC outlet<br />
For battery operation the instrument requires six 1.5V<br />
“AA” size, LR6 or equivalent batteries. (Alkaline batteries<br />
are recommended.) When battery power becomes too<br />
low for proper operation, the volume may be reduced, the<br />
sound may be distorted, and other problems may occur.<br />
When this happens, make sure to replace all batteries,<br />
following the precautions listed below.<br />
If necessary, also make sure to save all important User<br />
data (see page 45), since custom panel settings are lost<br />
when the batteries are removed.<br />
WARNING<br />
• Make sure to install the batteries with the proper orientation,<br />
maintaining the correct polarity (as shown). Incorrect battery<br />
installation may result in heat, fire and/or leaking of corrosive<br />
chemicals.<br />
• When the batteries run down, replace them with a complete set of<br />
six new batteries. NEVER mix old and new batteries. Do not use<br />
different kinds of batteries (e.g. alkaline and manganese) at the<br />
same time.<br />
• If the instrument is not to be in use for a long time, remove the<br />
batteries from it, in order to prevent possible fluid leakage from<br />
the battery.<br />
NOTICE<br />
• Use alkaline batteries for this instrument. Other types of batteries<br />
(including rechargeable batteries) may have sudden drops of<br />
power when battery power becomes low, possibly resulting in<br />
loss of data in the flash memory.<br />
• Please use the power adaptor when transferring data to flash<br />
memory. Batteries (including rechargeable types) can be drained<br />
rapidly by this type of operation. If the batteries do become<br />
drained during a data transfer, both the data being transferred<br />
and the data currently in the transfer destination will be lost.


