Single Reduction & Single Reduction with Differential Lock - Spicer
Single Reduction & Single Reduction with Differential Lock - Spicer
Single Reduction & Single Reduction with Differential Lock - Spicer

You also want an ePaper? Increase the reach of your titles
YUMPU automatically turns print PDFs into web optimized ePapers that Google loves.
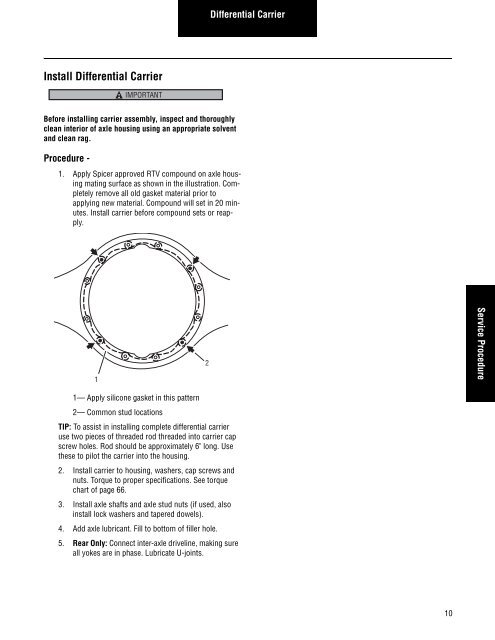
Install <strong>Differential</strong> Carrier<br />
Before installing carrier assembly, inspect and thoroughly<br />
clean interior of axle housing using an appropriate solvent<br />
and clean rag.<br />
Procedure -<br />
1. Apply <strong>Spicer</strong> approved RTV compound on axle housing<br />
mating surface as shown in the illustration. Completely<br />
remove all old gasket material prior to<br />
applying new material. Compound will set in 20 minutes.<br />
Install carrier before compound sets or reapply.<br />
1<br />
IMPORTANT<br />
1— Apply silicone gasket in this pattern<br />
2— Common stud locations<br />
TIP: To assist in installing complete differential carrier<br />
use two pieces of threaded rod threaded into carrier cap<br />
screw holes. Rod should be approximately 6" long. Use<br />
these to pilot the carrier into the housing.<br />
2. Install carrier to housing, washers, cap screws and<br />
nuts. Torque to proper specifications. See torque<br />
chart of page 66.<br />
3. Install axle shafts and axle stud nuts (if used, also<br />
install lock washers and tapered dowels).<br />
4. Add axle lubricant. Fill to bottom of filler hole.<br />
5. Rear Only: Connect inter-axle driveline, making sure<br />
all yokes are in phase. Lubricate U-joints.<br />
2<br />
<strong>Differential</strong> Carrier<br />
10<br />
Service Procedure