RCT2PC MANUAL FRONT COVER - Exent
RCT2PC MANUAL FRONT COVER - Exent
RCT2PC MANUAL FRONT COVER - Exent

You also want an ePaper? Increase the reach of your titles
YUMPU automatically turns print PDFs into web optimized ePapers that Google loves.
<strong>RCT2PC</strong>_ManInt-new 8/23/02 9:59 AM Page 30<br />
How to Place Elevated Scenery<br />
If you need to place an object, such as a roof or a<br />
wall, at an elevation above ground level, hold the<br />
Shift key once your cursor is over the area where<br />
you want to place the item (but before you click<br />
the mouse). Now, as you move the mouse, the<br />
object will rise in the air or even drop below the<br />
land surface. Click to place the object at the<br />
desired location and height.<br />
Alternatively, place the cursor over a scenery<br />
object that you want to match the height of (for example, a section of roof)<br />
then hold down the Ctrl key to “lock” your cursor to that height. Then, move<br />
the cursor around and you’ll see that whatever you are building will also appear<br />
at the same height.<br />
This can be combined with the Shift key: hold down Shift and Ctrl simultaneously<br />
to raise or lower the scenery a bit (and lock it to that height) before building it.<br />
30<br />
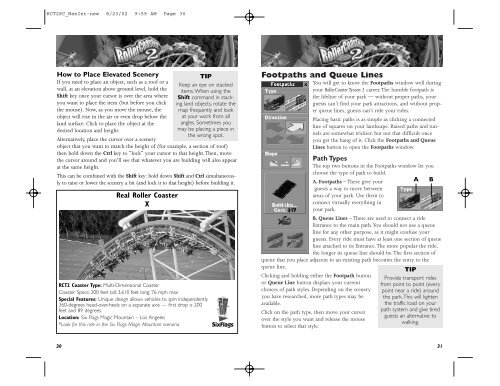
Real Roller Coaster<br />
X<br />
TIP<br />
Keep an eye on stacked<br />
items. When using the<br />
Shift command in stacking<br />
land objects, rotate the<br />
map frequently and look<br />
at your work from all<br />
angles. Sometimes you<br />
may be placing a piece in<br />
the wrong spot.<br />
RCT2 Coaster Type: Multi-Dimensional Coaster<br />
Coaster Specs: 200 feet tall; 3,610 feet long; 76 mph max<br />
Special Features: Unique design allows vehicles to spin independently<br />
360-degrees head-over-heels on a separate axis — first drop is 200<br />
feet and 89 degrees.<br />
Location: Six Flags Magic Mountain – Los Angeles<br />
*Look for this ride in the Six Flags Magic Mountain scenario.<br />
Footpaths and Queue Lines<br />
You will get to know the Footpaths window well during<br />
your RollerCoaster Tycoon 2 career. The humble footpath is<br />
the lifeline of your park — without proper paths, your<br />
guests can’t find your park attractions, and without proper<br />
queue lines, guests can’t ride your rides.<br />
Placing basic paths is as simple as clicking a connected<br />
line of squares on your landscape. Raised paths and tunnels<br />
are somewhat trickier, but not that difficult once<br />
you get the hang of it. Click the Footpaths and Queue<br />
Lines button to open the Footpaths window.<br />
Path Types<br />
The top two buttons in the Footpaths window let you<br />
choose the type of path to build.<br />
A. Footpaths – These give your A B<br />
guests a way to move between<br />
areas of your park. Use them to<br />
connect virtually everything in<br />
your park.<br />
B. Queue Lines – These are used to connect a ride<br />
Entrance to the main path.You should not use a queue<br />
line for any other purpose, as it might confuse your<br />
guests. Every ride must have at least one section of queue<br />
line attached to its Entrance. The more popular the ride,<br />
the longer its queue line should be. The first section of<br />
queue that you place adjacent to an existing path becomes the entry to the<br />
queue line.<br />
Clicking and holding either the Footpath button<br />
or Queue Line button displays your current<br />
choices of path styles. Depending on the scenery<br />
you have researched, more path types may be<br />
available.<br />
Click on the path type, then move your cursor<br />
over the style you want and release the mouse<br />
button to select that style.<br />
TIP<br />
Provide transport rides<br />
from point to point (every<br />
point near a ride) around<br />
the park.This will lighten<br />
the traffic load on your<br />
path system and give tired<br />
guests an alternative to<br />
walking.<br />
31