RCT2PC MANUAL FRONT COVER - Exent
RCT2PC MANUAL FRONT COVER - Exent
RCT2PC MANUAL FRONT COVER - Exent

Create successful ePaper yourself
Turn your PDF publications into a flip-book with our unique Google optimized e-Paper software.
<strong>RCT2PC</strong>_ManInt-new 8/23/02 9:59 AM Page 62<br />
Park – Set the cost of land and construction rights, and decide whether it’s a<br />
“pay at gate” or “pay per ride” park.You can also set other conditions, such as<br />
forbidding tree removal or high construction.<br />
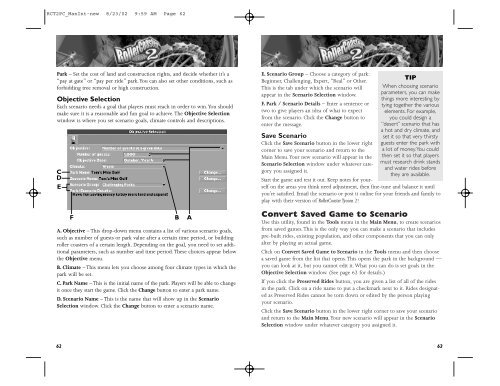
Objective Selection<br />
Each scenario needs a goal that players must reach in order to win.You should<br />
make sure it is a reasonable and fun goal to achieve. The Objective Selection<br />
window is where you set scenario goals, climate controls and descriptions.<br />
C<br />
D<br />
E<br />
A. Objective – This drop-down menu contains a list of various scenario goals,<br />
such as number of guests or park value after a certain time period, or building<br />
roller coasters of a certain length. Depending on the goal, you need to set additional<br />
parameters, such as number and time period. These choices appear below<br />
the Objective menu.<br />
B. Climate – This menu lets you choose among four climate types in which the<br />
park will be set.<br />
C. Park Name – This is the initial name of the park. Players will be able to change<br />
it once they start the game. Click the Change button to enter a park name.<br />
D. Scenario Name – This is the name that will show up in the Scenario<br />
Selection window. Click the Change button to enter a scenario name.<br />
62<br />
F B A<br />
E. Scenario Group – Choose a category of park:<br />
Beginner, Challenging, Expert, “Real” or Other.<br />
This is the tab under which the scenario will<br />
appear in the Scenario Selection window.<br />
F. Park / Scenario Details – Enter a sentence or<br />
two to give players an idea of what to expect<br />
from the scenario. Click the Change button to<br />
enter the message.<br />
Save Scenario<br />
Click the Save Scenario button in the lower right<br />
corner to save your scenario and return to the<br />
Main Menu.Your new scenario will appear in the<br />
Scenario Selection window under whatever category<br />
you assigned it.<br />
TIP<br />
When choosing scenario<br />
parameters, you can make<br />
things more interesting by<br />
tying together the various<br />
elements. For example,<br />
you could design a<br />
“desert” scenario that has<br />
a hot and dry climate, and<br />
set it so that very thirsty<br />
guests enter the park with<br />
a lot of money.You could<br />
then set it so that players<br />
must research drink stands<br />
and water rides before<br />
they are available.<br />
Start the game and test it out. Keep notes for yourself<br />
on the areas you think need adjustment, then fine-tune and balance it until<br />
you’re satisfied. Email the scenario or post it online for your friends and family to<br />
play with their version of RollerCoaster Tycoon 2!<br />
Convert Saved Game to Scenario<br />
Use this utility, found in the Tools menu in the Main Menu, to create scenarios<br />
from saved games. This is the only way you can make a scenario that includes<br />
pre-built rides, existing population, and other components that you can only<br />
alter by playing an actual game.<br />
Click on Convert Saved Game to Scenario in the Tools menu and then choose<br />
a saved game from the list that opens. This opens the park in the background —<br />
you can look at it, but you cannot edit it. What you can do is set goals in the<br />
Objective Selection window. (See page 62 for details.)<br />
If you click the Preserved Rides button, you are given a list of all of the rides<br />
in the park. Click on a ride name to put a checkmark next to it. Rides designated<br />
as Preserved Rides cannot be torn down or edited by the person playing<br />
your scenario.<br />
Click the Save Scenario button in the lower right corner to save your scenario<br />
and return to the Main Menu.Your new scenario will appear in the Scenario<br />
Selection window under whatever category you assigned it.<br />
63