RCT2PC MANUAL FRONT COVER - Exent
RCT2PC MANUAL FRONT COVER - Exent
RCT2PC MANUAL FRONT COVER - Exent

You also want an ePaper? Increase the reach of your titles
YUMPU automatically turns print PDFs into web optimized ePapers that Google loves.
<strong>RCT2PC</strong>_ManInt-new 8/23/02 9:59 AM Page 32<br />
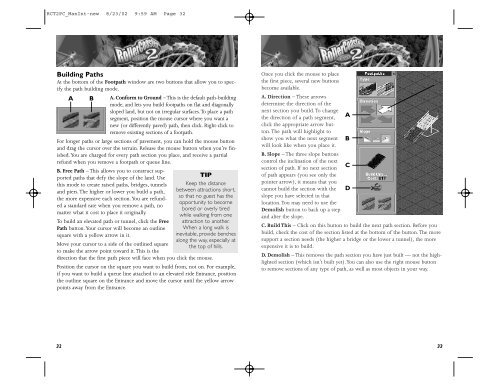
Building Paths<br />
At the bottom of the Footpath window are two buttons that allow you to specify<br />
the path building mode.<br />
A B A. Conform to Ground – This is the default path-building<br />
mode, and lets you build footpaths on flat and diagonally<br />
sloped land, but not on irregular surfaces.To place a path<br />
segment, position the mouse cursor where you want a<br />
new (or differently paved) path, then click. Right-click to<br />
remove existing sections of a footpath.<br />
For longer paths or large sections of pavement, you can hold the mouse button<br />
and drag the cursor over the terrain. Release the mouse button when you’re finished.You<br />
are charged for every path section you place, and receive a partial<br />
refund when you remove a footpath or queue line.<br />
B. Free Path – This allows you to construct supported<br />
paths that defy the slope of the land. Use<br />
this mode to create raised paths, bridges, tunnels<br />
and piers. The higher or lower you build a path,<br />
the more expensive each section.You are refunded<br />
a standard rate when you remove a path, no<br />
matter what it cost to place it originally.<br />
To build an elevated path or tunnel, click the Free<br />
Path button.Your cursor will become an outline<br />
square with a yellow arrow in it.<br />
Move your cursor to a side of the outlined square<br />
to make the arrow point toward it. This is the<br />
direction that the first path piece will face when you click the mouse.<br />
Position the cursor on the square you want to build from, not on. For example,<br />
if you want to build a queue line attached to an elevated ride Entrance, position<br />
the outline square on the Entrance and move the cursor until the yellow arrow<br />
points away from the Entrance.<br />
32<br />
TIP<br />
Keep the distance<br />
between attractions short,<br />
so that no guest has the<br />
opportunity to become<br />
bored or overly tired<br />
while walking from one<br />
attraction to another.<br />
When a long walk is<br />
inevitable, provide benches<br />
along the way, especially at<br />
the top of hills.<br />
Once you click the mouse to place<br />
the first piece, several new buttons<br />
become available.<br />
A. Direction – These arrows<br />
determine the direction of the<br />
next section you build. To change<br />
the direction of a path segment, A<br />
click the appropriate arrow button.<br />
The path will highlight to<br />
show you what the next segment B<br />
will look like when you place it.<br />
B. Slope – The three slope buttons<br />
control the inclination of the next<br />
section of path. If no next section C<br />
of path appears (you see only the<br />
pointer arrow), it means that you<br />
cannot build the section with the D<br />
slope you have selected in that<br />
location.You may need to use the<br />
Demolish button to back up a step<br />
and alter the slope.<br />
C. Build This – Click on this button to build the next path section. Before you<br />
build, check the cost of the section listed at the bottom of the button. The more<br />
support a section needs (the higher a bridge or the lower a tunnel), the more<br />
expensive it is to build.<br />
D. Demolish – This removes the path section you have just built — not the highlighted<br />
section (which isn’t built yet).You can also use the right mouse button<br />
to remove sections of any type of path, as well as most objects in your way.<br />
33