RCT2PC MANUAL FRONT COVER - Exent
RCT2PC MANUAL FRONT COVER - Exent
RCT2PC MANUAL FRONT COVER - Exent
Create successful ePaper yourself
Turn your PDF publications into a flip-book with our unique Google optimized e-Paper software.
<strong>RCT2PC</strong>_ManInt-new 8/23/02 9:59 AM Page 54<br />
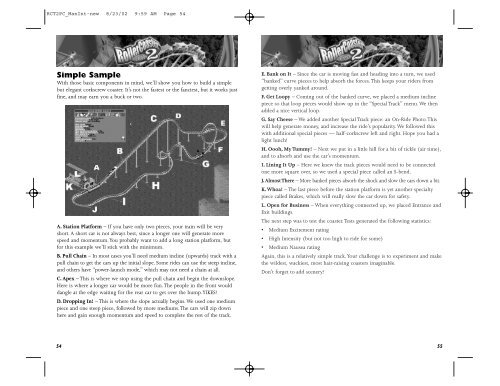
Simple Sample<br />
With those basic components in mind, we’ll show you how to build a simple<br />
but elegant corkscrew coaster. It’s not the fastest or the fanciest, but it works just<br />
fine, and may earn you a buck or two.<br />
A. Station Platform – If you have only two pieces, your train will be very<br />
short. A short car is not always best, since a longer one will generate more<br />
speed and momentum.You probably want to add a long station platform, but<br />
for this example we’ll stick with the minimum.<br />
B. Pull Chain – In most cases you’ll need medium incline (upwards) track with a<br />
pull chain to get the cars up the initial slope. Some rides can use the steep incline,<br />
and others have “power-launch mode,” which may not need a chain at all.<br />
C. Apex – This is where we stop using the pull chain and begin the downslope.<br />
Here is where a longer car would be more fun. The people in the front would<br />
dangle at the edge waiting for the rear car to get over the hump.YIKES!<br />
D. Dropping In! – This is where the slope actually begins. We used one medium<br />
piece and one steep piece, followed by more mediums.The cars will zip down<br />
here and gain enough momentum and speed to complete the rest of the track.<br />
54<br />
E. Bank on It – Since the car is moving fast and heading into a turn, we used<br />
“banked” curve pieces to help absorb the forces. This keeps your riders from<br />
getting overly yanked around.<br />
F. Get Loopy – Coming out of the banked curve, we placed a medium incline<br />
piece so that loop pieces would show up in the “Special Track” menu. We then<br />
added a nice vertical loop.<br />
G. Say Cheese – We added another Special Track piece: an On-Ride Photo. This<br />
will help generate money, and increase the ride’s popularity. We followed this<br />
with additional special pieces — half-corkscrew left and right. Hope you had a<br />
light lunch!<br />
H. Oooh, My Tummy! – Next we put in a little hill for a bit of tickle (air time),<br />
and to absorb and use the car’s momentum.<br />
I. Lining It Up – Here we knew the track pieces would need to be connected<br />
one more square over, so we used a special piece called an S-bend.<br />
J. Almost There – More banked pieces absorb the shock and slow the cars down a bit.<br />
K.Whoa! – The last piece before the station platform is yet another specialty<br />
piece called Brakes, which will really slow the car down for safety.<br />
L. Open for Business – When everything connected up, we placed Entrance and<br />
Exit buildings.<br />
The next step was to test the coaster. Tests generated the following statistics:<br />
• Medium Excitement rating<br />
• High Intensity (but not too high to ride for some)<br />
• Medium Nausea rating<br />
Again, this is a relatively simple track.Your challenge is to experiment and make<br />
the wildest, wackiest, most hair-raising coasters imaginable.<br />
Don’t forget to add scenery!<br />
55


